
User Manual


39
5.
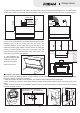
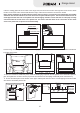
press the expansion pipe into the hole, and reliably fix the hitching leg with 4×60mm wood screws supplied with the
machine. Use a level ruler to make sure the hitching leg is in a horizontal position.
Note: The hitching leg must be fixed to the beam with a screw.
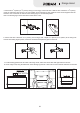
Drill a hole 2- ”(60mm)-2- ”(70mm) deep (not too large) at the mark with a drill bit with a diameter of ”(8mm),
3 3 5
/8 /4 /16
6. Drill a hole with a diameter of ”(10mm) (not too large) and a depth of 2”(50mm)-2- ”(55mm) at the fixing hole
mark of the hitching leg stop block, and insert the M6 metal expansion pipe into the hole.
3 3
/8 /16
12
1
4
1
6
10
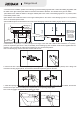
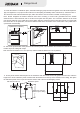
7. Put the sealing gasket at the air outlet of the range hood, and fix the check valve with eight ST4.2x18 screws.
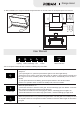
8. Lift the range hood, hang the back hook at the hitching leg and use a level ruler to ensure that the machine is horizontal.
Check valve
ST4.2×18 screw
Check valve seal
Range Hood
1
2
1
4
16
1
0