BEDIENUNGSANLEITUNG O P E R AT I N G I N S T R U C T I O N S N O T I C E D ´ U T I L I S AT I O N I S T R U Z I O N I P E R L’ U S O MANUAL DE USO N ÁV O D K O B S L U Z E ROXXY BL-CONTROL 900 SERIE OPTO
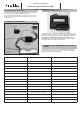
Bedienungsanleitung Roxxy BL-Control 900 Serie Opto Allgemeines Fahrtreglerserie in neuer Cool Power FET Technologie, dadurch besonders leistungsfähig und mit breitem Einsatzbereich, für Flug,- Schiffs,- Auto,- und EHeli- Modelle einsetzbar. Die Regler eignen sich besonders für die BL Motoren-Serie ROXXY, aber auch für andere BL-Motoren. Vor Anschluss und Inbetriebnahme diese Anleitung bitte aufmerksam lesen. 1.
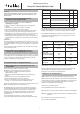
Bedienungsanleitung Roxxy BL-Control 900 Serie Opto 3. Programmierung der Knüppelpositionen Parametertyp Beep LED Batterietyp 1x 1x Parameter 2 Drehrichtung 2x 2x Parameter 3 - Bremse EIN/AUS (AIR) - Drehzahlreglung EIN/AUS (HELI) - Rückwärts Ein/AUS (CAR, BOOT) 3x 3x Parameter 4 Modelltyp AIR/HELI 4x 4x Parameter 5 Modelltyp BOOT/CAR 5x 5x Achtung: Zuerst muß der Modelltyp eingestellt werden (Parameter 4 oder Parameter 5). Ansonsten werden eingestellte Parameter nicht übernommen.
Bedienungsanleitung Roxxy BL-Control 900 Serie Opto 4.3 Programmierbeispiel Im nachfolgenden Beispiel wird die Anpassung des Reglers an die individuelle Knüppelposition und nachfolgend die Programmierung des Modeltyps: AIR (Motorflugzeug) und Bremse EIN erläutert. 4.3.1 Programmierung der Knüppelpositionen 1. Sender einschalten und Gasknüppel in die gewünschte Vorwärtsposition bringen. 2. Spannungsversorgung an den Regler anschließen. (kurze Tonfolge ertönt) 3. Nach ca.
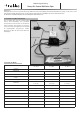
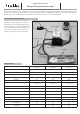
Bedienungsanleitung Roxxy BL-Control 900 Serie Opto 5. Einstellungen mit Programmer 5.2 Navigation mit Programmer Um den Regler einfacher und modellspezifischer zu programmieren, nutzen Sie den robbe Programmer No. 8642. Diese übersichtliche Bedieneinheit ermöglicht es Ihnen, über ein LC-Display, die einzustellenden Parameter schnell und sicher zu programmieren. 5.1 ANSCHLUSS PROGRAMMER Programmer Motoranschluss Die Bedienung des Programmers ist denkbar einfach.
Bedienungsanleitung Roxxy BL-Control 900 Serie Opto 6. DETAILS ZUR PROGRAMMIERUNG 6.1 Battery Type (Batterietyp) 6.7 Start Power Um den gewünschten Akku Typ einzustellen, nutzen Sie die DEC oder INC Taste. Nachdem Sie den neuen Akkutyp gewählt haben kann es sein, dass sich voreingestellte Parameter im Bereich “CUT OFF VOLTAGE” und “CUT OFF TYPE” verändert haben. Einzustellen sind die Modi immer durch die DEC und INC Tasten.
Bedienungsanleitung Roxxy BL-Control 900 Serie Opto 7. GEWÄHRLEISTUNG 6.13 Motor Pole Number (Motorpolzahl) Unsere Artikel sind selbstverständlich mit den gesetzlich vorgeschriebenen 24 Monaten Gewährleistung ausgestattet. Sollten Sie einen berechtigten Gewährleistungsanspruch geltend machen wollen, so wenden Sie sich immer an Ihren Händler, der Gewährleistungsgeber und für die Abwicklung zuständig ist. Im Motor Pole Number Mode können Sie einstellen, über wieviele Pole Ihr Motor verfügt.
Operating Instructions Roxxy BL-Control 900 series Opto Introduction Brushless motor speed controller in the latest Cool Power FET Technology; thereby offering a high performance in a wide range of applications for aircraft, boats, cars and electric heli models. The controller is particularly suitable for the ROXXY range of Brushless motors, but will also suit other Brushless motors from other manufacturers. Please read carefully the instructions before connecting and operating. 1.
Operating Instructions Roxxy BL-Control 900 series Opto 3. Programming the stick positions To change the Parameters, the throttle stick must be moved quickly from full throttle to the stop position and held for a minimum of 3 seconds in the stop position. NOTE! The model type must be chosen (Parameter 4 or Parameter 5). Otherwise the new parameters will not be stored. To set the parameters, move the throttle stick from the stop position to full throttle and back. 3.
Operating Instructions Roxxy BL-Control 900 series Opto 4.3 Programming example In the following example, the setting up of the controller will be made with the stick positions method and followed by the programming of the model type: AIR (power model) and brake ON used as an example. 4.3.1 Programming the stick positions 1. Switch the transmitter on, and move the throttle stick to the “forward” position. 2. Connect the drive battery to the speed controller (unit emits a brief beep). 3.
Operating Instructions Roxxy BL-Control 900 series Opto 5.2 Navigating using the Programmer 5. Using the Programmer to change settings Use the robbe Programme No.8642 will enable the easy and efficient programming of the controller to suit the model specific requirements. This clear, user-friendly unit allows quick and secure programming to be made via the unit’s LCD. 5.1 Connecting the Programmer Programmer motor connection The operation of the Programmer is extremely simple.
Operating Instructions Roxxy BL-Control 900 series Opto 6. PROGRAMMING IN DETAIL 6.1 Battery type 6.7 Start Power Use the DEC or INC button to set the desired battery type. When you have selected the new battery type you may find that the previously set “CUT OFF VOLTAGE” and “CUT OFF TYPE” parameters have changed. The DEC and INC buttons are always used to set the modes. In the Start Power menu you can set the level of power (torque) which the motor produces initially, i.e. from a stand-still.
Operating Instructions Roxxy BL-Control 900 series Opto 6.13 Motor Pole Number 7. GUARANTEE We guarantee this speed controller for a period of 24 months. Proof for the commencement and conclusion of this guarantee period is provided by your receipt from the model shop, which you obtained when you purchased the product. Any repairs carried out under guarantee do not extend the original guarantee period.
Notice d´utilisation Roxxy BL-Control série 900 Opto Généralités Série de variateurs bénéficiant de la nouvelle technologie Cool Power FET ce qui les rend parfaitement performants tout en leur procurant une large palette de mises en œuvre : modèles d’avions, de bateaux, d’autos et d’hélicoptères. Les variateurs sont particulièrement conçus pour les moteurs sans balais de la série ROXXY mais également pour d’autres moteurs sans balais.
Notice d´utilisation Roxxy BL-Control série 900 Opto 3. Programmation de la position des manches Pour changer de paramètre, il faut d’abord déplacer le manche des gaz hors de ka position marche avant dans la position arrêt et le manche des gaz doit alors demeurer au moins 3 secondes dans la position arrêt. Attention : Il faut tout d'abord régler le type de modèle (paramètre 4 ou paramètre 5). Sinon les paramètres établis ne seront pas pris en charge.
Notice d´utilisation Roxxy BL-Control série 900 Opto 4.3 Exemple de programmation Dans l’exemple suivant est expliquée l’adaptation du variateur à la position individuelle du manche puis la programmation du type de modèle : AIR et frein MARCHE. 4.3.1 Programmation de la position des manches 1. Mettre l’émetteur en marche et amener le manche des gaz dans la position marche avant souhaitée. 2. Raccorder l’alimentation en tension au variateur. (une courte séquence de sons retentit) 3.
Notice d´utilisation Roxxy BL-Control série 900 Opto 5.2 Navigation avec l’appareil de programmation 5. Réglages avec appareil de programmation Pour pouvoir programmer le variateur plus simplement et plus spécifiquement en fonction du modèle, utilisez l’appareil de programmation robbe, Réf. 8642. Cette unité de conduite très claire vous permet, via un écran à cristaux liquides, de programmer rapidement et sûrement les paramètres devant être mis au point. 5.
Notice d´utilisation Roxxy BL-Control série 900 Opto 6. DÉTAILS CONCEERNANT LA PROGRAMMATION 6.7 Start Power (démarrage puissance) 6.1 Battery Type (type d’alimentation) Pour établir le type d’alimentation souhaité, utiliser la touche DEC ou la touche INC. Une fois que vous avez sélectionné un nouveau type d’accu, il se peut que des paramètres préprogrammés dans les domaines “CUT OFF VOLTAGE” et “CUT OFF TYPE” aient changé. Les modes peuvent toujours être mis au point à l’aide des touches DEC et INC. 6.
Notice d´utilisation Roxxy BL-Control série 900 Opto 6.13 Motor pole Number (nombre de pôles du moteur) 7. GARANTIE Cette rubrique nombre de pôles du moteur (Motor Pole Number) permet de sélectionner le nombre de pôles dont est pourvu votre moteur. Cette valeur est importante pour indiquer avec précision le régime. La valeur qu’il est possible d’établir peut varier sur une fourchette de 2 à 36 pôles. 6.
Istruzioni per l’uso Roxxy BL-Control Serie 900 Opto Introduzione Regolatori di velocità con nuova tecnologia Cool Power FET integrata ed ampio spettro di utilizzo: aeromodelli, navi automodelli ed elicotteri elettrici. Particolarmente indicati per l’abbinamento con motori elettrici brushless della gamma ROXXY, ma compatibili anche con tutti gli altri motori. Si prega di leggere attentamente il presente manuale di istruzioni prima del collegamento e dell’utilizzo del dispositivo. 1.
Istruzioni per l’uso Roxxy BL-Control Serie 900 Opto 3. Programmazione delle posizioni dello stick di comando Per modificare il parametro è necessario spostare lo stick del gas da posizione avanti a posizione stop e lasciarlo in tale posizione per almeno 3 secondi. Attenzione: Se si intende effettuare una modifica del tipo di modello (Parametro 4 oppure Parametro 5), è necessario eseguirla prima di modificare gli altri parametri.
Istruzioni per l’uso Roxxy BL-Control Serie 900 Opto 4.3 Esempio di programmazione L’esempio seguente illustra l’adattamento del regolatore alla posizione dello stick di comando ed inoltre la programmazione del tipo di modello : AIR con freno attivo. 4.3.1 Programmazione della posizione dello stick di comando 1. Accendere la trasmittente e portare lo stick di comando del gas nella posizione desiderata in avanti. 2.
Istruzioni per l’uso Roxxy BL-Control Serie 900 Opto 5.2 Utilizzo del programmatore 5. Impostazioni con programmatore Per programmare il regolatore in maniera semplice e specifica per ciascun modello, è utile impiegare l’apposito programmatore esterno robbe Art.N. 8642. Questo pratico dispositivo consente di programmare in modo facile e veloce tutti i parametri del regolatore attraverso il suo display LC. 5.
Istruzioni per l’uso Roxxy BL-Control Serie 900 Opto 6.7 Start Power 6. DETTAGLI PER LA PROGRAMMAZIONE 6.1 Battery type (Tipo batteria) All’interno del menu Start Power è possibile regolare la potenza (coppia) da conferire al motore in fase di avviamento (da fermo). Potenze limitate risultano particolarmente importanti per preservare gli organi di trasmissione di elicotteri,per esempio.
Istruzioni per l’uso Roxxy BL-Control Serie 900 Opto 6.13 Motor Pole Number (Numero di poli motore) 7. GARANZIA Questa funzione consente di impostare il numero di poli del proprio motore all’interno di un intervallo compreso tra 2 e 36 poli. Il parametro risulta necessario per poter poi visualizzare il corretto numero di giri. 6.14 Gear ratio (Rapporto di trasmissione) Questo dispositivo gode di una garanzia di 24 mesi.
Manual de uso Roxxy BL-Control 900 Serie Opto General Serie de variadores motor con la nueva tecnología Cool Power FET, por tanto especialmente potentes y con un amplio espectro de uso, aplicable para aeromodelos, modelos de barcos, coches y helicópteros eléctricos. Los variadores están especialmente adecuados para los motores BL de la serie ROXXY, pero son adecuados también para otros motores BL.Antes de conectar y poner en funcionamiento el variador, leer este manual con atención. 1.
Manual de uso Roxxy BL-Control 900 Serie Opto 3. Programación de las posiciones del stick Para modificar el parámetro, es necesario cambiar el stick del gas desde la posición adelante a la posición stop. El stick de gas debe permanecer como mínimo 3 segundos en la posición stop. Atención: Si se quiere modificar el tipo del modelo (parámetro 4 o parámetro 5), hay que ajustar este parámetro antes de modificar otros parámetros. 3.
Manual de uso Roxxy BL-Control 900 Serie Opto 4.3 Ejemplo de programación Con este ejemplo se explica la adaptación del variador a la posición individual del stick y a continuación la programación del tipo de modelo: AIR y freno ON: 4.3.1 Programación de las posiciones del stick 1. Conectar la emisora y poner el stick de gas en la posición adelante deseada. 2. Conectar la alimentación al variador. (suena una secuencia corta de tonos). 3. Al cabo de aprox.
Manual de uso Roxxy BL-Control 900 Serie Opto 5.2 Navegación con programador 5. Ajuste con programador Para programar el variador de forma más simple y más específico respecto al modelo, utilizar el programador de robbe nº 8642. Esta unidad de mando clara, hace posible programar los parámetros a ajustar de forma segura y rápida a través de un display de LC. 5.1 Conexión del programador Programador Conexión motor Usar el programador es muy sencillo.
Manual de uso Roxxy BL-Control 900 Serie Opto 6. DETALLES PARA LA PROGRAMACIÓN 6.1 Battery Type (tipo de batería) 6.7 Start Power Para ajustar el “tipo de batería deseado”, utilizar la tecla DEC o INC. Después de haber seleccionado un nuevo tipo de batería, puede ser que se haya modificado el parámetro preajustado en el área “CUT OFF VOLTAGE” y “CUT OFF TYPE”. Se seleccionan siempre los modos con las teclas DEC e INC.
Manual de uso Roxxy BL-Control 900 Serie Opto 6.13 Motor Pole Number (Cantidad de polos del motor) 7. GARANTÍA Para este aparato, damos una garantía de 24 meses. El ticket de caja de su tienda, expedido en el momento de la compra, sirve de comprobante para el inicio y el final de esta garantía. Eventuales reparaciones no prolongan la duración de la garantía. Durante este tiempo reparamos gratuitamente eventuales errores de funcionamiento así como defectos de fabricación o defectos materiales.
NÁVOD K OBSLUZE Roxxy BL-Control 900 Serie Opto Všeobecný popis Řada regulátorů nové Cool Power technologie, díky které je regulátor obzvláště výkonný a lze jej použít v různých odvětvích modelařiny pro letadla, lodě, auta i vrtulníky. Regulátory jsou vhodné zejména pro střídavé motory Roxxy, nicméně je lze použít i pro ostatní střídavé motory. Před zapojením a uvedením do provozu si pozorně pročtěte tento Návod k obsluze. 1.
NÁVOD K OBSLUZE Roxxy BL-Control 900 Serie Opto 3. Programování pozic kniplů Pokud chcete parametry změnit, musíte pohnout pákou plynu z pozice vpřed do pozice stop a v pozici stop musí páka plynu setrvat minimálně po dobu 3 s. POZOR: Pokud má následovat změna typu modelu (parametr 4 nebo 5), musí se toto nastavení provést před ostatními změnami parametrů. Vlastní změna parametrů pak probíhá pomocí rychlé změny pozice plynu z polohy stop do polohy vpřed a zase zpět na stop. 3.
NÁVOD K OBSLUZE Roxxy BL-Control 900 Serie Opto 4.3 Příklad programování V následujícím příkladu je vysvětleno přizpůsobení regulátoru individuálním pozicím kniplů a následné programování typu modelu: letadlo a zapnutá brzda. 4.3.1 Programování pozic kniplů 1. 2. 3. 4. 5. Zapněte vysílač a uveďte páku plynu do požadované pozice Vpřed. Zapojte k regulátoru zdroj napětí. (zazní krátký signál) Po cca 10 s se ozve dvojitý akustický signál pro potvrzení úspěšného naprogramování pozice VPŘED.
NÁVOD K OBSLUZE Roxxy BL-Control 900 Serie Opto 5.2 Navigace s programátorem 5. Nastavování pomocí programátoru Pokud chcete regulátor nastavovat jednoduše a specificky pro určité modely, používejte robbe programátor č. 8642. Programátor Vám umožní rychlé a bezpečné nastavování parametrů přes LC displej. 5.1 Zapojení programátoru programátor zapojení motoru Obsluha programátoru je velmi jednoduchá. Pomocí tlačítek se šipkami – buď dolů nebo nahoru – přeskočíte do programovacího modu Vaší volby.
NÁVOD K OBSLUZE Roxxy BL-Control 900 Serie Opto 6. PODROBNOSTI K PROGRAMOVÁNÍ 6.1 Battery Type (typ baterií) 6.7 Start Power Pokud chcete nastavit požadovaný typ článků, použijte tlačítko DEC nebo INC. Poté, co jste zvolili jiný typ článků se může stát, že se všechny nastavené parametry v oblasti „CUT OFF VOLTAGE“ (odpojovací napětí) a „CUT OFF TYPE“ (Vypnout motor-typ) změní. Tyto módy lze nastavit tlačítky DEC a NC.
NÁVOD K OBSLUZE Roxxy BL-Control 900 Serie Opto 6.13 Motor Pole Number (počet závitů) 7. ZÁRUČNÍ PODMÍNKY Na výrobek se poskytuje záruka 24 měsíců od data prodeje. Jako záruční doklad platí paragon Vašeho prodejce, který je při koupi vystaven. Případně opravy neprodlužují záruční lhůtu. Během záruky jsou všechny opravy způsobené výrobní nebo materiálovou vadou prováděny zdarma v rámci servisu. Další nároky, jako např. následné škody, nelze uplatňovat.
Land Firma Strasse Stadt Telefon Fax Tschech. Rep. Ivo Marhoun AND-00130 Les escaldesPrincip. D'Andorre Santa Anna, 13 00376-862 865 00376-825 476 0045-86-43 61 0045-86-43 77 00 44 Bogensevej 13 DK-8940 Randers SV 0049-6644-87- 0049-6644-87777 779 Metzloser Str.
Pays Andorra Denmark Germany England France Greece Société Sorteney Nordic Hobby A/S robbe-Service robbe-Schlüter UK S.A.V Messe TAG Models Hellas MC-Electronic Jan van MouweNetherl. / Belgium rik Norwegian Modellers Norway Italy Sweden robbe-Service Minicars Hobby A.B. Switzerland Spahr Elektronik Slovak Rep. Ivo Marhoun Spain robbe-Service Czech Rep. Ivo Marhoun Austria rue ville Téléphone télécopie AND-00130 Les escaldesPrincip.
Dieses Symbol bedeutet, dass elektrische und elektronische Kleingeräte am Ende ihrer Nutzungsdauer, vom Hausmüll getrennt, entsorgt werden müssen. Entsorgen Sie das Gerät bei Ihrer örtlichen kommunalen Sammelstelle oder Recycling-Zentrum. Dies gilt für alle Länder der Europäischen Union sowie anderen Europäischen Ländern mit separatem Sammelsystem.