Version 2.
DigitalSpot 5000 DT Table of contents 1. Safety instructions ...................................................................................................................................................... 4 2. Unpacking ................................................................................................................................................................... 5 3. Introduction ......................................................................................................
DigitalSpot 5000 DT 20.1 Kaleidoscopic effect ..........................................................................................................................................35 20.2 Circular effect (Fish eye) ...................................................................................................................................36 20.3 RGB (CMY) effects.........................................................................................................................................
DigitalSpot 5000 DT FOR YOUR OWN SAFETY, PLEASE READ THIS USER MANUAL CAREFULLY BEFORE POWERING OR INSTALLING YOUR DIGITALSPOT 5000 DT ! Save it for future reference. This device has left our premises in absolutely perfect condition. In order to maintain this condition and to ensure a safe operation, it is absolutely necessary for the user to follow the safety instructions and warning notes written in this manual.
DigitalSpot 5000 DT When choosing the installation spot, please make sure that the device is not exposed to extreme heat, moisture or dust. Air vents and slots in the fixture´s head and base are provided for ventilation, to ensure reliable operation of the device and to protect it from overheating. The openings should never be covered with cloth or other materials, and never must be blocked. This fixture should not be placed in a built-in installation unless proper ventilation is provided.
DigitalSpot 5000 DT 3. Introduction The DigitalSpot 5000 DT features moving head with a video projection and automated lighting technologies including a DMX controllable digital media server installed in a fixture´s base. The built-in 32-bit Graphics Engine utilizes Linux and DirectX application programming interface to provide extensive image control of graphic objects.
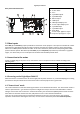
DigitalSpot 5000 DT Rear panel of the fixture base 1 - Power cord 2 - Power switch 3 - Fuse 4 - 5-pin DMX outputt 5 - 5-pin DMX input 6 - Ethernet input 7 - USB inputs 8 - VGA intput-dataprojector. 9 - S-video intput-dataprojector 10 - 3-pin DMX input 11 - 3-pin DMX output 12 - ATX switch 13 - S-video input- graphics engine 14 -Composite input-graphics engine 5. Video inputs Both VGA (8) and S-Video (9) inputs provide direct connection to the projector.
DigitalSpot 5000 DT 7. Shutting down the DigitalSpot 5000 DT There are two recommended ways how to shutdown the fixture: 1. A DMX controller can switch off the projector lamp and shut down the fixture with the "Lamp Off, Fixture Off" option on the control channel 8 (see DMX protocol). 2. The option "Fixture Off" in main menu of DigitalSpot 5000 DT switches off the projector´s lamp and shuts down the fixture.
DigitalSpot 5000 DT 9. Rigging the fixture Please consider the respective national norms during the installation! Verify the truss or support will handle the combined weight of all the fixtures on the truss Always use a secondary safety cable when mounting this fixture When rigging, derigging or servicing the fixture staying in the area below the installation place, on bridges, under high working places and other endangered areas is forbidden.
DigitalSpot 5000 DT To install the fixture on the truss: 1. Bolt clamp (1) to the omega holder (4) with M12 bolt and lock nut through the hole in the holder. 2. Fasten the omega holders on the bottom of the base by inserting both quick-lock fasteners (3) into the holes of the base and tighten fully clockwise. 3. Fasten the safety-rope (2) through the two apertures in the bottom of the base and over the trussing system.
DigitalSpot 5000 DT 10. DMX 512 connection The fixture is equipped with both 3-pin and 5-pin XLR sockets for DMX input and output. Only use a shielded twisted-pair cable designed for RS-485 and 3-pin/5-pin XLR- connectors in order to connect the controller with the fixture or one fixture with another.
DigitalSpot 5000 DT RJ-45 socket (front view): 1- TD+ 2- TD3- RX+ 4- Not connected RJ-45 plug (front view): 5- Not connected 6- RX7- Not connected 8- Not connected Patch cables that connect fixtures to the hubs or LAN sockets are wired 1:1, that is, pins with the same numbers are connected together: 1-1 2-2 3-3 4-4 5-5 6-6 7-7 8-8 If only the fixture and the computer are to be interconnected, no hubs or other active components are needed.
DigitalSpot 5000 DT The media files assigned to the DMX values can be sorted either in an alphabetical or numerical order. Default assigning is the alphabetical order. If you need to change this sorting, go to the menu ”Personality“ and select “Gobo selection mode“ option. The numerical order is suitable in the case that you need to exactly assign certain media files to specified DMX addresses. The table below show differences in file DMX assignment between the alphabetical and numerical sorting.
DigitalSpot 5000 DT 13.
DigitalSpot 5000 DT Menu Level 1 Menu Level 2 Menu Level 3 Lamp Presetting Lamp On/Power On Lamp Off via DMX Lamp On If DMX is Present Display Adjusting Lamp Off if not DMX Display Permanent On Menu Level 4 Menu Level 5 On, Off On, Off On, Off On, Off Display Off After 5 min Permanent On Display Orientation Pan/Tilt Feedback On, Off Pan/Tilt Mode Time Mode Normal Orientation Rotated Orientation Speed Mode Active Blackout While: Projection Presetting Dmx Protocol During Movement Cor.
DigitalSpot 5000 DT Menu Level 1 Menu Level 2 Menu Level 3 Menu Level 4 Manual Control Manual DMX Control Pan 0-255 Menu Level 5 Menu Level 6 Pan 0-255 Tilt 0-255 Zoom 0 - 255 Focus 0-255 Menu Level 7 : Synchro to L2 Video Input Selection 0-255 Internal Input External VGA Input External SVideo Input Dataprojector Control Stand-alone Setting Play Program Test program In Loop Normal Mode Program 1 Static Mode : Program 10 Run Program Editing Program Program 1 : Edit Steps Pro
DigitalSpot 5000 DT Menu Level 1 Menu Level 2 Menu Level 3 Preset Playback Deactivated Menu Level 4 Menu Level 5 : Fixture Off Timer Play DMX Program DMX Program 10 in Loop Timer Deactivated Timer Activated Set Timer Hours Set Timer Minutes DMX Program 1 in Loop : DMX Program 10 in Loop Preview Mode Reset Functions Reset Pan/Tilt System Reset Zoom/Focus System Reset Iris system Reset All Systems Service Menu Power On Time Total Hours Resetable Hours Lamp On Time Total Hours Resetable Hour
DigitalSpot 5000 DT Menu Level 1 Menu Level 2 Menu Level 3 Menu Level 4 Menu Level 5 Menu Level 6 Menu Level 7 Menu Level 8 Media Open 000 Open : Synchronize to Fixture 240 Synchronize from Fixture Projector temp. 3 Pan/Tilt Board Maximum Resetable Projector temp. 1 Projector temp. 2 Projector temp. 3 Pan/Tilt Board Air Filters Time To Clean Up Filters Set clean Up Timer 10..50..
DigitalSpot 5000 DT Menu Level 1 Menu Level 2 Menu Level 3 Menu Level 4 Menu Level 5 Remote Servis Set Service IP Address Remote IP Address 077.048.000.224 Remote Port 08283 Service Port 08290 Gateway Address 002.001.001.
DigitalSpot 5000 DT 14. Operating modes Before operating the DigitalSpot 5000 DT from a DMX 512 controller, you need to define the source of DMX data, which may be: DMX 512 - data is transmitted over standard DMX cables. Set a valid DMX start address, which is defined as the first channel from which the DigitalSpot 5000 DT will respond to the controller.
DigitalSpot 5000 DT 2. Use RNS wheel to set the first number of the IP address 3. Press the [ENTER] to move on the second number of the IP address 4. Repeat steps 2 and 3 for the third and fourth number of the IP address. If you want to return back on the previously edited number, press [ESC]. The same way you can set the Netmask Address. Gateway Address –Option allows to set gateway address. Set ArtNet Universe - Select this submenu to set a Universe (0-15).
DigitalSpot 5000 DT Display Adjusting --- This function allows you to change the display settings: Display Permanent On - This function allows you to keep the display permanent on or to turn it off after 5 minutes of inactivity of control buttons (wheel) Display Orientation - Select this function to adjust the display orientation: Normal orientation - A standard display orientation. Rotated Orientation - Inverts the display by 180°.
DigitalSpot 5000 DT Synchro Verbose Mode --- used for debugging of video synchronization. Default Settings --- Select this option to set default values or to remove user´s content in the fixture. Set Default Values --- Select this option to reset all fixture personalities to the default values. Remove User Media Content --- The item deletes all user media contents except the factory media content. 15.4 Lamp On/Off Use this option in order to switch on/off the projector´s lamp.
DigitalSpot 5000 DT Test Program In Loop --- The option starts built-in test program. Program 1 In Loop : These options start user defined programs Program 10 In Loop Every program can run in two modes: Normal - This mode uses pan/tilt movement and therefore is good for a dynamic projection. Static - This mode is suitable for projections on the wall, ceiling or ground without any head movement. By means of items Pan, Tilt and Focus is possible to adjust moving head to the desired position.
DigitalSpot 5000 DT file is a plain text that allows additional user editing. The first line of the file includes all DMX channels with their starting DMX values and the next lines display changes of DMX values of channel effect and a relevant time of the changes. Note: If you select the program which contains previously recorded data, the data will be overwritten without warning.
DigitalSpot 5000 DT Current - Select this function to read the current temperatures of the fixture interior . Maximum nonresetable -The function shows the max. temperatures of the fixture interior since the DigitalSpot 5000 DT has been fabricated. Maximum resetable - The function shows the maximum temperatures of the fixture interior since the respective counter was last reset. In order to reset desired counter to 0, press [ENTER] twice. Measuring points of temperatures: Projector temp.1 [°C] ]………….
DigitalSpot 5000 DT Allow Anonymous - If this option is set "Yes" ,no password is required at entering to the Remote control program. USB Data Synchronization --- The menu allows transfer of media files (images, videos) and software files between the USB stick and fixture´s hard disk and related operations. The USB stick must contain the following folders structure: Top level folder Media 000 001 002 : 240 Update Log : To create the folders structure mentioned above, use the option "Init Flash Disc".
DigitalSpot 5000 DT If you only want to copy one or more files to the fixture, select option "Open" and press the [ENTER]. Select desired file, press the [ENTER] and confirm a question in a dialogue box. After copying update file to the fixture, the desired software update will be activated by confirming the follow items: Update Graphical Software - starts update of the graphical software.
DigitalSpot 5000 DT use channel KeyStone X-ratio for correction use channel KeyStone Y-ratio for correction 16.2 Layer keystone parameters By the global keystone parameters stated above you can control each of the four corners of the graphics output individually to reshape your image to a form that is projected correctly. By the layer keystone parameters you can control all four corners of the image at the same time.
DigitalSpot 5000 DT 2. Gobo position in X and Y direction. The channels Gobo position X coarse and Gobo position X fine allow 8-bit/16-bit positioning in X-direction. The channels Gobo position Y coarse and Gobo position Y fine allow 8-bit/16-bit positioning in Y-direction. 3. Layer skewing along X and Y axis. On the channel Gobo effect 1 selection adjust a DMX value=150 and using the control parameters 1 an 2 you can skew the image in either X or Y axis.
DigitalSpot 5000 DT The channel Gobo effect 1 – Parameter 2 skews the image in Y-axis. 4. Layer Squeezing/Stretching along X and Y axis. On the channel Gobo effect 1 selection adjust a DMX value=150 and using the Control Parameters 3 you can squeeze the image in X axis. The channel Gobo effect 1 – Parameter 3 squeezes/stretches the image edges in Y-axis. On the channel Gobo effect 2 selection adjust a DMX value=150 and using the control parameters 1 you can squeeze the image in Y axis. Note.
DigitalSpot 5000 DT 5. Image X-ratio and Y-ratio. On the channel Gobo effect 2 selection adjust a DMX value=150 and the second and third parameter control image X-ratio and Y-ratio. Note. To allows this effect, the channel Gobo effect 1 selection has to be set at DMX=150. The channel Gobo effect 2 – Parameter 2 compresses or expands the image in X- axis The channel Gobo effect 2 – Parameter 3 compresses or expands the image in Y- axis.
DigitalSpot 5000 DT 17. In Frame and Out Frame parameters You can select any segment of a video file for playback by assigning parameters for In Frame (start point) and an Out Frame (end point) as pictured below. The In Frame parameter corresponds to a 16-bit DMX value equal to a starting point for the playback segment of the selected video file. The Out Frame parameter corresponds to a 16-bit DMX value equal to an end point for the playback segment of the selected video file. 1.
DigitalSpot 5000 DT a dark pixel, the result will be dark. Minimum mode (80-97 DMX): This mode takes the pixel that is the darkest between the current layer and the layer underneath Maximum mode (100-117 DMX): This mode takes the pixel that is the brightest between the current layer and the layer underneath. The playback options: DMX value Playback options Meaning 0. Play forward continuously if dimmer >0 Plays the video segment from In Frame point to Out Frame point, continuous looping.
DigitalSpot 5000 DT 20. Graphic effects There are two gobo effect channels on each gobo layer (Gobo effect 1 selection, Gobo effect 2 selection), which offer amount of effects that can be applied to the current running picture/video. Each effect channels have three control channels - Parameter 1, Parameter 2, Parameter 3 – which allow to change the behaviour of selected effect (e.g. speed, amount...) 20.
DigitalSpot 5000 DT Meaning of the control channels depends on the kaleidoscope mode which has been selected: Static mode. Gobo effect 1- Parameter 1: Density of mosaic segments DMX value Function 0 - 255 Adjusting density of mosaic segments from large (0 DMX) to small (255 DMX).
DigitalSpot 5000 DT 20.3 RGB (CMY) effects The RGB effects section on the channel Gobo effect 2 selection allows to apply a variety of RGB colour swapping effects to graphic objects. RGB subtract All Pixels (DMX value=50) – the effect reduces colour values across all pixels.
DigitalSpot 5000 DT Swap RGB to RBG (DMX value=54) – the effect swaps green and blue colour in all pixels. Red colour remains without change. Associated control parameters: Control parameter Parameter 1 Controlled item Red colour element DMX value 0-255 Parameter 2 Green colour element 0-255 Parameter 3 Blue colour element 0-255 Function No change. no adjustment (0 ) blue (255) no adjustment (0 ) green (255) Swap RGB to GRB (DMX value=55) – the effect swaps red and green colour in all pixels.
DigitalSpot 5000 DT Swap RGB to BGR (DMX value=58) – the effect swaps red and blue colour in all pixels. Green colour remains without change. Associated control parameters: Control parameter Parameter 1 Controlled item Function Red colour element DMX value 0-255 Parameter 2 Green colour element 0-255 No change.
DigitalSpot 5000 DT Colour to Alpha (DMX value=62) – the effect changes the transparency level of an image´s element colour values.
DigitalSpot 5000 DT Brightness scale (DMX value=69) – the effect changes the output intensity of brightness of the picture. Associated control parameters: Control parameter Parameter 1 Parameter 2 Controlled item Inclination of the conversion line – bottom point Inclination of the conversion line – top point DMX value Function 0-255 Changes the inclination of conversion line for output brightness from no adjustment (0 ) min.
DigitalSpot 5000 DT 20.4 Iris effect on layer The effect allows to simplify transition effects between layers and it can be activated on each gobo layer. On the effect can be applied layer´s X/Y zoom, X/Y position and rotation parameters. Another possible application of the iris effect is to use it as the mask function to mask unwanted parts of the image. On the iris effect on the layer can be also applied global effects as the iris, picture merging etc.
DigitalSpot 5000 DT Gobo Effect 1-Parameter 3: Texture modes applied on the iris surface Parameter 3 DMX value (Mode) Zoom X Zoom X + Position X 0-9 (Mode 1) 10-19 (Mode 2) 20-29 (Mode 3) 30-39 (Mode 4) The following modes (5-8) include black mask 40-49 Dimmer on the layer 3= 255 DMX Dimmer on the layer 3= 255 DMX (Mode 5) Dimmer on the layer 3= 1 DMX Dimmer on the layer 3= 1 DMX 43
DigitalSpot 5000 DT Parameter 3 DMX value (Mode) Zoom X Position X 50-59 Dimmer on the layer 3= 255 DMX Dimmer on the layer 3= 255 DMX Dimmer on the layer 3= 1 DMX Dimmer on the layer 3= 1 DMX Dimmer on the layer 3= 255 DMX Dimmer on the layer 3= 255 DMX Dimmer on the layer 3= 1 DMX Dimmer on the layer 3= 1 DMX Dimmer on the layer 3= 255 DMX Dimmer on the layer 3= 255 DMX Dimmer on the layer 3= 1 DMX Dimmer on the layer 3= 1 DMX (Mode 6) 60-69 (Mode 7) 70-79 (Mode 8) 44
DigitalSpot 5000 DT 20.5 Auto iris effect on layer The effect behaves similar as Iris effect on layer, but it is auto- triggered by gobo changes. The iris effect on layer can be activated on each gobo layer if you set the Gobo Effect 1 Selection channel to a DMX value of 92. The Parameter 1 of this effect changes the speed of the iris movement. The Parameter 2 changes the iris mask type.
DigitalSpot 5000 DT 20.7 Another graphic effects on layers 1. Swirl effect Activation channel Activation DMX value Control: Parameter 1 Parameter 2 Parameter 3 Gobo Effect 2 Selection (on each layer) 70 Radius: 0-255DMX - min.
DigitalSpot 5000 DT 3. Cross-stitching effect Activation channel Activation DMX value Control: Parameter 1 Parameter 2 Parameter 3 Gobo Effect 2 Selection (on each layer) 72 Pattern density: 0-255 DMX - max. min. Colour of stitch: 0-127 DMX - coloured 128-255 DMX - black Effect boundary position in X-axis: 0-255 DMX – movement of effect boundary from left to right Original P1=81DMX, P2=0DMX, P3=85DMX Default value 0 0 0 P1=81DMX, P2=128DMX, P3=85DMX Example 4.
DigitalSpot 5000 DT 21. Media content management As you seen earlier in chapter "12. Folder organization", the DigitalSpot 5000 DT uses the root folder named "Media". This folder contains subfolders (000,001...240) and inside each subfolder is the collection of media that the subfolder holds. The files in subfolders are sorted in an alphabetic or numerical order and assigned to DMX. The first part of the file name should be a 3-digit number followed by an underscore and a name e.g.: 001_sun.png............
DigitalSpot 5000 DT After network configuration, type the IP address of the DigitalSpot 5000 DT in address line in your Windows explorer window. Use this format ftp:// 2.X.X.X / (e.g. ftp://2.236.2.88/- see picture below). If all settings are proper, you will see "Media" and "Update" folders in the Windows explorer window and now you can work with them as local folders and files. See also "Special functions"--> "FTP Server". 2.
DigitalSpot 5000 DT 3.Select option “Get Add-ons” from the standard toolbar, type fireftp into the top left field and press Enter key. 4.Click on the Add to Firefox.. button and follow the installation instructions. 5. Follow the installation instructions until the installation has finished. 5.After installation, go to the “ Tools”, select “Add-ons” item, select “Extensions” in the toolbar and click on the Options button.
DigitalSpot 5000 DT After installing FTP client, run Mozilla Firefox and type the IP address of desired fixture in ftp format e. g. ftp://2.97.181.89 and a Fire FTP window will appear. If you do not want to keep in mind IP addresses of all connected fixtures, you can use the Remote configuration program (by typing the IP address of one fixture to the web browser in http format e. g. http://2.97.181.
DigitalSpot 5000 DT 21.2 Moving files between networked fixtures The option "Contents Synchronization" in a "Remote control program" running on your PC offers easy control of file transfer between networked fixtures via WWW browser. (For detail description of the Remote configuration program see chapter "Remote control of the fixture via WWW browser" below). A window of the Contents Synchronization: There is a list of available fixtures under Device Available for Update.
DigitalSpot 5000 DT The Remote Control screen offers these options: Fixture Info - the window with information about current fixture address, disk space, software versions etc. Personality - the window allows you to change the fixture settings like a pan/tilt reverse, feedback, speed, lamp status, DMX protocol selection etc.
DigitalSpot 5000 DT Status Messages -the window under this option displays error and status messages. Special Functions - the window offers several items: "Thumbnails size" - changing the size of the thumbnails. The change takes effect in the item "Content". If you change the thumbnail size, use the button "Update" below the size box. "Log File" - enables to generate log file for service purposes.
DigitalSpot 5000 DT Content - by entering this window a complete overview of all gobo folders is offered, from which the folder to be view can be selected.Click a desired folder to display its content. Click a desired picture to zoom it in. Contents Synchronization - the window allows you copy (addition) media content from a current fixture to another fixtures on an ethernet network. There is a list of available fixtures under Device Available for Update.
DigitalSpot 5000 DT 2. Select a target fixture (fixtures) in a list of available fixtures. 3. Select desired Synchronization mode and click the "Do Synchronization" button to start file transfer. Remote Graphics Output - preview of the current projecting output. Remote RNS Display - the window "takes" the fixture´s control panel. You can browse and adjust all items in this fixture menu by means of your keyboard. Use the Up/Down and Enter/Escape keys.
DigitalSpot 5000 DT To end the Remote control program, close WWW browser ( or use option "Logout" if you entered the program using the user name and password) . 23. Picture merging The picture merging system allows to create a panoramic projection controlled from a light DMX console. The resulting seamless image consists of the images of the individual projectors. It is possible to create an image field up to 64 segments (non-mirrored configuration).
DigitalSpot 5000 DT Global effect 1- Parameter 1 The DMX value from the range of 1- 235 allows selection of desired image field configuration according to the tables on the following pages.
DigitalSpot 5000 DT DMX value Image field Configuration WxH Total number of fixtures DMX value Image field Configuration WxH Total number of fixtures 37 1x7 7 92 11 x 1 11 38 7x2 14 93 2 x 11 22 39 2x7 14 94 11 x 3 33 40 7x3 21 95 3 x 11 33 41 3x7 21 96 11 x 4 44 42 7x4 28 97 4 x 11 44 43 4x7 28 98 11 x 5 55 44 7x5 35 99 5 x 11 55 45 5x7 35 100 12 x 1 12 46 7x6 42 101 1 x 12 12 47 6x7 42 102 12 x 2 24 48 7 x7 49 103 2 x 12 24 49
DigitalSpot 5000 DT Horizontally mirrored configuration DMX value Image field configuration of base matrix WxH Total number of fixtures in base matrix DMX value Image field configuration of base matrix WxH Total number of fixtures in base matrix 128 2x1 2 146 10 x 2 20 129 4x1 4 147 4x5 20 130 2x2 4 148 10 x 3 30 131 4x2 8 149 6x5 30 132 6x1 6 150 10 x 4 40 133 2x3 6 151 8x5 40 134 6x2 12 152 10 x 5 50 135 4x3 12 153 12 x 1 12 136 6x3 18 154 2x6 12
DigitalSpot 5000 DT Vertically mirrored configuration DMX value Image field configuration of base matrix WxH Total number of fixtures in base matrix DMX value Image field configuration of base matrix WxH Total number of fixtures in base matrix 164 1x2 2 182 5x4 20 165 2x2 4 183 2 x 10 20 166 1x4 4 184 5x6 30 167 2x4 8 185 3 x 10 30 168 3x2 6 186 5x8 40 169 1x6 6 187 4 x 10 40 170 3x4 12 188 5 x 10 50 171 2x6 12 189 6x2 12 172 3x6 18 190 1 x 12 12 1
DigitalSpot 5000 DT Vertically and horizontally mirrored configuration DMX value Image field configuration of base matrix WxH Total number of fixtures in base matrix DMX value Image field configuration of base matrix WxH Total number of fixtures in base matrix 200 2x2 4 218 10 x 4 40 201 4x2 8 219 4 x 10 40 202 2x4 8 220 10 x 6 60 203 4x4 16 221 6 x 10 60 204 6x2 12 222 10 x 8 80 205 2x6 12 223 8 x 10 80 206 6x4 24 224 10 x 10 100 207 4x6 24 225 12 x 2 24
DigitalSpot 5000 DT The mirrored image configurations bring 2 advantages: 1. Resolution of the source image and merged images on the wall is the same in comparison with non-mirrored configuration (if you use suitable mirrored configuration – see example 3 below). 2. By using the picture merging with mirrored configuration you can cover any size of projection area. The total number of used projectors is unlimited. Examples: 4 DigitalSpots 5000DT are used in the picture merging.
DigitalSpot 5000 DT Global effect 1- Parameter 2 The DMX values from the range of 0-255 are used to step segment by segment throw the image grid. The DMX value of 0 corresponds to the upper left segment of the image grid. The stepping runs from the left to the right and down from top (see example for field 8x3 segments bellow). Global effect 1- Parameter 3 This channel enables to transform displaying of the segment edges-sharp or blended edges.
DigitalSpot 5000 DT Global effect 2 A DMX value of 20 enables fine adjusting of the red, green and blue gamma curve at overlaping edges to achieve consistent colour (brightness) of these parts of image. Note. After selecting desired image segment for the gamma correction (by means of the Global effect 1 Parameter 2), set the channel Global effect 1 - Parameter 3 to 0 in order to display blended edges of the picture segment.
DigitalSpot 5000 DT 8. To execute the picture merging ,run the same gobo/video on all six fixtures and set the channels Global Effect 1Parameter 3 to a DMX value of 0-130. Note: In order to assure a correct playback of videos sequences , all fixtures in the picture merging system should be synchronized to the one (master) fixture - see the chapter bellow. 24.
DigitalSpot 5000 DT Size of segments in X-axis: LpartX = LtotalX/[x-(b/100)*(x-1)] LpartX =1024/ [3-(10/100)*(3-1)] the size of overlapping edges was selected 10% (b=10) LpartX = 366 pixels Since the size of the segments in Y-axis is the same as at the source picture, each of the 3 fixtures will project picture with resolution of 366x768 pixels. ___________________________________________________________________________________________ Note.
DigitalSpot 5000 DT 25. Effect video synchronization The synchronization option can be set separately for each gobo layer (channels Synchronization to ID). The fixture synchronization acts with the fixture ID which is defined as the last number of fixture´s IP address. This fixture ID is shown on the fixture´s display. The fixtures are synchronized to the one fixture - named a master fixture.
DigitalSpot 5000 DT 26. Projection onto angular, cylindric or spheric surfaces If a projection on curved surface is required a correction of the shape distortions is necessary. The DigitalSpot 5000 DT supports projection onto angular screens, cylinders and spheres. 26.1 Curved surface support channels Global effect 2 This channel enables you to select desired shape of the surface: To simplify a correction process, there is a gobo with a net pattern (DMX value = 2) in a factory folder No.
DigitalSpot 5000 DT Global effect 2- parameter 2 This parameter enables to adjust the horizontal length of the edge. A DMX Value of 128 = no adjustment, values below 128 move the edge to the left, values above 128 move the edge to the right. Global effect 2- parameter 3 This parameter enables to adjust the vertical length of the edge. A DMX Value of 128 = no adjustment, values below 128 move the edge downwards, values above 128 move the edge upwards.
DigitalSpot 5000 DT Note: If a projection of rectangle (square) on a circle (sphere) is selected on the channel Global Effect 2 (DMX value of 10 or 11), the meaning of the Keystone parameters in a DMX chart will be changed as follows: Channel Type of control DMX value Function 0 -127 128 129-255 Image moving in an X-direction Moving the image from left to center Center Moving the image from center to right proportional step proportional 0 -127 128 129-255 Image moving in a Y-direction Moving the imag
DigitalSpot 5000 DT 27. Video processing on gobo layers from a streaming video server A streaming video is a video that is continuously sent by one device (e.g. PC) and received by another device (DigitalSpot 5000 DT) over an ethernet network. 1. TightVNC client The TightVNC is a free remote control software package available at http://www.tightvnc.com/download.php . With TightVNC, you can see the image output of the DigitalSpot 3500 DT and edit it with your local PC which has TightVNC server installed.
DigitalSpot 5000 DT Hire is an example for Windows XP: 5. Run a Remote control by means of WWW browser at your PC, select option “Remote content” and write IP address of TightVNC server to the Source Address line in the following format : vnc:// xxx.xxx.xxx (e.g. vnc://2.1.1.12). 2. Streaming video server The Streaming video software stated on the pictures below is available at http://www.videolan.org/vlc/. Download VLC media player from this web page and install it on your streaming source (PC, notebook.
DigitalSpot 5000 DT - Click on the "Properties" button and the following window will open. - Click on the item "Internet Protocol (TCP/IP)" and the Internet Protocol Properties window will open. Set IP address to something like 2.X.X.X with an IP mask of 255.0.0.
DigitalSpot 5000 DT 3. Install a VLC media player- click on a VLC media player self-extracting package located on the hard disk and follow the on-screen instructions. After installing it, run this VLC media player. In a horizontal menu "File" click on "Open" and the following window will open. Type the name of video file in the "Open" field, check the "Stream/Save" option and click the "Settings" button.
DigitalSpot 5000 DT Check the "HTTP" option in a Outputs column, type an IP address of the PC in the "Address" field and a figure port in the "port" field. Note: If you want to run more videos on this PC, you have to run the VLC media player for each video and every media player has to have a different figure of the port but the IP address will be the same. Select the MPGTS or MPEGPS option in the "Encapsulation method" row. Check the "Video codec" option and select mp2v.
DigitalSpot 5000 DT PC Desktop streaming. The desktop streaming enables you to sent your presentation directly to the DigitalSpot 5000 DT via an ethernet network. You do not need extra cables for connecting video inputs of the DigitalSpot 5000 DT with your PC. A different setting of VLC media player for streaming of the PC desktop is required.
DigitalSpot 5000 DT Control PC (light console) Type the IP address of the DigitalSpot 5000 DT which is to project data from a remote streaming video source in your WWW browser to run the Remote Control program. Select the option "Remote Content" and the following window will open: Type in the "source Address" field the IP address and the port number of the streaming source (in our case it is a PC) in this format: http://2.x.x.x:port number e.g. http://2.1.1.
DigitalSpot 5000 DT Fixture linkage: 28. CITP/MSEX protocol The fixture also supports CITP/MSEX protocol. It is an open protocol for integration of lighting controllers, media servers and visualizers on a higher-than-control level. It makes it possible to browse a media server with thumbnail previews of content as well as effects, to use the correct effect-specific parameter names while programming and to preview output from a controller or visualizer.
DigitalSpot 5000 DT 29. Technical specifications Electrical specifications Input voltage range: 100-120V or 200-240V AC, 50/ 60 Hz Fuse: T 6.
DigitalSpot 5000 DT Web access for total control of fixture (user library management) Media Content Synchronization in web interface 103 control channels max.
DigitalSpot 5000 DT Dimensions (mm) Weight 45 kg 82
DigitalSpot 5000 DT 30. Error and information messages The warning icon (triangle) on the bottom-right side of the fixture´s screen indicates some error or information message which appears on the screen by pressing the [ESC] button. Pan Error The message will appear after the reset of the fixture if the yoke´s magnetic-indexing circuit malfunctions (sensor failed or magnet is missing) or the stepping motor is defective or its driving IC3 on the PCB in the fixture base.
DigitalSpot 5000 DT 31. Maintenance 31.1 Replacing the projector If you need to take out the data projector,disconnect the DigitalSpot 5000 DT from the mains.Remove all plastic covers of the head by loosening the quarter-turn fasteners (1).Disconnect cables from two motors (3) and two sensors next to the projector objective.Disconnect all cables from the projector´s rear panel and unscrew the 6 fastening screw (2) (three screws per side).Carefully pull out the projector (5) with chassis (4).
DigitalSpot 5000 DT 31.2 Replacing the air filters Important! Check the air filters periodically and clean before they become clogged! Clean the air filters with a vacuum cleaner or you can wash them and put back dry. Replacing air filters in the fixture head. 1) Disconnect the fixture from power. 2) Raise up the filter cover (fixed by two magnets) on the head cover. 3) Pull the air filter out. 4) Clean or replace the air filter. 5) Snap the filter cover back to the head cover.
DigitalSpot 5000 DT 31.3 Replacing the fuse Only replace the fuse by a fuse of same type and rating. Before replacing the fuse, turn the power off and unplug the mains lead. Procedure: 1) Unscrew the fuse holder on the rear panel of the base with a fitting screwdriver from the housing (anti - clockwise). 2) Remove the old fuse from the fuse holder. 3) Install the new fuse in the fuse holder. 4) Replace the fuse holder in the housing and fix it. 31.
DigitalSpot 5000 DT DANGER ! Disconnect from the mains before starting any cleaning and maintenance work The front covering glasses will require weekly cleaning as smoke-fluid tends to building up residues, reducing the light output very quickly. The cooling fans should be cleaned monthly. The interior of the fixture should be cleaned at least annually using a vacuum-cleaner or an air-jet. More complicated maintenance and service operations are only to be carried out by authorized dealers.
Appendix - DMX protocol DigitalSpot 5000 DT- DMX Protocol Protocol ver./Channel 3.9 1 4.7 1 5.5 1 6.3 1 2 2 2 2 3 3 3 3 4 4 4 4 5 5 5 5 6 7 8 6 7 8 6 7 8 6 7 8 DMX Value Function Pan 0-255 Pan movement by 530° Pan Fine 0-255 Fine control of pan movement Tilt 0-255 Tilt movement by 280° Tilt Fine 0-255 Fine control of tilt movement Pan/Tilt speed,Pan/Tilt time 0 Max.speed (tracking mode) P./T. speed-set Speed Mode in menu: Pan/Tilt Mode 1-255 Speed from max. to min.
Appendix - DMX protocol Protocol ver./Channel 3.9 4.7 5.5 6.
Appendix - DMX protocol Protocol ver./Channel 3.9 73 4.7 73 5.5 76 6.
Appendix - DMX protocol Protocol ver./Channel 3.9 _ 4.7 _ 5.5 79 6.
Appendix - DMX protocol Protocol ver./Channel 3.9 _ 4.7 _ 5.5 79 6.
Appendix - DMX protocol Protocol ver./Channel 3.9 75 76 4.7 76 77 5.5 80 81 DMX 6.
Appendix - DMX protocol Protocol ver./Channel 3.9 77 78 79 80 81 4.7 78 79 80 81 82 5.5 82 83 84 85 86 6.
Appendix - DMX protocol Protocol ver./Channel 3.9 4.7 5.5 6.
Appendix - DMX protocol Protocol ver./Channel 3.9 24 25 26 27 28 29 4.7 24 25 26 27 28 29 5.5 25 26 27 28 29 30 DMX Function 6.
Appendix - DMX protocol Protocol ver./Channel 3.9 29 4.7 29 5.5 30 6.
Appendix - DMX protocol Protocol ver./Channel 3.9 29 30 31 32 33 4.7 29 30 31 32 33 5.5 30 31 32 33 34 6.
Appendix - DMX protocol Protocol ver./Channel 3.9 33 4.7 33 5.5 34 6.3 59 DMX Value 19 20 21 22 23 24 25 26 27 28 29 30 31 32 33 34 35 36 37 38 39 40 41 42 43 44 45 46 47 48 49 50 51 52 53 54 55 56 57 58 59 60 61 62 63 64 65 66 67 68 69 Function Left-right diag. down scroll Left-right diag. up scroll X rotate Y rotate XY rotate XY inv. rotate X inv. y rotate Tile xy Tile xy XYZ rot. cube XYZ rot. sphere X rot. cylinder Y rot.
Appendix - DMX protocol Protocol ver./Channel 3.9 33 4.7 33 5.5 34 6.
Appendix - DMX protocol Protocol ver./Channel 3.9 4.7 5.5 34 34 35 _ _ 35 _ _ 35 _ _ 36 DMX Function 6.
Appendix - DMX protocol Protocol ver./Channel 3.9 4.7 5.5 6.
Appendix - DMX protocol Protocol ver./Channel 3.9 41 42 43 44 45 4.7 41 42 43 44 45 5.5 42 43 44 45 46 6.
Appendix - DMX protocol Protocol ver./Channel 3.9 53 54 54 4.7 53 54 54 5.5 55 56 56 6.
Appendix - DMX protocol Protocol ver./Channel 3.9 55 4.7 55 5.5 57 DMX Function 6.
Appendix - DMX protocol Protocol ver./Channel 3.9 56 57 58 4.7 56 57 58 5.5 58 59 60 DMX Function 6.
Appendix - DMX protocol Protocol ver./Channel 3.9 58 4.7 58 5.5 60 6.
Appendix - DMX protocol Protocol ver./Channel 3.9 4.7 5.5 6.
Appendix - DMX protocol Protocol ver./Channel 3.9 60 4.7 60 5.5 62 6.
Appendix - DMX protocol Protocol ver./Channel 3.9 4.7 5.5 6.
Appendix - DMX protocol Protocol ver./Channel DMX Function 3.9 4.7 5.5 6.