
Installation Guide

ASSEMBLY INSTRUCTIONS FOR YOUR
BLING CHANDELIER
S1000 & Z1000
IMPORTANT SAFETY INSTRUCTIONS:
*These instructions are provided for your safety. It is very important that they are read completely before beginning the installation of your xture.
*DIRECT WIRE FIXTURES: WE STRONGLY RECOMMEND INSTALLATION BY A LICENSED ELECTRICIAN.
*Turn the power to xture off before replacing bulbs, making sure the bulbs have sufcient time to cool down. Do not subject the xture to any
shock while lit as shattering of bulbs may result.
*Review all instruction pages before installing the xture.
1. SHUT OFF THE MAIN ELECTRICAL SUPPLY FROM THE
MAIN FUSE BOX/CIRCUIT BREAKER.
2. Remove all parts from carton. Do not throw away any parts.
3. Remove screws (D) from canopy (C). Remove mounting plate (A)
from canopy (C).
4. Guide wires from “J BOX” through center hole in mounting plate (A).
5. Afx mounting plate (A) to “J BOX” using screws (B) provided.
6. Measure desired length of xture to hang.
7. Add/remove chain links (F) to reach desired drop. Once a desired drop
has been reached, guide wiring from housing (H) through chain links
(F). Guide wiring through center hole in loop (E) and canopy (C).
8. Connect hooks (J) (at the end of arms (I)) to loops (K) attached to the
top ring of the xture. See “BOX: A” for illustration.
9. Lift xture to “J BOX” and make proper electrical connections.
10. Connect the bare copper/silver wire from the xture to the ground
wire in outlet box. Connect the black wire of the xture (or smooth
side of the wire) to the black wire in the outlet box using wire nuts
(N). Connect the white wire of the xture (or rough side of the wire)
to the white wire in the outlet box using wire nuts (N).
11. Place canopy (C) over mounting plate (A). Align holes in canopy (C)
with threaded holes in mounting plate (A). Afx canopy (C) to
mounting plate (A) using screws (D).
12. Install four (4) 60W max. Type B11 medium base torpedo bulbs.
GLASS DROP INSTALLATION:
**It is recommended to use needle nose pliers (not included) when
install the small glass drops (L).**
**Recommended by the vendor to install the glass drops (L & M) on the
bottom ring rst and continue upwards to the top ring.**
1. Remove packaging from glass drops. NOTE: The xture is designed
to have alternating size glass drops (L & M) on each ring.
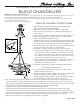
PENDANT ASSEMBLY INSTRUCTIONS
A
J-BOX
C
B
F
G
H
I
J
K
K
J
L
M
E
BOX: A
D
N
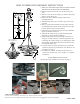
2. Start with a large glass drop (M). Notice the metal connection attached to each glass drop (L & M) has a large and
small side. Please see image at the bottom of page 2 for reference. Insert the larger connection side into a hole in the
ring. With your index nger guide the smaller connection side into the hole securing glass drop (M) to the ring. NOTE:
A small amount of adjustment maybe needed for each glass drop (L & M) to hang straight.
3. Needle nose pliers are recommended when installing small glass drops (L).
4. Locate the large and small connection side of the small glass drop (L). Firmly hold the vertical section (smaller
connection side) of the metal connection with the needle nose pliers (see images on page 2 for reference). Insert the
large connection side (same procedure as the large glass drop (M)) into the hole on the left side of installed large glass
drop (M). Using the pliers insert the small connection side into the hole securing glass drop (L) to the ring.
5. Repeat steps 2 and 4 for each ring until glass drops (L & M) are installed.
1