
Installation Guide

ASSEMBLY INSTRUCTIONS FOR YOUR
AXIOM PENDANT
3390
ASSEMBLY INSTRUCTIONS:
1. SHUT OFF THE MAIN ELECTRICAL SUPPLY AT FUSE BOX/ CIRCUIT BREAKER.
2. Remove all parts from carton. Do not throw away any parts.
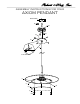
3. Remove mounting plate (B) from canopy (D) by removing canopy screws (E). Set canopy screws (E) aside.
4. Carefully pull the wiring from the ceiling outlet box. Thread the wires through the center hole in mounting plate (B).
5. Afx mounting plate (B) to ceiling outlet box with mounting screws (C) provided.
6. Measure the space where the xture will hang. Determine the desired drop of the xture based on this measurment.
7. Once the desired length is determined, lock the cords in place inside canopy (D). To do so, loosen screw (F) on wire
clamp (G). Guide cord through hole in canopy (D) and slide it to the position of desired drop. Pass cord through clamp
(G) and tighten screw (F) as shown in ILLUSTRATION A. If necessary, cut cord (H), leaving an additional 5 or 6
inches of length for wire connections.
8. Lift xture to ceiling outlet box and make proper electrical connections described in steps 9 - 11. A LICENSED
ELECTRICIAN IS RECOMMENDED.
9. Attach ground wire from xture (green or silver in color) to ground wire from outlet box. Fasten wires together with
wire nut (A) and tightly wrap connection with electrical tape.
10. Attach hot wire from xture (black in color or smooth side of wire) to hot wire from outlet box. Fasten wires together
with wire nut (A) and tightly wrap connection with electrical tape.
11. Attach neutral wire from xture (white in color or ribbed side of wire) to neutral wire from outlet box. Fasten wires
together with wire nut (A) and tightly wrap connection with electrical tape.
12. Carefully push wire connections back into ceiling outlet box.
13. Place canopy (D) over mounting plate (B). Thread canopy screws (E) into holes in canopy (D), and mounting plate (B)
to secure xture to ceiling.
14. Seperate glass diffuser (K) from housing (I) by removing screws (M) and plastic washers (L) from tabs (J). Set screws
(M) and plastic washers (L) aside.
15. Install three 35W Max. G9 Bi-pin 120V Halogen bulbs into sockets (N). Wrap the new bulbs with a soft cloth when
installing them. Do not touch bulb as oil from skin will reduce the performance of the bulb and can cause it to burn out
quickly.
16. Place glass diffuser (K) inside housing (I). Align diffuser (K) with tabs (J). If the holes in diffuser (K) and tabs (J) do
not line up correctly, then rotate diffuser (K) until the all holes line up properly.
17. Secure housing (I) and glass diffuser (K) together by threading screws (M) through plastic washer (L) and back into
tabs (J).
18. Reconnect main electrical supply from the fuse box/ circuit breaker and test the xture.
IMPORTANT SAFETY INSTRUCTIONS:
* These instructions are provided for your safety. It is very important that they are read completely before beginning the
installation of your xture.
* WE STRONGLY RECOMMEND INSTALLATION BY A LICENSED ELECTRICIAN.
* Turn off power at switch before replacing bulbs, making sure xture has had a sufcient time to cool down.