
User's Manual


8 • LMPL20
FEATURES
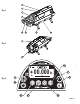
Fig. 1 & 2
1. Battery pack
2. Battery pack knob
3. LCD Display
4. Operating keys
5. Handle
6. External 12V Port
7. Interchangeable
legs
8. 5/8 -11 Tripod
mount
9. Laser centerline/
Plumb LED
10. Laser beam
window
OPERATION
Leveling
Place the LMPL20 so it is appears level on a flat surface, inside a pipe, on top of a pipe, secured to a 5/8”-11
mounting bracket, or to a 5/8”-11 surveyors tripod. Press and release the “A” button to turn the LMPL20 on. A
Startup Screen will initially appear on the LCD with manufacturer name and user information, if entered, for
approximately 3 second. If you press and hold the “A” button, the Startup Screen will remain on the LCD until
the button is released. The Main Screen will appear after the Startup Screen (Fig. 4 on Remote it is Fig. 16).
The Plumb LED turns on when the LMPL20 is turned on.
Allow the 60 seconds for the LMPL20 to self-level after entering the Main Screen. While the LMPL20 is leveling,
the laser will blink ON and OFF at a one second rate. Once the LMPL20 is level, the laser will turn on according
to the selected laser power mode. The LMPL20 will automatically re-level if it is moved from its level position.
The Level Bubble Icon on the main screen indicates when the cross-axis is level.
Note:The LMPL20 is remote capable with the RC20 remote.
Note: Signal Strength is only displayed after receiving signals from the LMPL20.
REMOTE: The Main Screen of the Remote Control works in the same manner as the Main Screen of the
LMPL20, and has the same features displayed with the exception of.
Signal Strength - Display’s the Signal Strength level of the Remote Control
Sleep Mode- Conserves battery power by turning the LCD and laser beam off. When sleep mode is
turned off the LCD will re-aluminate and Laser beam will become visible again with out losing
previous settings.
Note: Sleep Mode function is only available using the remote.
ICONS
Power key- Turn the instrument ON or OFF
(Remote: power button only powers on Remote and used to turn on
and off sleep mode)
Menu key- Press to show menu options.
Enter key- Press to set grade entries and to make selections from
menu screen.
Line control left and right- Press to position laser beam to left, right, or auto center.
Menu scroll key-
Used to scroll through menu options.
Grade up or down-
Press to position grade up or down, or auto zero grade
Menu scroll key-
Used to scroll through menu options.
Lock key- Press to prevent changes after setup.
A
B
C
D
E
F
Reference
in text
IMPORTANT
The owner/operator of the LMPL20 Pipe Laser is expected to follow all operation instructions, periodically
check the accuracy of the instrument, and make checks on line and grade as the work progresses. The
manufacturer, its distributors, or its agents assume no responsibility for improperly laid pipe.
m
SEL