Enjoy Listening ROBERTS 3 Band Mains Battery Portable Radio Please read this manual before use
Contents Contents ..............................................................................1 Controls ........................................................................... 2-3 Battery operation .................................................................4 Mains operation ...................................................................5 Operating your radio - FM ...................................................6 Operating your radio - Medium and Long wave ..................
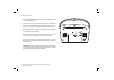
Controls (Top) 1 2 3 4 5 6 7 10 9 8 1. On/Off button 6. Tuning control 2. Power On indicator 7. Favourite station indicators 3. FM waveband button 8. Dial scale pointer 4. MW waveband button 5. LW waveband button 9. Tone control 10.
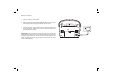
Controls (Rear) (Left) 11 14 13 11. Telescopic aerial 12. Mains input socket 13. Battery compartment 3 12 14.
Battery operation 1. Remove the battery cover on the back of the unit by sliding the cover in the direction of the arrow. 2. Insert four LR14 (C size) batteries into the spaces in the compartment. Take care to ensure all batteries are inserted with the correct polarity as shown next to the battery compartment. Replace the battery cover. 3. Reduced power, distortion and a ‘stuttering’ sound are all signs that the batteries may need replacing. 4.
Mains operation 1. Place your radio on a flat surface. 2. Plug the mains lead into the mains socket located on the rear of your radio ensuring that the plug is pushed fully into the socket. 3. Plug the other end of the mains lead into the wall socket and switch on the wall socket. Whenever the mains is used the batteries are automatically disconnected. IMPORTANT: The mains plug is used as the means of connecting the radio to the mains supply.
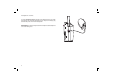
Operating your radio - FM 1. For FM reception fully extend the Telescopic aerial and then angle and rotate for best reception. 2 3 5 2. Switch on your radio by pressing the On/Off button. 3. Press the FM button to select the FM waveband. 4 4. Adjust the Volume control until a hissing sound is heard. 5. Rotate the Tuning control to select the desired station. On FM the tuning scale is marked in Megahertz (MHz). 8 6. Adjust the Volume control to the required setting. 7.
Operating your radio - Medium and Long wave 1. Switch on your radio by pressing the On/Off button. 1 2 4 2. Press either the MW or LW button to select the required waveband. 3. Adjust the Volume control until a hissing sound is heard. 3 4. Rotate the Tuning control to select the desired station. On MW and LW the tuning scale is marked in kilohertz (kHz). 5. For MW or LW reception rotate your radio to the position giving best reception. 6. Adjust the Volume control to the required setting. 5 7.
Favourite station markers Your radio is fitted with 3 favourite station markers which allow up to 3 stations to be quickly located. 2 1 1. Tune into the required station. 2. Position one of the markers so that it appears on top of the dial pointer. Whenever you wish to return to that station simply line up the dial pointer with the corresponding marker. 3. Repeat the above procedure for the 2 remaining favourite station markers.
Headphone socket A 3.5mm Headphone Socket located on the left hand side of your radio is provided for use with either headphones or an earpiece. Inserting a plug automatically mutes the internal loudspeaker. IMPORTANT: Excessive sound pressure from earphones and headphones can cause hearing loss.
General Do not allow this radio to be exposed to water, steam or sand. Do not leave your radio where excessive heat could cause damage such as in a parked car where the heat from the sun can build up even though the outside temperature may not seem too high. It is recommended that the FM band be used wherever possible as better results in terms of quality and freedom from interference will usually be obtained than on the MW or LW bands. The name plate is located underneath your radio.
Specifications Circuit Features Power Requirements Mains AC 230 volts, 50Hz Batteries 4 x LR14 (C size) Loudspeaker 92mm Headphone socket 3.5mm dia Output Power Battery powered - 640mW only Battery Life Up to 80 hours of listening for 4 hours a day at normal volume using alkaline cells. Mains powered - 1 Watt Aerial System Frequency Coverage FM FM MW Built-in Ferrite aerial LW Built-in Ferrite aerial 87.
Mains supply The Classic 997 will operate from a supply of AC 230 volts, only. 50Hz The wire coloured BLUE must be connected to the terminal marked N or coloured BLACK. DO NOT cut off the mains plug from this equipment. If the plug fitted is not suitable for the power points in your home or the cable is too short to reach a power point, then obtain an appropriate safety approved extension lead or adaptor. If in doubt consult your dealer.
Notes ........................................................................................................................................................................................... ........................................................................................................................................................................................... ..................................................................................................................................
Guarantee This instrument is guaranteed for twelve months from the date of delivery to the original owner against failure due to faulty workmanship or component breakdown, subject to the procedure stated below. Should any component or part fail during this guarantee period it will be repaired or replaced free of charge. The guarantee does not cover: 1. Damage resulting from incorrect use. 2. Consequential damage. 3. Receivers with removed or defaced serial numbers. N.B.
ROBERTS RADIO TECHNICAL SERVICES 97-99 Worton Road Isleworth Middlesex TW7 6EG Technical Helpline :- 020 8758 0338 (Mon-Fri during office hours) Web site: http://www.robertsradio.co.