ROBERTS Système audio DAB/DAB+/FM/CD/SD/USB/Bluetooth Veuillez lire ce manuel avant utilisation
Table des matières Introduction...................................................................................... 2-9 Caractéristiques du système audio Blutune 200 .............................. 3 Commandes et branchements....................................................... 4-5 Télécommande .............................................................................. 6-7 Affichage des symboles .................................................................... 8 Accès au menu système...............
Introduction À propos de ce guide d'utilisation Ce guide d'utilisation est divisé en sections relatives aux différents modes de fonctionnement de votre système audio numérique Roberts Blutune 200. L'introduction décrit les caractéristiques et les touches de commande de l'appareil. Introduction (page 2) Radio DAB (page 10) Radio FM (page 17) Les deux sections Radio DAB et Radio FM décrivent comment utiliser le système audio pour écouter la radio.
Caractéristiques du système audio Blutune 200 Le Système audio Roberts Blutune 200 offre l'ensemble de fonctions suivantes dans un appareil compact et attrayant : ● Réception d'émissions radio DAB et FM (avec RDS). ● Affichage de l'heure et la date en mode veille. ● 20 stations radio préréglées (10 DAB et 10 FM). ● ● Diffusion Bluetooth pour lire des fichiers audio ou des fichiers vidéo directement à partir de votre smartphone, tablette ou appareils similaires.
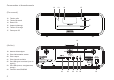
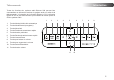
Introduction Commandes et branchements 8 (Haut) 7 9 10 6 5 4 11 3 2 1 1. Touche Lecture/Pause 5. Touche Select/Preset/Arrêt 9. 2. Touche dossier suivant 6. Touche Menu/Info 10. Touche Éjecter le CD 3. Touche Mode/Record (enregistrer) 7. Bouton Allumer/Veille/Volume 8. Antenne télescopique 11. Touche Recherche arrière/avance rapide 4.
Commandes et branchements 12 13 14 15 (Face avant) 12. Témoin veille CD 13. Témoin Bluetooth 16 14. Écran LCD 15. Capteur infrarouge 17 16. Témoin CD chargé 17. Fente pour CD 18 (Arrière) 18. Antenne télescopique 19. Prise d'alimentation secteur 20. Prise casque 21. Prise d'entrée auxiliaire 22. Port USB (pour les mises à jour du logiciel) DAB/DAB+ ( Band III ) : 5A - 13F 23. Port USB (lecture, enregistrement, charge) 24.
Introduction Télécommande Toutes les fonctions du système audio Blutune 200 peuvent être commandées en utilisant les touches du système audio ou celles de la télécommande, à l'exception de la fonction Éjecter le CD. La fonction Éjecter le CD ne peut être contrôlée qu'en utilisant la touche Éjecter le CD du système audio. 1 1. Touche Marche/Veille/veille automatique 2. Touche Mode/Record (enregistrer) 3. Touche Menu/Info 4. Touche Recherche avant/retour rapide 5. Touche dossier précédent 6.
Remplacement des piles de la télécommande Retirez le couvercle du compartiment à pile situé à l'arrière de la télécommande en appuyant sur le cliquet dans la direction indiquée par la flèche tout en soulevant le couvercle. 2. Retirez la pile du compartiment à pile en appuyant sur son coin inférieur droit pour la dégager de son emplacement. (Voir illustration) La pile peut à présent être retirée. 3.
Introduction Affichage des symboles A. Indicateur veille automatique I. B. Indicateurs alarme 1 et 2 J. Indicateur entrée auxiliaire C. Indicateur rappel d'alarme K. Témoin indiquant la répétition d'un seul morceau D. Indicateur de la force du signal radio D Indicateur Stéréo E. Chiffres de l'heure L. Témoin indiquant la répétition de tous les morceaux F. Témoin Bluetooth M. Témoin indiquant la répétition G. Indicateur DAB N. Indicateur Répéter le dossier H. Indicateur FM O.
Utilisation du système audio pour la première fois 1. Placez votre système audio sur une surface plane. 2. Déployez complètement l'antenne télescopique. L'antenne doit être entièrement déployée et positionnée verticalement pour une réception optimale. 3. Branchez le cordon d'alimentation dans la prise secteur située à l'arrière du système audio en veillant à ce que la fiche soit bien enfoncée dans la prise. 4.
Radio DAB Utilisation du système audio - DAB 1. Déployez complètement l'antenne télescopique. 2. Si le système audio est en veille, appuyez brièvement sur la touche Marche/Veille pour l'allumer. 3. Appuyez brièvement sur la touche Mode jusqu'à ce que le mode DAB soit sélectionné. L'écran affichera « DAB » pendant quelques secondes. 4.
Sélection d'une station - DAB 1. Lorsque l'appareil est en mode DAB, normalement le nom de la station sera affiché sur la ligne supérieure de l'écran. 2. Appuyez plusieurs fois sur les touches Recherche avant ou Recherche arrière pour faire défiler la liste des stations disponibles sur la ligne inférieure de l'écran. Relâchez la touche Recherche dès que vous tombez sur la station souhaitée.
Radio DAB Options d'affichage - DAB Lorsque la radio est en mode DAB, elle dispose de plusieurs options d'affichage. 1. Appuyez brièvement sur la touche Info pour parcourir les différentes options. a. Texte déroulant Pour afficher des messages déroulants, tels que le nom de l'artiste/du morceau, le numéro d'appel, etc. b. Type de programme Pour afficher le type de station que vous écoutez, par exemple pop, classique, infos, etc. c.
Options d'affichage – DAB (suite) f. Débit binaire et type audio Affiche le débit binaire numérique et le type audio de la station de radio DAB. g. Force du signal Affiche la force du signal de la station actuellement diffusée. Le rectangle vide indique la force de signal minimum requise pour une réception DAB claire. f BBC Radio 4 128kbps / Mono g BBC Radio 4 Recherche de nouvelles stations - DAB Au fil du temps, de nouvelles stations peuvent devenir disponibles.
Radio DAB Réglage manuel - DAB La recherche manuelle permet de rechercher une fréquence DAB dans la Bande III. Les stations détectées sont ajoutées à la liste des stations radio. Cette fonction peut également être utilisée pour aider au positionnement de l'antenne ou le système audio à optimiser la réception pour une chaîne ou fréquence spécifique. 1. Maintenez appuyée la touche Menu. « DAB Menu » apparaîtra sur l'écran. 2. Appuyez brièvement sur la touche Select pour accéder au menu DAB. 3.
Réglage du DRC (Dynamic Range Control) – DAB La fonction Contrôle de la gamme dynamique (connue sous le nom DRC) permet l'écoute de sons calmes dans un environnement bruyant. Il y a trois niveaux de compression : DRC Off DRC High DRC Low - Aucune compression n'est appliquée. (Option sélectionnée par défaut) - Une compression maximale est appliquée. - Une compression moyenne est appliquée. 1. Appuyez brièvement sur la touche Marche/Veille pour allumer le système audio.
Radio DAB Classement des stations - DAB Le système audio offre 2 options de classement des stations. Il s'agit d'un classement alphanumérique et par ensemble. Remarque : Le classement par défaut est alphanumérique. 1. Appuyez brièvement sur la touche Marche/Veille pour allumer le système audio. Appuyez brièvement sur la touche Mode jusqu'à ce que le mode DAB soit sélectionné. 2. Maintenez appuyée la touche Menu. « DAB Menu » apparaîtra sur l'écran.
Utilisation de votre système audio - Recherche des stations FM 1. Déployez complètement l'antenne télescopique. L'antenne doit être entièrement déployée et positionnée verticalement pour une réception optimale. FM 2,10 2. Appuyez brièvement sur la touche Marche/Veille pour allumer le système audio. 3. Appuyez brièvement sur la touche Mode jusqu'à ce que la bande FM soit sélectionnée.
Radio FM Réglage manuel - FM 1. Déployez complètement l'antenne télescopique. L'antenne doit être entièrement déployée et positionnée verticalement pour une réception optimale. 2. Appuyez brièvement sur la touche Marche/Veille pour allumer le système audio. 3. Appuyez brièvement sur la touche Mode jusqu'à ce que la bande FM soit sélectionnée. 4. FM 2,7 3 89.30MHz Appuyez sur les touches Recherche avant ou Recherche arrière pour choisir une station radio.
Options d'affichage - FM Le système audio offre plusieurs options d'affichage en mode FM : Le RDS est un système par lequel des informations numériques inaudibles sont transmises en plus du programme radio FM normal. Le RDS offre plusieurs fonctionnalités utiles. Les options suivantes sont disponibles sur votre système audio. 1. BBC R2 The latest news b BBC R2 Talk c BBC R2 MON 10 MAR 2014 d BBC R2 BBC R2 1 Appuyez brièvement sur la touche Info pour parcourir les différents modes. a.
Radio FM Réglage stéréo/mono - FM Votre système audio réceptionne les émissions FM stéréo à condition que les signaux reçus soient suffisamment forts. Cependant, si un signal stéréo s'affaiblit, le signal audio s'affaiblit également. Il peut être préférable de mettre la radio en mode mono afin de réduire le niveau de sifflement d'arrière-plan. 1. Appuyez brièvement sur la touche Marche/Veille pour allumer le système audio. 2.
Paramétrage de la sensibilité de la recherche - FM Votre système audio recherche normalement les émissions FM qui sont suffisamment fortes pour offrir une bonne réception. Cependant, vous voulez peut-être sélectionner également les signaux plus faibles émis par des émetteurs radio plus éloignés. Votre radio comprend une option locale/distante pour la fonction Recherche automatique. 1. Appuyez brièvement sur la touche Marche/Veille pour allumer le système audio. 2.
Radio FM Préréglages des stations - DAB et FM Il est possible de présélectionner vos stations radio DAB et FM dans les positions mémoire disponibles. 20 positions de présélection sont disponibles, 10 pour la bande de fréquences radio DAB et 10 pour la bande de fréquences radio FM. Vos présélections sont conservées en cas de panne de courant.
Rappel de stations présélectionnées 1. Appuyez brièvement sur la touche Marche/Veille pour allumer le système audio. 2. Appuyez brièvement sur la touche Mode pour sélectionner la bande de fréquences DAB ou FM. 3. Appuyez brièvement sur la touche Preset. L'écran affiche par exemple, « 1: (Empty) » si aucune station n'est mémorisée dans cette position de préréglage. Si une station a été présélectionnée, l'écran affiche son nom (pour les stations radio DAB) ou sa fréquence (pour les stations radio FM).
Radio FM Langue - DAB et FM Si nécessaire on peut choisir une autre langue pour les fonctions radio du système audio. 1. Appuyez brièvement sur la touche Marche/Veille pour allumer le système audio. 2. Si nécessaire appuyez sur la touche Mode pour sélectionner la bande DAB ou FM. 3. Maintenez appuyée la touche Menu. « DAB Menu » ou « FM Menu » apparaîtra à l'écran. Appuyez brièvement sur la touche Select pour accéder au menu. 4.
Mode Bluetooth Le mode Bluetooth de votre système audio vous permet de lire des fichiers audio, lire l'audio à partir de fichiers vidéo et diffuser de la musique via le haut-parleur de votre système audio à partir d'appareils compatibles Bluetooth tels que téléphone portable, ordinateur, tablette, etc. ● Lorsqu'un appareil compatible Bluetooth tel que votre système audio Blutune 200 est dans un état « détectable » d'autres appareils Bluetooth peuvent le détecter, se coupler ou se connecter avec.
Bluetooth Connexion d'appareils Bluetooth 1. Assurez-vous que la fonction Bluetooth de votre téléphone, tablette ou PC est activée. Vous devez vous reporter au guide d'utilisation de votre appareil, car la méthode varie avec chaque appareil. 2. Appuyez brièvement sur la touche Marche/Veille pour allumer le système audio. 3. Appuyez plusieurs fois sur la touche Mode de votre système audio jusqu'à ce que le mode Bluetooth soit sélectionné.
Lecture de fichiers audio en mode Bluetooth Une fois que vous avez réussi à connecter votre système audio au dispositif audio choisi, vous pourrez commencer à écouter votre musique en utilisant les boutons de celui-ci. 1. Une fois que la lecture a commencé, réglez le niveau de volume souhaité à l'aide des touches de Volume de votre système audio ou de l'appareil Bluetooth connecté. 2.
Bluetooth Connexion et reconnexion d'un appareil Bluetooth Vous ne pouvez avoir qu'un seul appareil Bluetooth connecté au système audio à la fois, même s'il peut être couplé avec plusieurs. Si un appareil compatible Bluetooth est connecté à votre système audio, il ne peut pas être interrompu par un autre appareil Bluetooth, sauf si vous choisissez de forcer la déconnexion. 1. La radio affiche alors la liste des appareils précédemment connectés.
Disques compacts N'utilisez que des CD audio numériques portant le sigle . Disques CD-R/CD-RW N'utilisez que des CD de taille normale (12 cm de diamètre) avec ce système audio. Les mini CD (8cm de diamètre) ne sont pas compatibles avec le lecteur et peuvent bloquer le mécanisme du lecteur CD. Le système audio Blutune 200 peut lire les CD audio, CD-R et CD-RW qui ont été finalisés * après une opération de gravure.
CD/MP3/WMA Insertion d'un CD Assurez-vous que le lecteur CD est vide avant d'insérer un CD. Si un CD se trouve dans le lecteur, le témoin « CD chargé » sera allumé. Si vous ne n'arrivez pas à insérer un CD, appuyez sur la touche Éjecter le CD pour retirer le CD du lecteur. 1. Appuyez brièvement sur la touche Marche/Veille pour allumer le système audio. 2. Pour sélectionner le mode CD appuyez sur la touche Mode jusqu'à ce que « CD » s'affiche sur la ligne supérieure de l'écran. 3.
5. Si vous mettez l'appareil en veille, la prochaine fois que l'appareil est allumé, il retourne à la piste précédemment lue. Éjection d'un CD 1. Pour retirer le CD, appuyez brièvement sur la touche Éjecter le CD. L'écran affiche « EJECT ». Afin de protéger le CD dans le cas où il n'a pas été retiré, l'appareil le rechargera au bout de 10 secondes, puis passera en veille. 2. Dans le cas où l'éjection du CD ne fonctionnerait pas, maintenez appuyé la touche Éjecter le CD.
CD/MP3/WMA Répétition de morceaux 1. Lors de lecture de CD, maintenez appuyée la touche Menu. 2. Appuyez sur la touche Recherche avant ou Recherche arrière jusqu'à ce que « Repeat » apparaisse à l'écran. Appuyez sur la touche Select our accéder au menu options de répétition. 3. Appuyez sur la touche Recherche avant ou Recherche arrière jusqu'à ce que l'option de répétition souhaitée s'affiche à l'écran, puis appuyez sur la touche Select pour confirmer votre choix.
Lecture dans un ordre aléatoire 1. Lors de lecture de CD, maintenez appuyée la touche Menu. 2. Appuyez sur la touche Recherche avant ou Recherche arrière jusqu'à ce que « Shuffle » apparaisse à l'écran. Appuyez sur la touche Select pour accéder au menu options de la lecture aléatoire. 3. Appuyez sur la touche Recherche avant ou Recherche arrière jusqu'à ce que l'option de lecture aléatoire souhaitée s'affiche à l'écran, puis appuyez sur la touche Select pour confirmer votre choix.
CD/MP3/WMA Mode CD MP3/WMA Le système audio Blutune 200 peut lire des CD-R et CD-RW contenant des fichiers MP3 et WMA. Dans cette section, on suppose que le fichier est équivalent à une piste de CD. Un CD MP3/WMA ne peut pas contenir plus de 511 fichiers et plus de 99 dossiers. Les fichiers MP3 et WMA doivent être créés avec un taux d'échantillonnage audio de 44,1 kHz (ceci est normal pour les fichiers créés à partir de CD audio).
Lecture d'un CD MP3/WMA 1. Appuyez sur la touche Lecture/Pause pour démarrer la lecture du CD. L'écran affichera le premier dossier et le nombre de fichiers « 01 » et « 001 ». 2. Appuyez sur la touche Lecture/Pause pour suspendre la lecture. Appuyez sur la touche Lecture/Pause pour reprendre la lecture. Title:Lazing on 02 001 01:44 1,2 Si vous mettez l'appareil en veille, la prochaine fois que l'appareil est allumé, il retourne au fichier précédemment lu. 3.
CD/MP3/WMA Fonction Recherche 1. En cours de lecture de CD MP3/WMA, maintenez appuyée la touche Avance rapide ou Retour rapide. Relâchez les touches lorsque vous avez atteint la partie que vous souhaitez sur le fichier. 1 1 >> 02 001 01:44 Pour aller à un autre dossier 1. Avec le CD MP3/WMA à l'arrêt ou en lecture, appuyez brièvement sur la touche Dossier précédent ou Dossier suivant. Le premier fichier du dossier du suivant ou précédent sera lu.
Utilisation des cartes SD et clés USB Cette section explique comment utiliser votre système audio pour accéder et lire vos fichiers audio contenus dans des clés USB et cartes Secure Digital (SD, SDHC). Blutune 200 peut également enregistrer des fichiers au format MP3 sur cartes SD, SDHC ou clés USB. Important : Votre système audio n'est compatible qu'avec les clés USB à mémoire flash. Il n'est pas conçu pour être connecté à un disque dur ou à tout autre type de périphérique USB.
SD/USB Lecture de fichiers MP3/WMA à partir de SD/USB 1. Appuyez sur la touche Lecture/Pause pour commencer la lecture à partir de la carte SD/clé USB. L'écran affichera le premier dossier et le nombre de fichiers – « 01 » et « 001 ». 2. Appuyez sur la touche Lecture/Pause pour suspendre la lecture. Appuyez sur la touche Lecture/Pause pour reprendre la lecture. 3. Appuyez sur la touche Arrêt pour arrêter la lecture.
Fonction Recherche 1. En cours de lecture à partir de carte SD/clé USB, maintenez appuyée la touche Avance rapide ou Retour rapide. Relâchez les touches lorsque vous avez atteint la partie que vous souhaitez sur le fichier. 1 1 Pour aller à un autre dossier 1. Que la lecture à partir de carte SD/clé USB soit en cours ou arrêtée, appuyez brièvement sur la touche Dossier précédent ou Dossier suivant. Le premier fichier du dossier suivant ou précédent sur la mémoire sera lu.
SD/USB Enregistrer sur une carte SD/clé USB Votre système audio Blutune 200 permet de faire des enregistrements sur cartes SD/SDHC ou clés USB. Les enregistrements sont effectués au format MP3 à 128k bits par seconde. Blutune 200 ne supporte que les cares SD/SDHC et clés USB utilisant le système de fichiers FAT ou FAT32. De tels supports sont généralement vendus déjà formatés et peuvent l'être via un PC muni d'un lecteur de cartes approprié (pour les cartes SD/SDHC) ou un port USB (pour les clés USB).
Contrôler un enregistrement AUX L'enregistrement à partir d'un CD commence par le début de la piste en cours de lecture. Chaque piste du CD sera enregistrée dans un fichier à part sur le support. 4. 4 AUX IN Record ending... Maintenez appuyée la touche Record pour arrêter l'enregistrement. L'enregistrement s'arrête et un fichier est créé sur le support de stockage. Les fichiers qui sont créés sur le support sont contenus dans un dossier appelé « RECORD ».
SD/USB Enregistrement de fichiers MP3/WMA à partir de CD/ SD/USB En plus de l'enregistrement à partir de sources conventionnelles, le système Blutune 200 peut également enregistrer à partir de fichiers MP3 ou WMA à partir d'un support CD, SD ou USB. Dans ce cas, les fichiers sont copiés plutôt que codés au format MP3 afin d'éviter une détérioration de la qualité. Vous pouvez copier des fichiers depuis un CD ou SD vers USB et à partir de CD ou USB vers SD. 1 SD 1.
Suppression et formatage SD Après avoir enregistré des fichiers sur un support SD ou USB, vous pouvez toujours les supprimer pour récupérer l'espace. Blutune 200 peut supprimer des fichiers individuels, ou tous les fichiers sur une carte. < Delete/Format > 1 SD Suppression d'un fichier La fonction suppression d'un fichier permet de supprimer le fichier en cours de lecture (ou en pause). 1.
SD/USB Suppression de tous les fichiers 1. Avec le système audio en mode USB ou SD, un support inséré, maintenez appuyée la touche Menu. 2. Appuyez sur la touche Recherche avant ou Recherche arrière jusqu'à ce que « Delete/Format » s'affiche à l'écran. 3. Appuyez sur la touche Select pour accéder au menu « Delete/Format ». L'écran affiche « Delete » comme option par défaut. 4. Appuyez sur la touche Recherche avant ou Recherche arrière jusqu'à ce « Format » soit affiché. 5.
Alarmes Le système audio dispose de deux alarmes qui peuvent être réglées pour vous réveiller sur une station radio DAB/FM, CD, USB, carte SD ou sur la sonnerie. Les alarmes peuvent être réglées lorsque l'appareil est en mode veille ou en lecture. 1 < Set alarm > < Alarm 1 > < Alarm 1 Setting > Remarque : Si aucune touche n'est appuyée pendant quelques secondes, le système audio quitte le réglage d'alarme.
7. Appuyez sur la touche Recherche avant ou Recherche arrière pour choisir l'heure de l'alarme, puis appuyez brièvement sur la touche Select pour accéder au réglage de l'heure. Les chiffres des minutes d'alarme se mettent à clignoter sur l'écran. 8. Appuyez sur la touche Recherche avant ou Recherche arrière pour choisir les minutes de l'alarme, puis appuyez brièvement sur la touche Select pour accéder au réglage des minutes. « Alarme: Mode » s'affichera sur la ligne supérieure de l'écran. 9.
13. Appuyez sur la touche Recherche avant ou Recherche arrière pour sélectionner le volume de l'alarme. 14. Appuyez brièvement sur la touche Select pour confirmer votre choix. Le système audio quitte le menu alarme. Les alarmes actives sont indiquées à l'écran par le symbole numéro d'alarme correspondant. et le 13 13 < Alarm 1: Vol 12 Lorsque l'alarme se déclenche L'alarme se déclenche aux heures sélectionnées pendant 60 minutes au maximum sauf si elle est annulée.
Horloge et alarmes Fonction Rappel d'alarme 1. 2. Lorsque l'alarme se déclenche, en appuyant sur une touche quelconque autre que les touches « Marche/Veille » ou « Volume » l'alarme reste coupée pendant 5 minutes. Le symbole de rappel d'alarme( Z Z Z ) se met à clignoter. Cette séquence peut être répétée pendant la période d'alarme de 60 minutes. 2 Appuyez sur la touche Marche/Veille pour annuler la fonction Rappel d'alarme. Visualisation des réglages de l'alarme 1.
Fonction veille automatique Votre système audio peut être arrêté automatiquement après un certain délai. Ce délai peut être choisi entre 15 et 120 minutes. Veillez à ce que votre système audio soit allumé. 1. Lorsque votre système audio est allumé, maintenez appuyée la touche Sleep. « Sleep time » s'affiche à l'écran. 2. Appuyez sur la touche Recherche avant ou Recherche arrière pour choisir le délai de veille automatique. Les options sont 15, 30, 60, 90 et 120 minutes.
Horloge et alarmes Réglage manuel de l'heure Normalement, votre système audio règle automatiquement l'heure à l'aide du signal radio DAB. Si aucun signal DAB n'est disponible et que vous devez régler l'heure manuellement, suivez la procédure décrite ci-après. L'heure peut être réglée alors que l'unité est en mode veille ou lecture. 1. Maintenez appuyée la touche Menu pour régler l'heure. 2. Appuyez sur la touche Recherche avant ou Recherche arrière jusqu'à ce que « Set clock » apparaisse à l'écran.
9. Appuyez sur la touche Recherche avant ou Recherche arrière pour sélectionner l'année. 10. Appuyez brièvement sur la touche Select pour accéder au réglage de l'année. Le mois clignote sur l'écran. 9-13 9-13 Set month < 10 MAR 2014 > Set date < 10 MAR 2014 > < Set clock > < Set clock Auto > 11. Appuyez sur la touche Recherche avant ou Recherche arrière pour sélectionner le mois. 12. Appuyez brièvement sur la touche Select pour accéder au réglage du mois. Le jour clignote à l'écran.
Audio et configuration Égaliseur Le son de votre Blutune 200 peut être réglé selon votre goût. Le système audio offre six options d'égalisation prédéfinies. Vous pouvez également régler les niveaux des aigus et des basses selon vos propres préférences. 1. Appuyez brièvement sur la touche Marche/Veille pour allumer le système audio. 2. Maintenez appuyée la touche Menu. 3. Appuyez sur la touche Recherche avant ou Recherche arrière jusqu'à ce que « Set Equalizer » apparaisse à l'écran. 4.
Contrôle des aigus 1. Suivez les étapes 1-4 de la page précédente pour accéder au menu Réglage de l'égaliseur. 2. Appuyez sur la touche Recherche avant ou Recherche arrière pour parcourir les différentes options jusqu'à ce que l'option « Treble » s'affiche. 3. Appuyez brièvement sur la touche Select. Le réglage actuel des aigus s'affiche. 4. Appuyez sur la touche Recherche avant ou Recherche arrière jusqu'à ce que le niveau souhaité s'affiche. 5.
Audio et configuration Couper le son Lors de lecture en mode radio DAB/FM ou entrée auxiliaire, on peut couper le son à l'aide de la touche Lecture/Pause. En appuyant sur la touche Lecture/Pause, le son sera coupé au niveau des haut-parleurs. 1. Appuyez brièvement sur la touche Lecture/Pause pour couper le son. Le symbole volume du haut-parleur disparaît de l'écran. 2. Appuyez brièvement à nouveau sur la touche Lecture/Pause ou sur l'une des touches Volume pour rétablir le son.
Prise d'entrée auxiliaire Une Prise d'entrée auxiliaire stéréo 3,5 mm est disponible à l'arrière du système audio pour permettre à un signal audio d'alimenter l'appareil à partir d'un dispositif audio externe tel qu'iPod, lecteur MP3/CD. 1. Appuyez brièvement sur la touche Mode jusqu'à ce que « AUX IN » s'affiche. 2. Connectez une source audio externe (par exemple, iPod, lecteur MP3/CD) à la prise d'entrée auxiliaire. 3.
Audio et configuration Rétroéclairage du mode veille La luminosité de l'écran lorsque l'appareil est en veille peut être réglée. Si vous utilisez l'appareil dans une chambre, un niveau de luminosité de veille plus faible est peut-être préférable au réglage standard. Le niveau de luminosité peut être réglé lorsque l'appareil est en veille ou en cours de lecture. 1. Maintenez appuyée la touche Menu. 2.
Réinitialisation du système Si votre système audio ne fonctionne pas correctement, ou certains caractères ne s'affichent pas lisiblement ou pas du tout, effectuer la procédure suivante. 1. Maintenez appuyée la touche Menu. 2. Appuyez sur la touche Recherche avant ou Recherche arrière jusqu'à ce que « System reset » s'affiche à l'écran. 3. Appuyez brièvement sur la touche Select. L'écran affiche « Press SELECT to reset ». 4.
Audio et configuration Afficher la version du logiciel Le système audio peut afficher les numéros de version des différents composants logiciels qui lui permettent de fonctionner. Ces informations sont fournies à titre de référence dans le cas où elles seraient nécessaires pour la réparation ou le service à la clientèle. Blutune200 V0.21 < MCU SW Version > Pour afficher la version du logiciel du système... 1. Maintenez appuyée la touche Menu. 2.
Détacher l'antenne L'antenne télescopique installée est adaptée à la plupart des applications. L'antenne télescopique peut être retirée et remplacée par une antenne filaire fournie pour pouvoir se connecter à une antenne externe au moyen d'un câble coaxial. Enlevez d'abord les deux petites vis qui maintiennent le couvercle du connecteur d'antenne en utilisant un petit tournevis cruciforme.
Informations Avertissements N'exposez pas le système audio à l'eau, la vapeur ou la poussière. Ne laissez pas votre système audio sous la chaleur excessive pour éviter les dégâts. ● Il est recommandé d'utiliser la bande DAB quand c'est possible car elle offre une meilleure qualité et une absence d'interférence contrairement à l'usage de la bande FM. ● ● La plaque signalétique se trouve à l'arrière du système audio.
Remarques ...................................................................................................................................................................................................... ...................................................................................................................................................................................................... ........................................................................................................
Garantie Informations Cet appareil est garanti pendant douze mois à compter de la date d'achat au propriétaire d'origine contre toute défaillance de main d'œuvre et vices de matériaux, objet de la procédure citée ci-dessous. Si un composant ou une pièce faisait défaut pendant cette période de garantie, il/elle sera réparé(e) ou remplacé(e) gratuitement. La garantie ne couvre pas : 1. Dommages résultant d'une utilisation incorrecte. 2. Dommages directs. 3.
Website : http://www.robertsradio.