ROBERTS DAB/DAB+/UKW/CD/SD/USB/Bluetooth-Soundsystem Bitte lesen Sie diese Bedienungsanleitung vor Inbetriebnahme
Inhalt Einführung ....................................................................................... 2-9 Funktionen des Blutune 200 Soundsystems .................................... 3 Bedienelemente und Anschlüsse .................................................. 4-5 Fernbedienung............................................................................... 6-7 Symbole im Display .......................................................................... 8 Menüsystem aufrufen .........................
Einführung Über dieses Benutzerhandbuch Dieses Handbuch ist nach den Betriebsmodi Ihres Roberts Blutune 200 Digital-Soundsystems unterteilt. Die Einleitung beschreibt die Funktionen und Steuerungen des Produkts. Einführung (Seite 2) Sieben Kapitel decken die Hauptabschnitte im Detail ab - DAB-Radio, UKWRadio, Bluetooth, CD-/MP3-/WMA-Wiedergabe, SD-Karte/USB-Geräte, Uhr und Alarm sowie Audio und Einstellungen.
Funktionen des Blutune 200 Soundsystems Das Roberts Blutune 200 Soundsystem bietet die folgenden Schlüsselmerkmale in einem attraktiven Kompaktgerät: ● Radio für DAB- und UKW- (mit RDS) Empfang. ● Uhranzeige mit Uhrzeit und Datum im Stand-by-Modus. ● 20 Senderspeicher (10 für DAB und 10 für UKW). ● ● Bluetooth-Streaming zur Wiedergabe Ihrer Musik oder VideoSoundtracks von Ihrem Smartphone, Tablet oder ähnlichem Gerät.
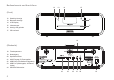
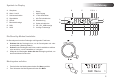
Einführung Bedienelemente und Anschlüsse (Draufsicht) 8 7 9 10 6 5 4 11 3 2 1 1. Wiedergabe/Pause 5. Auswahl/Senderspeicher/Stopp 9. 2. Ordner abwärts 6. Info/Menü 10. CD ausgeben Ordner aufwärts 3. Modus/Aufnahme 7. Ein/Stand-by-Modus/Lautstärke 11. Senderwahl aufwärts/Schneller Vorlauf 4. Senderwahl abwärts/Rücklauf 8.
Bedienelemente und Anschlüsse 12 13 14 15 (Front) 12. Stand-by-Anzeige CD 13. Bluetooth-Anzeige 16 14. LCD-Display 15. Infrarotsensor 17 16. Anzeige CD geladen 17. CD-Laufwerk 18 (Rückseite) 18. Teleskopantenne 19. Netzeingang 20. Kopfhörerbuchse 21. AUX-Eingang für Zusatzgeräte 22. USB-Port (nur für Software-Upgrades) DAB/DAB+ ( Band III ) : 5A - 13F 23. USB-Port (Wiedergabe, Aufnahme, Laden) 24.
Einführung Fernbedienung Alle Funktionen des Blutune 200 Soundsystems können entweder mit den Tasten auf dem Soundsystem oder auf der Fernbedienung gesteuert werden, mit Ausnahme der CD-Ausgabe. Die CD-Ausgabe kann nur mit der Taste CD ausgeben auf dem Soundsystem gesteuert werden. 1 1. Ein/Stand-by-Modus/Sleep 2. Modus/Aufnahme 3. Info/Menü 4. Senderwahl abwärts/Rücklauf 5. Ordner aufwärts 6. Senderwahl aufwärts/Schneller Vorlauf 7. Wiedergabe/Pause 8. Lautstärke - 9.
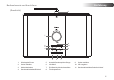
Batteriewechsel der Fernbedienung Öffnen Sie das Batteriefach auf der Rückseite Ihrer Fernbedienung in Pfeilrichtung. 2. Nehmen Sie die Batterie aus dem Batteriefach, drücken Sie die Batterie unten rechts andrücken, womit sie aus ihrer Halterung gelöst wird (siehe Abbildung). Die Batterie kann nun herausgenommen werden. 3. Ersetzen Sie die Batterie (CR2032 oder gleichwertig) und achten Sie darauf, dass der Pluspol der Batterie nach oben zeigt.
Einführung Symbole im Display A. Sleeptimer I. B. Alarm 1 und 2 J. AUX-Eingang C. Schlummerfunktion K. 1 Titel wiederholen D. Signalstärke L. Alle Titel wiederholen E. Uhrzeit M. Wiederholung D Stereo F. Bluetooth-Anzeige N. Ordner wiederholen G. DAB O. CD-, SD-, USB-Anzeige H. UKW P. 2-zeilige Textanzeige Ein/Stand-by-Modus/Lautstärke C ZZ FG H I E Z SD USB AUX 1 B P A J K O N M L Ihr Soundsystem hat einen Drehregler mit folgenden Funktionen. 1.
Erstbenutzung des Soundsystems 1. Stellen Sie Ihr Soundsystem eben auf. 2. Ziehen Sie die Teleskopantenne vollständig aus. Die Antenne muss für besten Empfang vollständig ausgezogen und in senkrechter Stellung sein. 3. Schließen Sie das Netzkabel am Netzeingang auf der Rückseite Ihres Soundsystems an, der Stecker muss vollständig in der Buchse stecken. 4. Stecken Sie den Netzstecker in die Steckdose.
DAB-Radio Soundsystem - DAB 1. Ziehen Sie die Teleskopantenne vollständig aus. 2. Befindet sich Ihr Soundsystem im Stand-by-Modus, so drücken Sie Ein/Stand-by-Modus zum Einschalten. 3. Drücken Sie Mode zur Auswahl des DAB-Modus. Im Display wird für einige Sekunden „DAB“ angezeigt. 4. Ist dies das erste Mal, dass Sie Ihr Soundsystem benutzen, so erfolgt ein schneller Scan der Band III DAB-Kanäle (abhängig davon, ob der Scan bereits im Stand-by-Modus beendet wurde).
Sendereinstellung - DAB 1. Im DAB-Modus wird auf der oberen Zeile der Textanzeige gewöhnlich der aktuelle Sendername angezeigt. 2. Drücken Sie mehrmals Senderwahl aufwärts oder abwärts, um durch die Liste verfügbarer Sender zu scrollen, die auf der unteren Zeile angezeigt werden. Drücken Sie die Senderwahltasten nicht weiter, wenn Sie einen gewünschten Sender gefunden haben. Drücken Sie weiterhin eine der Senderwahltasten, so scrollt das Gerät schnell durch die Liste verfügbarer Sender. 3.
DAB-Radio Anzeigeoptionen - DAB Im DAB-Modus hat Ihr Radio eine Reihe von Anzeigeoptionen. 1. Drücken Sie Info zum Durchlaufen der verschiedenen Optionen. a. Lauftext b. Programmtyp Anzeige von Lauftexten wie zum Beispiel Interpret/Titel, Telefonnummer, usw. Anzeige des jeweiligen Sendertyps, z.B. Pop, Klassik, Nachrichten, usw. c. Multiplexname Anzeige des DAB-Multiplexnamens, zu welchem der aktuelle Sender gehört. d. Datum Anzeige des aktuellen Datums. e.
Anzeigeoptionen - DAB Fortsetzung f. Bitrate/Audiotyp g. Signalstärke Anzeige der digitalen Bitrate des derzeit eingestellten DAB-Senders. f BBC Radio 4 128kbps / Mono g BBC Radio 4 Anzeige der Signalstärke für den aktuellen Sender. Das durchsichtige Quadrat zeigt die Mindestsignalstärke für klaren DAB-Empfang. Auffinden neuer Sender - DAB Von Zeit zu Zeit werden neue Sender verfügbar. Zum Auffinden neuer Sender gehen Sie wie folgt vor: 1. Halten Sie Menu gedrückt.
DAB-Radio Manuelle Sendersuche – DAB Mit der manuellen Sendersuche stellen Sie direkt die verschiedenen DABSender in Band III ein. Alle aufgefunden Sender werden der Senderliste hinzugefügt. Diese Funktion kann ebenfalls benutzt werden, um die Ausrichtung der Antenne zu unterstützten oder das Soundsystem für den Empfang eines spezifischen Kanals oder einer Frequenz zu optimieren. 1. Halten Sie Menu gedrückt. „DAB Menu“ wird im Display angezeigt. 2. Drücken Sie Select zum Aufrufen des DAB-Menüs. 3.
Dynamic Range Control (DRC) einstellen - DAB Dynamic Range Control (oder DRC) ermöglicht ein besseres Hören von leisen Tönen in einer lauten Umgebung. Sie haben 3 Kompressionspegel: DRC off DRC high DRC low Drücken Sie Ein/Stand-by-Modus zum Einschalten Ihres Soundsystems. Drücken Sie Mode zur Auswahl des DAB-Modus. 2. Halten Sie Menu gedrückt. „DAB Menu“ wird im Display angezeigt. Drücken Sie Select zum Aufrufen des DAB-Menüs. 3.
DAB-Radio Setup der Senderreihenfolge - DAB Sie können am Soundsystem aus 2 Einstellungen für die Senderreihenfolge auswählen. Die Einstellung der Reihenfolge der Sender ist alphanumerisch und Ensemble. Hinweis: Die Standardeinstellung der Senderreihenfolge ist alphanumerisch. 1. Drücken Sie Ein/Stand-by-Modus zum Einschalten Ihres Soundsystems. Drücken Sie Mode zur Auswahl des DAB-Modus. 2. Halten Sie Menu gedrückt. „DAB Menu“ wird im Display angezeigt. Drücken Sie Select zum Aufrufen des DAB-Menüs.
Radio hören - Sendersuche UKW 1. Ziehen Sie die Teleskopantenne vollständig aus. Die Antenne muss für besten Empfang vollständig ausgezogen und in senkrechter Stellung sein. 2. Drücken Sie Ein/Stand-by-Modus zum Einschalten Ihres Soundsystems. 3. Drücken Sie Mode, bis das UKW-Band gewählt ist. 4.
UKW-Radio Manuelle Sendersuche - UKW 1. Ziehen Sie die Teleskopantenne vollständig aus. Die Antenne muss für besten Empfang vollständig ausgezogen und in senkrechter Stellung sein. 2. Drücken Sie Ein/Stand-by-Modus zum Einschalten Ihres Soundsystems. 3. Drücken Sie Mode, bis das UKW-Band gewählt ist. 4. Drücken Sie Senderwahl aufwärts oder abwärts, um einen Sender einzustellen. Die Frequenz ändert sich in Schritten von 50 kHz.
Anzeigeoptionen - UKW Ihr Soundsystem hat im UKW-Modus eine Reihe von Anzeigeoptionen: Radio Data System (RDS) ist ein System, bei dem nicht hörbare digitale Informationen zusätzlich zum normalen UKW-Radioprogramm übertragen werden. RDS bietet zahlreiche praktische Funktionen. Folgende sind auf Ihrem Soundsystem verfügbar. 1. BBC R2 The latest news b BBC R2 Talk c BBC R2 MON 10 MAR 2014 d BBC R2 BBC R2 1 Drücken Sie Info zum Durchlaufen der verschiedenen Optionen. a.
UKW-Radio UKW Stereo/Mono Das Soundsystem kann entsprechende UKW-Sendungen nur dann in Stereo abspielen, wenn das empfangene Signal stark genug ist. Je schwächer jedoch das Stereosignal, desto schlechter auch das Audiosignal. Es kann ratsam sein, in den Monobetrieb umzuschalten, um die Nebengeräusche zu vermindern. 1. Drücken Sie Ein/Stand-by-Modus zum Einschalten Ihres Soundsystems. 2. Suchen Sie wie bereits beschrieben nach UKW-Sendern (siehe Seite 17 und 18). 3. Halten Sie Menu gedrückt.
Empfindlichkeit Sendersuche - UKW Ihr Soundsystem sucht gewöhnlich nach UKW-Sendern mit einem ausreichend starken Signal für guten Empfang. Sie können die automatische Sendersuche jedoch auch benutzen, um schwächere Signale von weiter entfernten Sendern zu finden. Ihr Radio verfügt über die Local/Distant Option bei der automatischen Sendersuche. 1. Drücken Sie Ein/Stand-by-Modus zum Einschalten Ihres Soundsystems. 2. Drücken Sie Mode zur Auswahl des UKW-Bandes. 3. Halten Sie Menu gedrückt.
UKW-Radio Senderspeicher einstellen - DAB und UKW Sie können Ihre bevorzugten UKW- und DAB-Sender auf verschiedenen Speicherplätzen speichern. Maximal stehen 20 Speicherplätze zur Verfügung – 10 für DAB- und 10 für UKW-Sender. Die Speichereinstellungen bleiben auch bei einem Stromausfall erhalten. Das Einstellen und Aufrufen von Favoritensendern ist für DAB- und UKWSender gleich. Gehen Sie wie folgt vor. 1. Drücken Sie Ein/Stand-by-Modus zum Einschalten Ihres Soundsystems. 2.
Aufrufen Ihres Favoritensenders 1. Drücken Sie Ein/Stand-by-Modus zum Einschalten Ihres Soundsystems. 2. Drücken Sie Mode zur Auswahl des gewünschten Bandes DAB oder UKW. 3. Drücken Sie Preset. Im Display wird beispielsweise „1: (Empty)“ wird angezeigt, falls noch kein Sender gespeichert ist. Falls bereits ein Sender gespeichert wurde, erscheint im Display entweder der Sendername (DAB-Sender) oder die Frequenz (UKW-Sender). 4.
UKW-Radio Sprachfunktion - DAB und UKW Falls gewünscht, können die Radiofunktionen Ihres Soundsystems auf eine andere Sprache eingestellt werden. 1. Drücken Sie Ein/Stand-by-Modus zum Einschalten Ihres Soundsystems. 2. Drücken Sie Mode zur Auswahl des gewünschten Bandes DAB oder UKW. 3. Halten Sie Menu gedrückt. „DAB Menu“ oder „FM Menu“ wird im Display angezeigt. Drücken Sie Select zum Aufrufen des Menüs. 4. Drücken Sie Senderwahl aufwärts oder abwärts, bis „Language“ im Display angezeigt wird.
Bluetooth-Modus Der Bluetooth-Modus Ihres Soundsystems ermöglicht die Wiedergabe von Audio, Soundtracks von Videodateien und die Übertragung von Musik von Bluetooth-fähigen Geräten wie Smartphone, Computer, Tablet usw. über die Lautsprecher Ihres Soundsystems. ● Ist ein Bluetooth-fähiges Gerät wie Ihr Blutune 200 Soundsystem „erkennbar“, so kann es durch andere Bluetooth-Geräte erkannt und damit verbunden werden.
Bluetooth Mit Bluetooth-Geräten verbinden 1. Achten Sie darauf, dass die Bluetooth-Funktion Ihres Telefons, Tablet-PC oder PC aktiviert ist. Einzelheiten finden Sie in der Bedienungsanleitung Ihres Geräts, da die Methoden von Gerät zu Gerät abweichen. 2. Drücken Sie Ein/Stand-by-Modus zum Einschalten Ihres Soundsystems. 3. Drücken Sie wiederholt Mode auf Ihrem Soundsystem, bis der Bluetooth-Modus gewählt ist.
Audiodateien im Bluetooth-Modus abspielen Nach der erfolgreichen Verbindung Ihres Soundsystems mit dem gewählten Bluetooth-Gerät können Sie die Wiedergabe Ihrer Musik mit den Bedienelementen des Geräts starten. 1. Nach dem Start der Wiedergabe stellen Sie die Lautstärke mit den Lautstärketasten auf Ihrem Soundsystem oder dem verbundenen Bluetooth-Gerät ein. 2.
Bluetooth Mit Bluetooth-Gerät verbinden und erneut verbinden Es kann immer nur ein Bluetooth-Gerät mit Ihrem Soundsystem verbunden sein, auch wenn Sie ein Pairing für mehrere Geräte durchgeführt haben. Sobald ein Bluetooth-fähiges Gerät mit Ihrem Soundsystem verbunden ist, kann es nicht durch ein anderes Bluetooth-Gerät unterbrochen werden, es sei denn, Sie unterbrechen die Verbindung. 1. 4. 5. 1,2 1,2 Switch to 1: < Dad’s tablet > Das Radio zeigt dann eine Liste zuvor verbundener Geräte an.
Compact Discs Benutzen Sie nur digitale Audio-CDs, die mit dem gekennzeichnet sind. Symbol Benutzen Sie nur CDs mit 12 cm Durchmesser für das Soundsystem. Mini-CDs (8 cm Durchmesser) können auf dem Player nicht wiedergegeben werden und können den CD-Mechanismus blockieren. CD-R/CD-RW Discs Ihr Blutune 200 Soundsystem kann CD-DA Format Audio CD-R/CD-RW Discs wiedergeben, die nach der Aufnahme finalisiert* wurden.
CD/MP3/WMA CD einlegen Achten Sie darauf, dass der CD-Player leer ist, bevor Sie eine Disc einlegen. Befindet sich eine Disc im Player, so leuchtet die CD-Anzeige. Können Sie keine Disc einlegen, so drücken Sie CD ausgeben, um die derzeit eingelegte CD aus dem Player auszugeben. 1. Drücken Sie Ein/Stand-by-Modus zum Einschalten Ihres Soundsystems. 2. Zur Auswahl des CD-Modus drücken Sie Mode, bis „CD“ auf der oberen Zeile des Displays angezeigt wird. 3. Zur Ausgabe einer CD drücken Sie CD ausgeben.
5. Versetzen Sie das Gerät in den Stand-by-Modus, so kehrt es beim nächsten Einschalten zum zuvor wiedergegebenen Musiktitel zurück. CD ausgeben 1. Zum Ausgeben der CD drücken Sie CD ausgeben. Im Display wird „EJECT“ angezeigt. Wird die Disc nicht entnommen, so wird die CD nach 10 Sekunden erneut zu ihrem Schutz geladen und das Gerät begibt sich in den Stand-by-Modus. 2. Wird die CD nicht ausgegeben, so halten Sie CD ausgeben gedrückt.
CD/MP3/WMA Wiederholtes Abspielen von Titeln 1. Während der CD-Wiedergabe halten Sie Menu gedrückt. 2. Drücken Sie Senderwahl aufwärts oder abwärts, bis „Repeat“ im Display angezeigt wird. Drücken Sie Select zum Aufrufen des Wiederholungsmenüs. 3. Drücken Sie Senderwahl aufwärts oder abwärts, bis die gewünschte Wiederholungsoption im Display angezeigt wird, dann drücken Sie Select zur Bestätigung der Einstellung. Off One (1) All ( Dir ( ) ) - Die Wiederholungsfunktion ist deaktiviert.
Zufallswiedergabe 1. Während der CD-Wiedergabe halten Sie Menu gedrückt. 2. Drücken Sie Senderwahl aufwärts oder abwärts, bis „Shuffle“ im Display angezeigt wird. Drücken Sie Select zum Aufrufen des Mischmenüs. 3. Drücken Sie Senderwahl aufwärts oder abwärts, bis die gewünschte Mischoption im Display angezeigt wird, dann drücken Sie Select zur Bestätigung der Einstellung. Off On 2,3 - Die Mischfunktion ist deaktiviert. - Alle Titel werden in zufälliger Reihenfolge wiedergegeben.
CD/MP3/WMA MP3-/WMA-CD-Modus Ihr Blutune 200 Soundsystem kann CD-R und CD-RW Discs mit MP3- und WMA-Dateien abspielen. Hier wird davon ausgegangen, dass eine Datei einem CD-Musiktitel entspricht. Eine MP3-/WMA-CD darf nicht mehr als 511 Dateien und nicht mehr als 99 Ordner enthalten. MP3- und WMA-Dateien müssen mit einer Audioabtastrate von 44,1 kHz erstellt sein (das ist normal für Dateien, die von CD-Audioinhalten erstellt wurden).
MP3-/WMA-CD-Wiedergabe 1. Drücken Sie Wiedergabe/Pause, um die CD-Wiedergabe zu starten. Im Display werden der erste Ordner- und Dateinummer angezeigt - „01“ und „001“. 2. Zur Unterbrechung der Wiedergabe drücken Sie Wiedergabe/Pause. Zum Fortsetzen der Wiedergabe drücken Sie erneut Wiedergabe/ Pause. Title:Lazing on 02 001 01:44 1,2 Versetzen Sie das Gerät in den Stand-by-Modus, so wird beim nächsten Einschalten die zuvor gespielte Datei wiedergegeben. 3.
CD/MP3/WMA Suchfunktion 1. Während der MP3-/WMA-CD-Wiedergabe halten Sie Schneller Vorlauf oder Rücklauf gedrückt. Lassen Sie die Taste wieder los, wenn die gewünschte Stelle erreicht wurde. 1 1 >> 02 001 01:44 Anderen Ordner wählen 1. Mit der MP3-/WMA-CD im Stopp- oder Wiedergabemodus drücken Sie entweder aufwärts oder abwärts Ordner. Die erste Datei des nächsten oder vorherigen Ordners wird wiedergegeben.
SD-Karten und USB-Speichermedien Dieses Kapitel beschreibt, wie Sie Ihr Soundsystem zum Zugriff auf und zur Wiedergabe von Audiodateien auf USB-Speichermedien und Secure Digital (SD, SDHC) Karte benutzen. Das Blutune 200 kann ebenfalls auf SD-, SDHC- oder USB-Speichermedien im MP3-Format aufnehmen. Wichtig: Ihr Soundsystem arbeitet nur mit USB-Flash-Speichermedien. Es kann nicht an einem Computer, einer Festplatte oder anderen USBGeräten angeschlossen Werden.
SD/USB MP3-/WMA-Dateien wiedergeben - SD/USB 1. Drücken Sie Wiedergabe/Pause , um die Wiedergabe von SD-Karte/ USB-Speichermedium zu starten. Im Display wird die erste Ordnerund Dateinummer angezeigt – „01“ und „001“. 2. Zur Unterbrechung der Wiedergabe drücken Sie Wiedergabe/Pause. Zum Fortsetzen der Wiedergabe drücken Sie erneut Wiedergabe/ Pause. 3. Zur Beendigung der Wiedergabe drücken Sie Stopp .
Suchfunktion 1. Während der Wiedergabe von SD-Karte/USB-Speichermedium halten Sie Schneller Vorlauf oder Rücklauf gedrückt. Lassen Sie die Taste wieder los, wenn die gewünschte Stelle erreicht wurde. 1 1 Anderen Ordner wählen 1. Im Stopp- oder Wiedergabemodus der SD- oder USB-Wiedergabe drücken Sie Ordner aufwärts oder abwärts. Die erste Datei des nächsten oder vorherigen Ordners wird abgespielt.
SD/USB Aufnahme auf SD/USB Ihr Blutune 200 Soundsystem kann auf angeschlossene SD-/SDHCKarten oder USB-Speichermedien aufnehmen. Die Aufnahmen erfolgen im MP3-Format bei 128 kbit/s. SD-/SDHC- oder USB-Speichermedien müssen im FAT oder FAT32 Dateisystem sein, um mit dem Blutune 200 zu arbeiten. Die Medien werden gewöhnlich bereits formatiert geliefert oder können auf einem PC mit einem geeigneten Kartenleser (für SD-/SDHC-Karten) oder USB-Port (für USB-Speichermedien) formatiert werden.
Radioprogramm aufnehmen (Fortsetzung) AUX Bei Aufnahme von einer CD startet die Aufnahme am Anfang des aktuellen Titels. Jeder Titel auf der CD wird als separate Datei gespeichert. 4. 4 AUX IN Record ending... Zur Beendigung der Aufnahme halten Sie Record gedrückt. Die Aufnahme wird beendet und eine Datei wird auf das Speichermedium geschrieben. Die geschriebenen Dateien befinden sich im Ordner „RECORD“.
SD/USB MP3-/WMA-Dateien von CD/SD/USB aufnehmen Zusätzlich zur Aufnahme von herkömmlichen Quellen kann das Blutune 200 Soundsystem auch von MP3- oder WMA-Dateien aufnehmen, die zuvor auf CD, SD- oder USB-Medien geschrieben wurden. In diesem Fall werden die Dateien kopiert, nicht neu zu MP3 codiert, um Qualitätsverlust zu vermeiden. Sie können Dateien von CD oder SD auf USB und von CD oder USB auf SD kopieren. 1. Wählen Sie die gewünschte Aufnahmequelle (SD, USB oder CD). 2.
Löschen und formatieren Nach der Aufnahme von Dateien auf SD- oder USB-Medien können diese später gelöscht werden, um Platz für neue Aufnahmen zu schaffen. Das Blutune 200 kann einzelne oder alle Dateien auf dem Speichermedium löschen. SD < Delete/Format > 1 SD Einzelne Datei löschen Mit dieser Funktion löschen Sie die aktuelle Datei (im Wiedergabe- oder Pausemodus). 2 2 Delete or Format Delete < > SD 1.
SD/USB Alle Dateien löschen 1. Mit dem Soundsystem im USB- oder SD-Modus und angeschlossenem Speichermedium halten Sie Menu gedrückt. 2. Drücken Sie Senderwahl aufwärts oder abwärts, bis im Display „Delete/Format“ angezeigt wird. 3. Drücken Sie Select zum Aufrufen des Lösch- und Formatierungsmenüs. Im Display wird standardgemäß „Delete“ angezeigt. 4. Drücken Sie Senderwahl aufwärts oder abwärts zur Anzeige von „Format“. 5.
Alarme Ihr Soundsystem hat zwei Alarme, mit denen Sie mit DAB-, UKW-Radio, CD, USB, SD-Karte oder Summer geweckt werden. Die Alarme können nur im Stand-by- oder Wiedergabemodus eingestellt werden. Hinweis: Werden für mehrere Sekunden keine Tasten gedrückt, so verlässt Ihr Soundsystem die Alarmeinstellung wieder. Zum Verlassen der Alarmeinstellungen drücken Sie Menu. 1. Vor dem Einstellen eines Alarms vergewissern Sie sich, dass die Uhrzeit eingestellt ist (siehe Seite 50). Halten Sie Menu gedrückt. 2.
7. Drücken Sie Senderwahl aufwärts oder abwärts zur Auswahl der Alarmstunden, dann drücken Sie Select zur Eingabe der Stunden. Die Alarmminuten blinken. 8. Drücken Sie Senderwahl aufwärts oder abwärts zur Auswahl der Alarmminuten, dann drücken Sie Select zur Eingabe der Minuten. „Alarm: „Mode“ wird auf der oberen Textzeile angezeigt. 9.
13. Drücken Sie Senderwahl aufwärts oder abwärts zur Auswahl der gewünschten Alarmlautstärke. 14. Drücken Sie Select zur Bestätigung der Alarmeinstellungen. Das Soundsystem verlässt das Alarmmenü. Aktive Alarme werden im Display mit Alarmnummer angezeigt. und der entsprechenden 13 13 < Alarm 1: Vol 12 Wenn der Weckruf ertönt Der Alarm ertönt zur voreingestellten Zeit für bis zu 60 Minuten, sofern er nicht deaktiviert wird.
Uhrzeit und Alarme Snooze-Funktion 1. 2. Drücken Sie während des Alarms eine beliebige Taste außer Ein/Stand-by-Modus oder Lautstärke, um den Alarm für 5 Minuten zu unterbrechen. Das Schlummersymbol ( Z Z Z ) blinkt. Die Schlummerfunktion wird innerhalb eines Zeitraums von 60 Minuten wiederholt. 2 Zum Beenden der Schlummerfunktion drücken Sie Ein/Stand-byModus. Anzeige der Alarmeinstellungen 1. Zur Anzeige der Alarmeinstellungen halten Sie Menu gedrückt. 2.
Sleep-Funktion Sie können für Ihr Soundsystem eine Zeit programmieren, nach deren Ablauf sich das Gerät automatisch ausschaltet. Diese Funktion kann zwischen 15 und 120 Minuten eingestellt werden. Ihr Soundsystem muss eingeschaltet sein. 1. Halten Sie Sleep gedrückt. „Sleep time“ wird im Display angezeigt. 2. Drücken Sie Senderwahl aufwärts oder abwärts zur Auswahl der gewünschten Ausschaltzeit. Die Optionen sind 15, 30, 60, 90 oder 120 Minuten.
Uhrzeit und Alarme Manuelle Einstellung der Uhrzeit Normalerweise stellt Ihr Soundsystem die Uhrzeit automatisch anhand des DAB-Radiosignals ein. Falls kein DAB-Radiosignal empfangen wird und Sie die Uhrzeit manuell einstellen müssen, gehen Sie bitte wie folgt vor. Die Uhr kann im Stand-by-Modus oder während des Betriebs eingestellt werden. 1. Zum Einstellen der Uhrzeit halten Sie Menu gedrückt. 2. Drücken Sie Senderwahl aufwärts oder abwärts, bis „Set clock“ im Display angezeigt wird.
9. Drücken Sie Senderwahl Aufwärts oder abwärts zur Auswahl des Jahres. 10. Drücken Sie Select zur Eingabe des Jahres. Die Monatsanzeige blinkt nun im Display. 9-13 9-13 Set month < 10 MAR 2014 > Set date < 10 MAR 2014 > < Set clock > < Set clock Auto > 11. Drücken Sie Senderwahl aufwärts oder abwärts zur Auswahl des Monats. 12. Drücken Sie Select zur Eingabe des Monats. Der Tag blinkt im Display. 10-14 13. Drücken Sie Senderwahl Aufwärts oder abwärts zur Änderung des Tagesdatums. 14.
Audio und Einstellungen Equalizer Stellen Sie den Sound Ihres Blutune 200 je nach Geschmack und Programm ein. Ihr Soundsystem hat sechs Equalizer-Voreinstellungen. Alternativ können Sie Höhen und Bässe auch selbst definieren. 1. Drücken Sie Ein/Stand-by-Modus zum Einschalten Ihres Soundsystems. 2. Halten Sie Menu gedrückt. 3. Drücken Sie Senderwahl aufwärts oder abwärts, bis „Set Equalizer“ im Display angezeigt wird. 4. Drücken Sie Select zum Aufrufen des Equalizermenüs. 5.
Höhen 1. Folgen Sie den Schritten 1-4 auf der vorangehenden Seite zum Aufrufen des Equalizer-Einstellungsmenüs. 2. Drücken Sie Senderwahl aufwärts oder abwärts zum Durchlaufen der Optionen, bis „Treble“ im Display angezeigt wird. 3. Drücken Sie dann die Taste Select. Die aktuelle Höheneinstellung wird angezeigt. 4. Zum Einstellen der Höhen drücken Sie Senderwahl aufwärts oder abwärts, bis der gewünschte Pegel angezeigt wird. 5. Drücken Sie Select zur Bestätigung der Einstellung.
Audio und Einstellungen Stummschaltung Im DAB-, UKW-Radio- oder AUX-Eingangsmodus hat die Taste Wiedergabe/ Pause eine Stummschaltfunktion. Mit Wiedergabe/Pause schalten Sie die Lautsprecher stumm. 1. Drücken Sie Wiedergabe/Pause, um den Ton stummzuschalten. Das Lautsprecherlautstärkesymbol im Display erlischt. 2. Drücken Sie erneut Wiedergabe/Pause oder eine der Lautstärketasten zum Aufheben der Stummschaltung.
AUX-Eingang für Zusatzgeräte Ein 3,5 mm Stereo AUX-Eingang auf der Rückseite Ihres Soundsystems dient dem Anschluss eines Audiosignals von einem externen Audiogerät wie iPod, MP3- oder CD-Player. 1. Drücken Sie Mode, bis „AUX IN“ angezeigt wird. DAB/DAB+ ( Band III ) : 5A - 13F 2. Schließen Sie eine Stereo- oder Mono-Audioquelle (z.B. iPod, MP3oder CD-Player) am AUX-Eingang an. 3.
Audio und Einstellungen Helligkeit im Stand-by-Modus Die Helligkeit des Displays im Stand-by-Modus kann eingestellt werden. Im Schlafzimmer bevorzugen Sie während Stand-by-Modus höchstwahrscheinlich ein dunkleres Display. Die Helligkeit des Displays im Stand-by-Modus kann im Stand-by- oder Wiedergabemodus eingestellt werden. 1. Halten Sie Menu gedrückt. 2. Drücken Sie Senderwahl aufwärts oder abwärts, bis „Set Brightness“ auf der unteren Textzeile angezeigt wird. 3.
Systemrückstellung Falls Ihr Soundsystem Fehlfunktionen anzeigt, oder Anzeigen im Display fehlen bzw. unvollständig sind, führen Sie bitte wie folgt eine Rückstellung durch. 1. Halten Sie Menu gedrückt. 2. Drücken Sie Senderwahl aufwärts oder abwärts, bis im Display „System reset“ angezeigt wird. 3. Drücken Sie dann die Taste Select. Im Display wird „Press SELECT to reset“ angezeigt. 4. Drücken Sie erneut Select zur Bestätigung der Rückstellung. 5.
Audio und Einstellungen Software-Version anzeigen Das Soundsystem kann die Versionsnummern der unterschiedlichen Softwarekomponenten einstellen. Diese Anzeigen dienen nur als Referenz zur Wartung oder für den Kundendienst. Zur Anzeige der Systemsoftware-Version gehen Sie wie folgt vor: 1. Halten Sie Menu gedrückt. 2. Drücken Sie Senderwahl aufwärts oder abwärts, bis die Informationen zur Software-Version für einige Sekunden angezeigt werden. Blutune200 V0.
Antenne abnehmen Die montierte Teleskopantenne ist für die meisten Anwendungen geeignet. Eine Wurfantenne ist als Alternative mitgeliefert und die Teleskopantenne kann abgenommen werden, um sie zu montieren oder um über Koaxialkabel eine Hausantenne anzuschließen. Entfernen Sie zunächst mit einem kleinen Kreuzschlitzschraubendreher die beiden kleinen Schrauben, welche die Abdeckung des Antennenanschlusses halten.
Informationen Sicherheitshinweise Setzen Sie Ihr Soundsystem nicht Wasser, Dampf oder Sand aus. Lassen Sie Ihr Soundsystem nicht an Orten stehen, an denen extreme Hitze das Gerät beschädigen könnte. ● Wir empfehlen, möglichst das DAB-Band zu benutzen, da dies zu besseren Ergebnissen bezüglich Qualität und Störungsfreiheit führt als im UKW-Band. ● Das Typenschild befindet sich auf der Rückseite des Soundsystems.
Notizen ...................................................................................................................................................................................................... ...................................................................................................................................................................................................... ..........................................................................................................
Garantie Informationen Dieses Produkt ist für zwölf Monate ab Kaufdatum für den Originalerwerber gemäß der nachstehenden Vorgehensweise für Material- und Verarbeitungsfehler garantiert. Sollten während dieser Garantiezeit Komponenten oder Bauteile ausfallen, so werden diese kostenfrei ersetzt oder repariert. Ausgeschlossen von der Garantie sind: 1. Schäden aufgrund unsachgemäßer Benutzung. 2. Folgeschäden. 3. Produkte mit entfernten oder verfremdeten Seriennummern.
Website: http://www.robertsradio.