Sound for Generations ROBERTS CRD-37 DAB / FM RDS / CD Clock radio with MP3 / WMA playback facility Please read this manual before use
Contents CRD-37 Clock Radio features .............................................2 CD Repeat .........................................................................22 Controls ........................................................................... 3-4 CD Intro .............................................................................22 Using your clock radio for the first time ...............................5 CD Random .......................................................................
CRD-37 Clock radio features The Roberts CRD-37 Clock radio provides the following features in an attractive compact unit. Radio The CRD-37 can receive DAB and FM (with RDS) wavebands. CD The CRD-37 plays audio CDs (can also play CDR, CD-RW discs). CD-MP3/WMA The CRD-37 plays MP3 and WMA files which have been recorded to CDR or CD-RW discs.
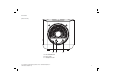
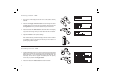
Controls 16 (Front) 17 15 18 14 13 12 11 1 2 3 5 6 7 8 9 10 1. On/Off button 6. Display button 11. Volume control 16. Snooze button 2. Dimmer button 7. Intro / Repeat button 12. Memory / Album Up button 17. Tuning / Skip Up button 3. Alarm / Autoscan button 8. Function button 13. LCD display 18. Tuning / Skip Down button 4. Sleep button 9. Menu button 14. Stop button 5. Prog / Random button 3 4 10. Memory / Album Down button 15 .
Controls (Rear view) 19 20 21 19. Wire DAB/FM aerial 20. DC in socket 21.
Using the clock radio for the first time 1. Place your clock radio on a flat surface. 2. Fully extend the wire aerial located on the rear of your clock radio. The wire should be fully extended and positioned for optimum reception. 3. Insert the adaptor plug into the DC socket located on the rear of your clock radio. 4. Plug the adaptor into a standard 13amp mains socket outlet. IMPORTANT: The mains adaptor is used as the means of connecting the clock radio to the mains supply.
Operating your clock radio - DAB 1. Fully extend the wire aerial. 2. If your clock radio is in standby mode, press the On/Off button to switch on your clock radio. 2 3. Press and release the Function button to select DAB. The display will show "DAB" and then " Now tuning" for a few seconds. 4. If this is the first time the clock radio is used a quick scan of UK Band III DAB channels may be carried out (the scan is normally performed automatically when the clock is first set - page 5).
Selecting a station - DAB 1. The top line of the display shows the name of the station currently selected. 2 2 2. Press the Tuning Up or Down buttons to scroll through the list of available stations on the lower line of the display. Stop pressing the Tuning buttons when you find the station that you wish to hear. 3. Press and release the Select button to select the station. The display may show "Now tuning" while your clock radio finds the new station. 3 4. Adjust the Volume to the required settings.
Display modes - DAB Your radio has seven display modes:1. Press the Display button to cycle through the various modes. a. Scrolling text Displays scrolling text messages such as artist/track name, phone in number, etc. a 1 b b. Programme type Displays the programme type information for the station currently being received. e.g. Pop, Classic, News, etc. c. Multiplex Name Displays the name of the DAB multiplex to which the current station belongs. d. Time and date Displays the current time and date.
Finding new stations - DAB As time passes new stations may become available. To find new stations proceed as follows:- 1 1. Press and release the Alarm/Auto Scan button. The display will show "Scanning". Your clock radio will perform a scan of the UK DAB frequencies. As new stations are found the station counter on the right-hand side of the display will increase and stations will be added to the list. 2.
Manual Tuning - DAB Manual tuning allows you to tune directly to the various DAB Band III channels. UK DAB stations are located in the range 11B to 12D. 1 1. Press and release the Menu button until the display shows "Station order". 2. Press the Tuning Up or Down buttons until "Manual tune" appears on the display. Press and release the Select button. 3. Press the Tuning Up or Down buttons to select the required DAB channel. 4. Press and release the Select button.
Dynamic Range Control (DRC) settings - DAB only Dynamic Range Control (also known as DRC) can make quieter sounds easier to hear when your radio is used in a noisy environment. This function is only available for the DAB waveband. 1 1. Press the On/Off button to switch on your clock radio. 2. Press and release the Menu button until "Station order" appears on the display. 2 3. Press and release the Tuning Up or Down buttons until the display shows "DRC value". 4.
Operating your radio - Search tuning FM 1. Fully extend the wire aerial and press the On/Off button to switch on your clock radio. 1 2. Press and release the Function button until the FM band is selected. 3. Press the Tuning Up button and then press the Alarm/Auto scan button. Your clock radio will scan from the currently displayed frequency direction upwards and will stop scanning when it finds a station of sufficient strength. 4. The display will show the frequency of the signal which has been found.
Manual tuning - FM 1. Press the On/Off button to switch on your clock radio. 1 2. Press and release the Function button as needed to select the FM waveband. 3. Fully extend the wire aerial for FM reception. 2 4. Repeatedly press the Tuning Up and Down buttons to tune to a station. The frequency will change in steps of 50kHz. Pressing and holding one of the buttons will advance the frequency selection several times each second. 5.
Display modes - FM On FM the bottom line of the display can be set to any of the following modes:1. Press the Display button to cycle through the various modes. a. Scrolling text Displays scrolling text messages such as artist/track name, phone in number etc. b. Programme Type Displays programme type for the station currently being listened to e.g. Pop, Classic, News, etc. c. Time and date Displays the current time and date. d. Frequency Displays the frequency of the station being listened to.
Presetting stations There are 20 memory presets available. There are 10 on each of the DAB and FM wavebands. 1 1. Press the On/Off button to switch on your clock radio. 2. Tune to the required station as previously described. 3 3. Press the Prog/Random button, the display will show "Preset" with "01" flashing. 4. Use the Memory Up or Down buttons to select the desired preset number under which you wish to store the station. 5. Press the Prog/Random button again.
Recalling a preset station 1. Press the On/Off button to switch on your clock radio. 1 2. Select the required waveband by pressing the Function button. 3. Press the Memory Up or Down buttons to select the desired preset number. 2 4. Your clock radio will tune to the station stored in preset memory.
Compact discs Use only Digital Audio CDs which have the symbol. Never write on a CD or attach any sticker to the CD. Always hold the CD at the edge and store it in its box after use with the label facing up. To remove dust and dirt, breathe on the CD and wipe it with a soft, lint free cloth in a straight line from the centre towards the edge. Cleaning agents may damage the CD. Do not expose the CD to rain, moisture, sand or to excessive heat. (e.
WARNING CLASS 1 LASER PRODUCT means that the laser's construction makes it inherently safe so that the legally prescribed maximum permissible radiation values can never be exceeded. Caution: Using any equipment or devices other than those described and specified in these operating instructions, or tampering with the unit in any way, can result in dangerous exposure to radiation. MP3 / WMA CD Mode The CRD-37 is able to play CD-R and CD-RW discs containing MP3 or WMA files.
Inserting a CD 1. To open the CD compartment, lift up the CD door. 2. Put the CD on the spindle until it clicks into place and then gently close the CD compartment by pushing the cd door back into position. 1 Playing a CD 1. Press the On/Off button to switch on your clock radio. 1 2. Press the Function button to choose CD as the input source. The CD player will scan the contents of the CD and "READING" will appear on the display.
5. To pause playback press the Play/Pause/Select button. The pause symbol will show on the display. Audio CD: The current track number and the elapsed playing time will be shown on the display. 5,6 MP3 / WMA CD: The file name with ID3 tag scrolls, the elapsed playing time will be shown on the display. 6. To continue playback press the Play/Pause/Select button again. 7. To stop playback, press the Stop button once.
Selecting a track 1. Audio CD: While the CD is playing, press either the Skip Up or Down buttons to change the desired track. You can also skip to a wanted track when the player is in stop mode. Press the Play/Pause/Select button to play the selected track. 1 1 1 2. MP3 / WMA CD: While the CD is playing, press either the Memory/ Album Up or Down buttons to change to the desired album / folder, then press either the Skip Up or Down buttons to change to the desired track.
Search function 1. While the CD is playing, press and hold down either the Skip Up or Down button. Release the button when the desired part of the track is reached. 1 1 CD repeat mode 1. Whilst the CD is playing press the Intro/Repeat button. The radio will step through the following options: Audio CD: Repeat 1 , MP3 / WMA CD: Repeat 1 ALL , Normal Play Repeat ALL , , Repeat Album Normal Play , 1 Repeat 2. The display will show the currently selected repeat mode. CD Intro mode 1.
CD Random play 1. While the CD is playing, press the Prog/Random button to play all tracks on the CD in random order. "RAND" will appear on the display. The tracks are played in random order until all tracks have been played. 1,2 2. Press the Prog/Random button again to return to normal play. "RAND" will disappear from the display. Creating a play list (Program Play - audio CD only) By programming the player you can play up to 20 tracks in any desired order. 1 1.
Checking and Editing a programme Whilst the CD is in stop mode, you can check and edit the program. 1. Press the Prog/Random button repeatedly. The display will show the play list that you have have already programmed. 1 2. You can edit the playlist. When the desired track that you want to edit is reached, follow the procedure for creating a playlist page 23. Erasing a programme 1. Press the Stop button when in programme mode to erase the programme.
Alarm mode Your clock radio has four alarms which can be set to wake you by radio (FM or DAB), CD or beep type alarm. Each alarm can be set to sound: Once only Everyday Monday to Friday Monday to Saturday Saturday to Sunday The alarms can only be set with the radio in standby mode. In the event of a power failure the alarm settings will be retained for up to 24 hours. Note: If no buttons are pressed for 10 seconds, the clock radio will exit the alarm setup.
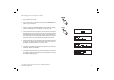
6. Press the Alarm button to confirm the setting and to enter the alarm day option menu. You can select between once, daily, Mon-Fri, MonSat and Sat-Sun. 6 Display Once (Once) - Will sound at one time only Mon-Sun (Daily) - Will sound every day Mon-Fri (1-5) - Will sound every weekday Mon-Sat (1-6) - Will sound from Monday to Saturday Sat-Sun (6-7) - Will sound only on weekends 7,9 7,9 7. Press the Skip Up or Down buttons to select the desired Alarm day option. 8.
11. When the clock radio display is set to show both time and date the alarm symbol will appear if an alarm is set. To toggle between the large time display and the time and date display press the Display button. 11 Note: When the alarm is set to wake by radio, the last used station will be switched on at the alarm time. The radio alarm volume will be the volume previously listened to when setting up the alarm.
Sleep function Your clock radio can be set to turn off after a preset time has elapsed. The sleep setting can be adjusted between 0 and 90 minutes in 10 minute increments. 1. To set the desired sleep time, press the Sleep button to enter the sleep setup. "Sleep 90" will be displayed. 2. Repeatedly press the Sleep button to adjust the sleep countdown timer to the desired duration, ranging from 0-90 minutes in 10 minute increments. The sleep timer will be set to the displayed time.
Snooze 1. When the alarm sounds, pressing the Snooze button will silence the alarm for the number of minutes specified for that particular alarm. 1 2. The snooze setting can be adjusted between 5, 10, 15 and 20 minutes in 5 minute increments in the Alarm settings (see pages 25-27). Dimmer 1. Press the Dimmer button to change the backlight illumination level between high, low and off settings.
Clock display When in Standby your clock radio has two display modes, time or time and date combined. 1 1. If your clock radio is switched on, press the On/Off button to switch your clock radio to the standby mode. 2. To toggle between the two display modes press the Display button.
Software version The software display cannot be altered and is just for your reference. 1 1. To view which software version your clock radio has ensure your clock radio is in DAB mode and press the Menu button to enter the menu setup. 2. Press the Skip Up or Down buttons until "SW Version" together with the Version number appears on the display. 2 System Reset 2 If your radio fails to operate correctly, or some digits on the display are missing or incomplete, carry out the following procedure. 1.
Headphone socket 1. A 3.5mm Headphone Socket is provided on the rear of your clock radio for use with headphones to permit private listening. Inserting a plug automatically mutes the internal loudspeakers. 2. Adjust the volume on the clock radio as needed. Please be aware that the sensitivity of headphones can vary widely. We therefore recommend setting volume to a low level before connecting headphones to the clock radio.
IMPORTANT: General • The mains adaptor is used as the means of connecting the clock radio to the mains supply. The mains socket used for the clock radio must remain accessible during normal use. In order to disconnect the clock radio from the mains completely, the mains adaptor should be removed from the mains socket outlet completely. Do not allow this clock radio to be exposed to water, steam or sand. Do not leave your radio where excessive heat could cause damage.
Specifications Circuit features Power Requirements Mains AC 230 volts, 50Hz Loudspeakers 2 x 78mm Output power 1W Headphone socket 3.5mm dia Aerial System FM Wire aerial DAB Wire aerial only Frequency Coverage FM 87.5-108MHz DAB 174.928 - 239.200MHz The Company reserves the right to amend the specification without notice.
Notes ...................................................................................................................................................................................................... ...................................................................................................................................................................................................... ............................................................................................................
Notes ...................................................................................................................................................................................................... ...................................................................................................................................................................................................... ............................................................................................................
Notes ...................................................................................................................................................................................................... ...................................................................................................................................................................................................... ............................................................................................................
Guarantee This instrument is guaranteed for twelve months from the date of delivery to the original owner against failure due to faulty workmanship or component breakdown, subject to the procedure stated below. Should any component or part fail during this guarantee period it will be repaired or replaced free of charge. The guarantee does not cover: 1. Damage resulting from incorrect use. 2. Consequential damage. 3. Receivers with removed or defaced serial numbers.
ROBERTS RADIO TECHNICAL SERVICES 97-99 Worton Road Isleworth Middlesex TW7 6EG Technical Helpline :- 020 8758 0338 (Mon-Fri during office hours) Website: http://www.robertsradio.co.