Sound for Generations ROBERTS RD14 final version.
Contents Controls ........................................................................... 3-4 Favourites' menu - FM .......................................................22 Display .................................................................................4 Display mode - FM ............................................................23 Batteries ..............................................................................5 Keylock ...........................................................
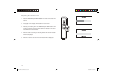
Controls 2 3 6 1 4 5 7 1. LCD display 5. Volume down button 2. Headphone socket 6. Tuning jog wheel 3. On/off button 7. DC input socket 4. Volume up button If you need any further advice, please call our Technical Helpline on :020 8758 0338 (Mon-Fri) RD14 final version.
Display screens Your radio has two display modes Full Information and Full text. These are displayed and can be altered in the Settings menu sub menu display mode (page 16 DAB and 23 FM). Full Info screen a b c d The Full info mode will display the following:a. The time in 24 hour format b. Keylock indicator when enabled c. Service/station name d. Date e. Signal strength meter f. Programme type g. Ensemble name h. Scrolling DLS/Radio text i.
Batteries 1. Press the Power On/Off button to switch the radio off before replacing batteries. 2. Open the battery cover located on the rear of the radio by pushing the cover in and down where shown. 3. Insert 2 x AA size batteries into the compartment. Make sure the (+) and (-) ends of the batteries are positioned as shown inside the compartment. 4. Close the battery cover. 5. Batteries should be replaced when the Battery Level two bars or less. icon shows 6.
Using the AC adaptor The AC adaptor for use with your RD-14 should provide 3 volts DC output at 350mA centre pin positive (Roberts type PU14). 1. Insert the adaptor plug into the DC socket on the right side of your radio. Plug the adaptor into a standard 13A mains socket outlet. Whenever the adaptor is used the batteries are automatically disconnected. 2. The AC adaptor should be disconnected from the mains supply and the radio when not in use.
First time operation - DAB This step is only necessary for first time operation - proceed to page 8 if this step has been carried out 1. Check that the batteries have been installed correctly. 3 2. Plug the earphones into the socket on the top of your radio. 3. Press the Power On/Off button on the left hand side of your radio. 4. The Display Screen will show “Roberts" followed by Sports DAB ” for a few seconds. 5. The screen will then show the Find Services Menu. 6 6.
Menu/option screens Your radio has graphical Icons to represent each of the menu options. Once in any of the five menus further options will be displayed - the options will change depending on the waveband selected. 1. To enter the menus from normal radio display mode press the Jog wheel. 1 2. To scroll through the various menus push the Jog wheel up or down. 3. To select a menu press the Jog wheel. 2 3 4 5 7 8 4. You can scroll through the various sub options by pushing the Jog wheel up or down.
Selecting a station - DAB 1. Press the On/Off button to switch on your radio. The display will show “Roberts" followed by Sports DAB ” for a few seconds. 1 2. Turn the Jog wheel either clockwise or anti-clockwise to display the station list. 3. Turn the Jog wheel to scroll through available stations until the station you wish to listen to is highlighted. The Up and Down scroll arrows indicate that you will need to scroll either further up the display or down to view the whole station list. 4.
Adjusting the volume Level 1. Press the Volume Up or Down button to increase or decrease the volume. 2. A bargraph on the display will indicate the volume level. 3. Pressing and holding down the Volume Up or Down buttons will continue to alter the volume until the button is released or the maximum/minimum level is reached. 1 1 4. When the radio is scanning or selecting stations the volume indicator will not be displayed. 5. When the volume is set at 0 the mute indicator will be displayed.
Favourites' menu - DAB The favourite menu allows you to add or remove stations from your favourites list. Stations added to your favourites list will appear at the top of the station list marked with a heart. 1. When in normal radio mode click and release the Jog wheel and the favourites menu will appear on the display. 1,2 2. Click the Jog wheel. The radio will open the favourites menu. 3. To add a favourite station turn the Jog wheel until “Add” is highlighted on the display. 3 4.
Find Services Menu - DAB The Find Services Menu allows you to autotune or to manually tune your radio. Autotune Band III (UK) - DAB Carry out this procedure if you move the radio to a different area or new stations become available. 1 1. Click and release the Jog wheel the Favourites menu will appear on the display. 2. Turn the Jog wheel until the Find Services Menu appears on the display. 2 3. Click the Jog wheel and open the FInd Services Menu. The radio will display the Find services menu. 4.
Autotune Band III - DAB Carry out this procedure if you are operating your radio in a country other than UK. 1. Click and release the Jog wheel the Favourites menu will appear on the display. 1 2. Turn the Jog wheel until the Find Services Menu appears on the display. 3. Click the Jog wheel and open the Find Services Menu. The radio will display the Find services menu. 4. To scan all the Band III DAB channels turn the Jog wheel until Band III is highlighted on the display.
Channel tuning - DAB 1. Turn the Jog wheel until Manual Tune is highlighted on the display. 2. Click the Jog wheel the Manual Tune options will appear on the display. 1 2 3. Turn the Jog wheel until Channel is highlighted on the display. 4. Click the Jog wheel until the required channel is highlighted. If the channel can be received the Ensemble (group of stations) name will appear in the display 3 5. Click the Jog wheel to select the Ensemble. 6.
Frequency tuning - DAB 1. Once in the Find Services Menu turn the Jog wheel until Manual Tune is highlighted on the display. 1 2 2. Click the Jog wheel, the manual tune options will appear on the display. 3. Turn the Jog wheel until frequency is highlighted on the display. 4. Click the Jog wheel to enter the frequency tuning mode. 3 5. Turn the Jog wheel clockwise or anti-clockwise until you find the desired frequency. 6. Click the Jog wheel to select the desired frequency. 4 5 7.
Display mode - DAB Your radio has two display modes when using the DAB waveband:a. Full information shows station name, time/date, signal and battery level and a single line of scrolling text (DLS) b. Full text shows station name and full text (DLS without scrolling making the text easier to read) 1 To select the required DAB display mode proceed as follows:1. From the Settings Menu turn the Jog wheel clockwise or anti-clockwise until DAB display mode is highlighted on the display. 2.
Service information - DAB The Service information menu displays technical information about the current station. 1. From the Settings Menu turn the Jog wheel clockwise or anti-clockwise until Service Information Menu is highlighted on the display. 1 2. Click the Jog wheel the Service Information Menu will be displayed. 3. The following service information will be displayed Bit rate in kbps Audio mode - Mono/stereo/joint stereo DAB mode I, II,III 2 Protection level Start CU and length 4.
Autoselect - DAB As an alternative to pressing the Jog wheel to select a station your radio has the facility to automatically select a station. 1. From the Settings Menu turn the Jog wheel clockwise or anti-clockwise until the Autoselect is highlighted on the display. 1 2 3 4 6 7 2. Click the Jog wheel to select Autoselect. 3. Turn Jog wheel until “ON” is highlighted . 4. Click the Jog wheel to select ON. 5.
Operating your radio - FM 1. Press the On/Off button to switch on your radio. The display will show “Roberts" followed by "Sports DAB ” for a few seconds. 1 2. Click and release the Jog wheel and the favourites menu will appear on the display. 3. Turn the Jog wheel until Switch to FM Menu appears on the display. 4. Click the Jog wheel and the radio will switch to the FM waveband. 2 3 4 If you need any further advice, please call our Technical Helpline on :020 8758 0338 (Mon-Fri) RD14 final version.
Search tuning - FM 1. Turn the Jog wheel until Search Up or Down is highlighted on the display. 2. Click the Jog wheel and your radio will search in an upwards or downwards direction until it finds a station of sufficient strength. After a few seconds the display will update and show station name followed by the time/date and radio text 1 3. To search for other stations repeat the above steps.
Audio mode - FM If a station being received is weak some hiss may be audible changing the audio mode to mono can reduce the hiss. 1. From the Settings Menu turn the Jog wheel clockwise or anti-clockwise until Audio mode is highlighted on the display. 2. Click the Jog wheel the Audio mode options will be displayed. 1 2 3 4 6 7 3. Turn Jog wheel until “Mono” is highlighted . 4. Click the Jog wheel to select mono. Your radio will select the mono audio mode. 5. To switch back to Stereo (Auto) mode. 6.
Favourites' menu - FM The favourite menu allows you to add or remove stations from your favourites list. Stations added to your favourites list will appear at the top of the station list marked with a heart. 1. When in normal radio mode click and release the Jog wheel and the favourites menu will appear on the display. 1,2 2. Click the Jog wheel. The radio will open the favourites menu. 3. To add a favourite station turn the Jog wheel until “Add” is highlighted on the display. 4.
Display mode - FM Your radio has two display modes when using the FM waveband:a. Full info shows station name, time/date, signal and battery level and a single line of scrolling text (Radio text) 1 b. Full text shows station name and full text (Radio text without scrolling making the text easier to read) To select the required FM display mode proceed as follows:1. From the Settings Menu turn the Jog wheel clockwise or anti-clockwise until FM display mode is highlighted on the display. 2 2.
Keylock function The Keylock function is used to prevent unintentional change of station. 1. Hold in the Jog wheel for 2 seconds to switch on the keylock function. will show on screen. The Jog wheel will The keylock indicator be disabled preventing accidental station or settings change when your radio is carried in your pocket. 1 2. To switch off the Keylock function hold in the Jog wheel for 2 seconds. The keylock function will be disabled and the keylock indicator will disappear from the display.
Autolock With Autolock switched on a few seconds after a station is selected the Keylock symbol will appear in the display preventing accidental station or settings change. The Keylock can be switched off by pressing and holding in the Jog wheel until the Keylock symbol disappears from the display. 1 1. From the Settings Menu turn the Jog wheel clockwise or anti-clockwise until Autolock is highlighted on the display. 2. Click the Jog wheel the autolock menu will be displayed. 3.
Auto power off The Auto Power Off function will allow your radio to automatically switch off after a preset time has elapsed. The preset time starts after the last time any button is pressed. 1. From the Settings Menu turn the Jog wheel clockwise or anti-clockwise until Auto power off is highlighted on the display. 1 2. Click the Jog wheel the Auto power off menu will be displayed. 3. Turn the Jog wheel to highlight either 30, 60 or 90 minutes. 4. Click the Jog wheel to select the auto power off time.
System reset FM and DAB The System reset function will erase all settings, station lists, favourite stations and restore default settings as follows:Service database empty Favourite services list empty Previously selected service empty DAB display mode set to Full info 1 2 3 4 5 6 Autoselect function disabled Autolock function disabled Auto power off set to disabled Volume set to 25% of maximum 1.
General Do not allow this unit to be exposed to moisture e.g. dripping or splashing. Do not leave your radio where excessive heat could cause damage such as in a parked car where the heat from the sun can build up even though the outside temperature may not seem too high. Specifications Circuit Features Power Requirements Mains (via AC adaptor) AC 230 volts, 50Hz Batteries Headphones 32 ohms, in-ear style, with in-line aerial Output Power 3mW Headphone socket 3.
DAB (Band III) frequency table Channel Frequency Channel Frequency 5A 174.928 MHz 9D 208.064 MHz 10A 209.936 MHz 5B 176.640 MHz 5C 178.352 MHz 10B 211.648 MHz 5D 180.064 MHz 10C 213.360 MHz 6A 181.936 MHz 10D 215.072 MHz 6B 183.648 MHz 11A 216.928 MHz 6C 185.360 MHz 11B 218.640 MHz 6D 187.072 MHz 11C 220.352 MHz 7A 188.928 MHz 11D 222.064 MHz 7B 190.640 MHz 12A 223.936 MHz 7C 192.352 MHz 12B 225.648 MHz 7D 194.064 MHz 12C 227.360 MHz 8A 195.
Notes: 30 RD14 final version.
Guarantee This instrument is guaranteed for twelve months from the date of delivery to the original owner against failure due to faulty workmanship or component breakdown, subject to the procedure stated below. Should any component or part fail during this guarantee period it will be repaired or replaced free of charge. The guarantee does not cover: 1. Damage resulting from incorrect use. 2. Consequential damage. 3. Receivers with removed or defaced serial numbers.
ROBERTS RADIO TECHNICAL SERVICES 97-99 Worton Road Isleworth Middlesex TW7 6EG Technical Helpline :- 020 8758 0338 (Mon-Fri during office hours) Website: http://www.robertsradio.co.uk Issue 1 RD14 final version.