ROBERTS RD-27 Sound for Generations FM RDS/DAB digital radio with RD27 Issue 3.
Contents Controls ............................................................................... 2 General .............................................................................. 18 Battery operation ................................................................. 3 Specifications ................................................................... 18 Mains operation ................................................................... 3 Circuit features ..........................................
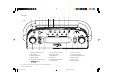
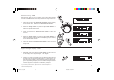
Controls 1 2 3 4 5 6 7 8 9 10 11 (Top) 18 17 16 15 14 12 1. Telescopic aerial (on rear) 7. Line out socket (on rear) 2. On/Off button 8. Auto Tune button 14. Tuning down button 3. Mains LED indicator 9. FM/DAB button 15. Liquid crystal display (LCD) 13. Tuning up button 4. Station presets 10. Info button 16. Treble control 5. Headphone socket (on rear) 11. Select/Real Time button 17. Bass control 6. 12. Tuning control 18.
Battery operation 1. Remove the Battery cover on the rear of the unit by pushing the battery door in and downwards. 2. Insert six LR20 (D size) batteries into the spaces in the compartment. Take care to ensure all batteries are inserted with the correct polarity as shown inside the battery compartment. Replace the battery cover. 3. Reduced power, distortion and a ‘stuttering’ sound are all signs that the batteries may need replacing. 4.
Operating your radio - DAB 2 1. Carefully extend the telescopic aerial. 2. Press the On/Off button to switch on your radio. The display will show "Roberts DAB digital radio" for a few seconds. 3. If this is the first time the radio is used a quick scan of UK Band III DAB channels will be carried out. The display will show "Autotune Quick scan". If the radio has been used before the last used station will be selected. 4.
Selecting a station - DAB 1. The top line of the display shows the name of the station currently selected. 2. Rotate the Tuning control or press the Up or Down buttons to scroll through the list of available stations. 2 3. Press and release the Select/real time button to select the station. The display may show "Tuning" while your radio finds the new station. 2 2 4. Adjust the Volume and Tone controls to the required settings.
Secondary services - DAB 1. Certain radio stations have one or more secondary services associated with them. If a station has a secondary service associated with it the display will show ">" next to the station name on the station list. The secondary service will then appear immediately after the primary service as you turn the tuning control. Display modes - DAB Your radio has six display modes:- a 1 1. Press the Info button to cycle through the various modes. a.
Finding new stations - DAB As time passes new stations may become available. To find new stations proceed as follows:- 1 1. Press and release the Auto Tune button, the display will show Autotune Quick scan. Your radio will perform a scan of the UK DAB frequencies. As new stations are found the station counter on the right-hand side of the display will increase and stations will be added to the list. 2.
Manual Tuning - DAB Manual tuning allows you to tune directly to the various Band III DAB channels. UK DAB stations are currently located in the range 11B to 12D. 1 1. Press and hold down the Select/real time button until the display shows Manual tune. Release the Select/real time button. 2. Rotate the Tuning control or press the Up or Down buttons to select the required DAB channel. 2 3. Press and release the Select/real time button to select the channel. 4.
Using your radio's Pause Plus feature How many times has your favourite radio station been interrupted by that phone call from a double glazing firm or someone selling that must have item? Sound familiar? Now with a single press of the button you can put your favourite station on hold while you answer that important call. After the call or other important task is finished simply press the button to return to your favourite station exactly where you left off so that you never miss a single word.
Pause Plus continued 1. As soon as you switch on your radio the feature is working silently in the background so, say for example, you want twice and rotate the to hear a news item again press the tuning control anti-clockwise to scroll back to the item you wish to listen. The display will show the amount of time you have scrolled back. Note the switched on. 1 1 memory only starts when your radio is feature the lower line of display 2.
Operating your radio - FM 2 3 1. Carefully extend the telescopic aerial. 2. Press the On/Off button to switch on your radio. The display will show "Roberts DAB digital radio" for a few seconds. 3. Press the FM/DAB button to select the FM band. 4 4. Press and hold down either the Up or Down buttons until the frequency in the display begins to change rapidly. Release the button. Your radio will scan the FM waveband, stopping each time it finds a station of sufficient strength. 4 5.
Manual tuning - FM 1 2 1. Press the On/Off button to switch on your radio. 2. Press the FM/DAB button to select the FM band. Fully extend the Telescopic aerial. 3. Rotate the Tuning control or press the Up or Down buttons to tune to a station. The frequency will change in steps of 50kHz. 3 3 3 4. When the waveband end is reached the radio will recommence tuning from the opposite waveband end. 5. Set the Volume and Tone controls to the desired settings. 6.
Display modes - FM On FM the bottom line of the display can be set to any of the following modes:- 1 a 1. Press the Info button to cycle through the various modes. a. Scrolling text b Displays scrolling text messages such as artist/track name, phone in number etc. b. Programme Type c Displays type of station being listened to e.g. Pop, Classic, News etc. c. Signal strength d Displays signal strength for station being listened to. d. Time and date Displays current time and date. e.
Presetting stations - DAB and FM 1 There are 5 memory presets for each of the 2 wavebands. 1. Press the On/Off button to switch on the radio. 2. Tune to the required station as previously described. 3 3. Press and hold down the required Preset button until the display shows e.g. Preset 1 stored. The station will be stored under the chosen preset button. Repeat this procedure for the remaining presets. 4. Stations stored in preset memories may be overwritten by following the above procedure.
Recalling a preset station - DAB and FM 1 2 1. Press the On/Off button to switch on the radio. 2. Select the required waveband by pressing the FM/DAB button. 3. Momentarily press the required Preset button, your radio will tune to the station stored in preset memory. 3 15 RD27 Issue 3.
System reset If your radio fails to operate correctly, or some digits on the display are missing or incomplete carry out the following procedure. 1 1. Switch off your radio 2. Switch on your radio - before the screen shows Roberts DAB digital radio, press and hold down the Select/real time button until the display shows System Reset. 2 2 3. A full reset will be performed all presets and station lists will be erased. 4.
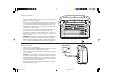
Headphone socket A 3.5mm Headphone Socket located on the rear of your radio is provided for use with either headphones or an earpiece. Inserting a plug automatically mutes the internal loudspeaker. IMPORTANT: Excessive sound pressure from earphones and headphones can cause hearing loss. Line out socket A 3.5mm Line out socket located on the rear of your radio is provided for connecting the audio signal to an external amplifier. Inserting a line out audio cable will not mute the internal loudspeaker.
General Do not allow this radio to be exposed to water, steam or sand. Do not leave your radio where excessive heat could cause damage such as in a parked car where the heat from the sun can build up even though the outside temperature may not seem too high. It is recommended that the DAB band be used wherever possible as better results in terms of quality and freedom from interference will usually be obtained than on the FM band.
Mains supply The RD-27 will operate from a supply of AC 230 volts, 50Hz only. DO NOT cut off the mains plug from this equipment. If the plug fitted is not suitable for the power points in your home or the cable is too short to reach a power point, then obtain an appropriate safety approved extension lead or adaptor. If in doubt consult your dealer. The wire coloured BLUE must be connected to the terminal marked N or coloured BLACK.
Guarantee This instrument is guaranteed for twelve months from the date of delivery to the original owner against failure due to faulty workmanship or component breakdown, subject to the procedure stated below. Should any component or part fail during this guarantee period it will be repaired or replaced free of charge. The guarantee does not cover: 1. Damage resulting from incorrect use. 2. Consequential damage. 3. Receivers with removed or defaced serial numbers. N.B.
ROBERTS RADIO TECHNICAL SERVICES 97-99 Worton Road Isleworth Middlesex TW7 6EG Technical Helpline :- 020 8758 0338 (Mon-Fri during office hours) Website: http://www.robertsradio.co.uk Issue 3 RD27 Issue 3.