
Use and Care Manual

CARPET TRIMMER
1
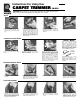
. Three basic parts of your Trimmer:
(
Top to Bottom) Handle unit,
l
ocating plate and blade holder
u
nit.
2
. Insert locating plate between
s
pacers at the height desired, using
t
he finger notches at either end. The
a
verage location will be on top of
the fourth spacer. If this leaves the
carpet too long move down one or
two spaces. If the carpet is too
s
hort, move the locating plate, to a
h
igher position.
4
. Tighten knobs firmly to secure
b
lade holder.
3
. Insert the blade holder above the
l
ocating plate. Adjust “in and out”
d
imension for type of carpet being
t
rimmed.
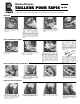
Remove old blades as shown. Insert
new blade under spring clip and
position between raised guides. When
only one end of each blade is dull you
need only switch blades to the other
position to double the life of the
blades. Note: Use only ROBERTS
Trimmer Blades in this tool. For
satisfactory performance, you must
be able to read the printing on the
blade, when it is in position.
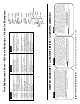
Delrin
®
Guide
We have included a Delrin
®
guide
with your trimmer. Many
installers have found this device
useful as additional protection
against marking baseboards and
walls. The Delrin
®
guide can be
adhered to your blade guide by
using standard contact adhesive
such as ROBERTS #41-0308.
Follow instruction of contact
cement’s manufacturer for
applying. After applying Delrin
®
to blade guide, apply pressure by
clamping.
The blade-holder unit has two “finger
holes” to facilitate removal and
replacement of blade.
Loosen knobs and remove blade
holder.
Instructions For Using Your
CARPET TRIMMER
10-616
S
ET-UP
CHANGING CUTTING BLADE
CHANGING HANDLE ANGLE
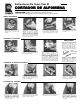
USING
THE
TRIMMER
1.
Loosen handle knob a full
3-4 tur
ns.
1. Start cut at 45° angle. Moving the
trimmer down to a flat position on
the floor. It is usually necessary to
pull the carpet tight with the other
hand when starting the cut.
2. Keeping the base plate flat on the
carpet and the guide bar against the
wall, make the trimming cut.
3. Move the trimmer in the opposite
direction to complete the cut at the
corner.
4. Using the guide bar, tuck the
carpet into the gully to
complete the job. The large
handle will permit you to use
both hands when necessary.
2.
Squeeze the handle to open up the
handle and disengage the teeth. Re-
tighten the knob fir
mly after setting
handle to the desir
ed angle.
3.
Normal angle for using trimmer.
4.
Flat angle for use under toe
spaces and over
hangs. Five
dif
ferent angles are possible.
ENGLISH
10-616-07
B
lade Guide
Delrin
®
CAUTION!: S
harp blade exposed can cause injury! Use extreme caution. Keep away from children.
A
lways use gloves and protective eye wear. Do not bend blade or use for prying.