ROBERTS CD9912 Sound for Generations Stereo CD Radio Cassette Recorder cd9912 instruction book.
Contents ............................................................................. 1 Listening to cassette tapes .............................................. 16 Controls ........................................................................... 2-3 Recording from the radio ................................................. 17 Display ............................................................................... 4 Recording from CD ..........................................................
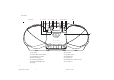
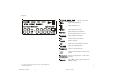
Controls (Top) 4 3 5 F u n cti on CD Tape Radio D igi tal S ou nd C on tr ol SPATIAL SOUND 2 1 CD 9912 Vo lu m e Digital to Analogue Converter 6 O pen 1. Volume control 7. Pause button 2. Spatial sound control 8. Stop/Eject button 9. Fast forward button 3. Function switch 10. Rewind button 4. Telescopic aerial 5. Digital sound control 12 11 10 9 8 11. Play button 7 12. Record button 6.
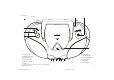
Controls (Front) 13 14 15 16 Ba nd 17 18 19 20 21 22 23 24 UP / F.Skip Stop On Repeat DOW N/ Stand B y B.Skip ME M Pr og Intr o Trac k S EN S OR Pla y /Pa use Random Clos e 25 STEREO RADIO CD CASSETT E PLAYER Pla y Rewind F. For ward Stop/Eje ct Pa use 13. Intro button 20. Stop button 14. Random/Memory down button 21. Play pause button 15. Repeat/Memory up button 22. Standby button 16. Band select button 23. Prog. button 17. Tuning Up/F.Skip button 24.
Display Indicates sound effect Lights during CD playback Lights during CD pause Lights during CD intro mode Lights during CD repeat all tracks Flashes during CD repeat one track Lights during CD random play Indicates radio memory channel Indicates CD track Lights when receiving FM stereo stations Lights when adjusting volume Indicates selected waveband Indicates CD track number or radio memory channel Indicates CD playing time or radio station frequency Shows MHZ for FM reception and kHz for MW/LW receptio
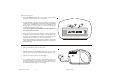
Battery operation 1. Remove the Battery cover on the rear of your CD radio cassette by pushing the catches in the direction of the arrows. 2. Insert two LR6 (AA size) batteries into the small spaces in the battery compartment. Insert eight LR20 (D size) batteries into the remaining spaces in the compartment. Take care to ensure all batteries are inserted with the correct polarity as shown inside the battery compartment. Replace the battery cover.
General Switching on and off 1. Press the Standby button to switch on. The Standby indicator located within the Standby button will turn off. 2. To switch off press the Standby button again. The Standby indicator will light up. Stand By Stand By 3. When using the mains supply the Standby button on the remote control can be used to turn the unit on and off. Stand By 4. When using battery supply the Standby button on the remote control can only be used to turn the unit off. This is to save battery life.
Radio operation Function note : the two LR6 batteries provide power for the radio memory and must be fitted at all times. CD Tape Radio 1. Set the Function switch to the 'Radio' position. 2. Adjust the Volume control until a hissing sound is heard. Band 3. Repeatedly press and release the Band button until the required waveband appears in the display. On FM fully extend the Telescopic aerial. On MW and LW rotate your radio for best reception. 4.
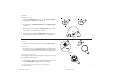
Presetting stations You may store up to 40 different stations, 20 on FM, 10 on MW and 10 on LW. Band UP/ 1. Select the required waveband using the Band button. 2. Select the required station using the UP or DOWN F.Skip buttons. DOWN/ B.Skip 3. Press the Prog. button. MEMORY will flash in the display. 4. Select the required memory channel where you wish to store the station using the MEM or buttons. 5. Whilst MEMORY is flashing in the display press PROG. to store the station. Prog 6.
Recalling a preset station Band MEM 1. Select the required waveband using the Band button. 2. Select the desired memory channel using the MEM or buttons. The display indicates the selected channel, station frequency and waveband. Last station memory 1. Your radio provides an automatic last station memory function. This function recalls the station that was playing when the radio was switched off. Stand By 9 cd9912 instruction book.
Compact discs Use only Digital Audio CDs which have the symbol. Never write on a CD or attach any sticker to the CD. Always hold the CD at the edge and store it in its box after use with the label facing up. To remove dust and dirt, breathe on the CD and wipe it with a soft, lint-free cloth in a straight line from the centre towards the edge. Cleaning agents may damage the CD Do not expose the CD to rain, moisture, sand, or to excessive heat. (e.g.
Playing a CD 1. Press the Play/Pause button to start playback. 2. Set the Volume to the required level. Play /Pause 3. Set the Spatial sound and DSC controls to the required positions. 4. To pause playback press the Play/Pause button. The Pause symbol will appear in the display. To resume playback press the Play/Pause button again. SPATIAL SOUND 5. To stop playback, press the Stop button. The total number of CD tracks and playing time will appear on the display. Volume 6.
Selecting a track 1. Whilst the CD is playing, press either the B.skip buttons to change to the desired track. or F.skip UP/ 2. You can also skip tracks when the player is in stop mode. Skip to the desired track using the B.skip or F.skip buttons. Press the Play/Pause button to play the selected track. F.Skip Play /Pause DOWN/ B.Skip 3. You can search for a particular part of a track whilst the CD is playing, press and hold down either the B.skip or F.skip buttons.
Repeat play Repeating the CD 1. Press the Repeat button once. 'REPEAT' will appear in the display. Repeat 2. Press the Play/Pause button, the CD will repeat continuously. 3. Press the Stop button to cancel repeat play. Repeating a track 1. Press the Repeat button twice. 'REPEAT' will flash in the display. Repeat 2. Press the Play/Pause button, the track will repeat continuously. 3. Press the Stop button to cancel repeat play.
Checking a programme 1. Whilst the CD is in STOP mode, repeatedly press and release the Prog. button to step through the programme. The display will show the programme and track numbers. Prog 2. Press the Play/Pause button to commence playback of the programme. Play /Pause Changing a programme Adding tracks to the programme 1. Repeatedly press and release the Prog. button until the display shows the first empty memory location (00 under track). Prog 2.
Playing a programme 1. Press the Prog. button once to show the first track of the programme. 2. Press the Play/pause button. Play will start with the first track of the programme and stop after the last track of the programme. Prog 3. Press the Stop button to stop playback of a programme. Stop 4. Whilst playing a programme it is possible to select the required programme track using the B.skip or F.skip Play /Pause buttons. Erasing a programme 1. To clear a CD programme press the Prog.
Listening to cassette tapes Function 1 Note: This unit is not suitable for recording onto CHROME (IEC II) or METAL (IEC IV) cassettes. For playback any cassette type may be used CD Tap e R adio 1. Set the Function switch to the 'Tape' position. Play Rewind F. Forward Stop/Eject Pause 2. Press the Stop eject button to open the Cassette compartment. 2 5 3. Insert a pre-recorded cassette with the tape surface downwards and the side with the desired recording facing towards you. 4.
Recording from the Radio 3 Function 1. Set the Function switch to the 'Radio' position. 1 CD Tape Radio 2. Tune in to the desired station. 3. Adjust the Volume control to suit your requirements. Volume 4. Insert a blank cassette with the tape surface downwards and the side you wish to record on facing towards you. Play Rewind F. Forward Stop/Eject Pause 5. Depress the Record button to commence recording. 5 7 6.
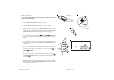
Preventing accidental erasure 1. To safeguard your recordings against accidental erasure, break off the appropriate tab on the cassette as shown . 2. There is one tab for each side of the cassette. This will prevent the Record button from being pressed. Safety tab side A Safety tab side B A 3. To restore the cassette to normal, seal the tab openings with a small piece of self-adhesive tape.
Remote control The buttons on the remote control have the same functions as the corresponding buttons on the main unit. Note: When using your CD radio cassette on batteries, the Standby button on the remote handset can only be used to switch the unit off. To switch the unit on when using battery supply, use the Standby button on the main unit. Stand By Play/ Pause Digita l S ou nd Co ntro l Batteries 1.
Headphones 1. A Headphone Socket (3.5mm) located on the left hand end of your CD radio cassette is provided for use with either headphones or an earpiece. Inserting the headphone plug automatically mutes the internal loudspeaker. If you need any further advice, please call our Technical Helpline on :- 20 020 8758 0338 (Mon-Fri) cd9912 instruction book.
Specifications Circuit Features Power Requirements Mains AC 230 volts, 50Hz Batteries 8 x LR20 (C size) only Loudspeaker 2 x 100mm Output Power 2 x 2.5 Watts Headphone socket 3.5mm dia Aerial System FM Telescopic aerial 2 x LR6 (AA size) 2 x LR03 (AAA size) included MW Built-in Ferrite aerial LW Built-in Ferrite aerial Frequency Coverage FM 87.
Guarantee This instrument is guaranteed for twelve months from the date of delivery to the original owner against failure due to faulty workmanship or component breakdown, subject to the procedure stated below. Should any component or part fail during this guarantee period it will be repaired or replaced free of charge. The guarantee does not cover: 1. Damage resulting from incorrect use. 2. Consequential damage. 3. Receivers with removed or defaced serial numbers. N.B.
ROBERTS RADIO TECHNICAL SERVICES DEPARTMENT 97-99 Worton Road Isleworth Middlesex TW7 6EG Technical Helpline:- 020 8758 0338 (Mon-Fri) Issue 1 cd9912 instruction book.