ROBERTS RD4 Digital Audio Broadcasting (DAB) Sports Radio Operating Instructions
Contents Contents ................................................................................................................ 2 Controls .................................................................................................................. 3 Display Screen ...................................................................................................... 6 Batteries ................................................................................................................
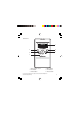
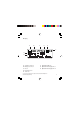
Controls 1 2 4 6 5 3 1. LCD Display screen 4. Menu button 2. Info button 5. Tone button 3. Select button 6.
Controls 7 8 7. Power Supply socket 8.
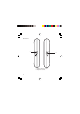
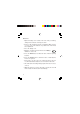
Controls 9 10 POWER HOLD 9. Power button 10.
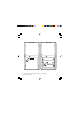
Display Screen The radio includes a back lit LCD Display Screen. The icons at the top of the screen form a custom display indicating the status of the radio and any user settings. The two-line alphanumeric display at the bottom of the screen can show up to 16 characters on each line, and provide information about the received stations. Back Light The Back Light illuminates the Display Screen, making it easy to view in a dark environment. 1.
Display A B C D E F G H A. Volume Level icon F. B. Battery Level icon G. Alphanumeric Display Line 1 Signal Strength icon C. Clock H. Alphanumeric Display Line 2 D. Favourites icon E.
Batteries 1. Open the battery cover located on the rear of the your radio by sliding it in the direction shown by the arrow. 2. Insert 3 x AA size batteries into the compartment. Make sure the (+) and (-) ends of the batteries are positioned as shown inside the compartment. 3. Close the battery cover 4. Batteries should be replaced when the the Battery Level icon shows low. 5. Press the Power button to switch the radio off before replacing batteries. 6.
1 2 If you need any further advice, please call our Technical Helpline on :020 8758 0338 (Mon-Fri) 9
Hold switch The Hold switch is used to prevent unintentional operation of your radio. 1. Move the Hold switch on the top of the unit to the “Hold” position, as indicated by the arrow. The power and all other buttons will be disabled, this will prevent accidental operation when your radio is packed in a suitcase or travel bag. 2. To prevent accidental operation of the controls when your radio is switched on, move the Hold switch on the top of the unit to the “Hold” position as indicated by the arrow. 3.
POWER HOLD 1 If you need any further advice, please call our Technical Helpline on :020 8758 0338 (Mon-Fri) 11
Earphones Plug the earphones into the Earphone Socket on the side of the unit. Check the Volume Level icon shows that the volume is not too loud and place the ear-pieces into your ears. Do not turn on the radio with the earphones connected and inserted in your ear. Loud noises can damage your hearing. Aerial The lead connecting earphones to your radio acts as an aerial when plugged into the Earphone socket. The lead should be extended as much as possible to increase reception.
Earphones If you need any further advice, please call our Technical Helpline on :020 8758 0338 (Mon-Fri) 13
Volume Level Icon The number of bars displayed (0 - 7) indicates the current volume. Battery Level Icon The number of bars displayed (0 - 3) indicates the remaining power. Clock The clock displays the time in 24-hour format as broadcast by DAB stations.The Clock is only visible when DAB is being received. Favourites Icon The Favourites icon displays when tuned to one of the top ten most listened to stations.
Volume Level Icons OFF ----------------------- INCREASING TO ----------------------- FULL Battery Level Icons EMPTY LOW MEDIUM FULL Clock The time shown is 11:45 pm Favourite Icon Tone Icons FLAT MBASS MONITOR STUDIO CLUB ARENA Signal Strength Icons NONE LOW MEDIUM STRONG If you need any further advice, please call our Technical Helpline on :020 8758 0338 (Mon-Fri) 15
Switching the Radio On 1. Check that the batteries have been installed correctly. 2. Ensure that the Hold switch on the top of the unit is in the “Off” position. 3. Plug the earphones into the socket on the side of the unit. 4. Press the Power button on the top of the unit. 5. The Display Screen will illuminate to show a welcome message. 6. After a short period the message will change.
If you need any further advice, please call our Technical Helpline on :020 8758 0338 (Mon-Fri) 17
Digital Label (DLS) 1. After a station has been tuned and is playing, the station name will appear on the first line of the Display Screen. 2. The bottom line displays the first line of the Digital Label (DLS). This information is broadcast along with the audio and contains information relevant to the current broadcast content, and technical data about the station. 3. Press the Info button to step through and display the DLS information. Example DLS information: . 1Xtra : BBC . Program type : Other music .
3 If you need any further advice, please call our Technical Helpline on :020 8758 0338 (Mon-Fri) 19
Displaying the Signal Level While the radio is in play mode the Select button can be used to display the current station Signal Level. 1. Pressing the Select button will display a bar graphic indicating the signal level. The minimum required signal for this station is presented as an open box on the bar. 2. Press the Select button to cancel the Signal Level function. Adjusting the Volume Level While the radio is in play mode the Select button can be used to alter the volume. 1.
Signal Level 1 Volume Level Increase Decrease If you need any further advice, please call our Technical Helpline on :020 8758 0338 (Mon-Fri) 21
Selecting a Station While the radio is in play mode you can step through the list of available stations by using the Select button. 1. Push the Select button right or left to move the list forward or back. The station names will appear in the bottom line of the Display Screen with arrows on either side 2. When the last station in the list is shown pushing the Select button to the right will display the first station in the list. 3. To change the station being played, press the Select button.
Backward Forward If you need any further advice, please call our Technical Helpline on :020 8758 0338 (Mon-Fri) 23
Presetting stations Selected stations can be stored in memory using the preset function. To assign a station to a preset the radio must be in play mode. 1. Press the Preset button to access the preset function. 2. The first of a list of ten presets is displayed in the bottom line of the Display Screen. 3. Push the Select button right or left to move the list forward or back until you find an empty preset or one you would like to overwrite. 4.
1 Backward Forward If you need any further advice, please call our Technical Helpline on :020 8758 0338 (Mon-Fri) 25
Recalling a preset station To select and play a preset station use the Select button to step through the list. 1. Press the Preset button to access the preset function. 2. The first of a list of ten presets is displayed in the bottom line of the Display Screen. 3. Push the Select button right or left to move the list forward or back. 4. If a station has been stored in the preset, the name of the station and the number of the preset will be displayed with arrows on either side. 5.
1 Backward Forward 5 If you need any further advice, please call our Technical Helpline on :020 8758 0338 (Mon-Fri) 27
Adjusting the Tone While the radio is in play mode the Tone button can be used to change the tone. The current tone is shown on the Display Screen by the Tone icon. 1. Press the Tone button to change the tone setting. List of tone settings: MBass Monitor Studio Club Arena Flat 2. The next tone setting will be applied to the current station. 3. The Tone icon changes to reflect the setting. 4. Press the Tone button until the desired tone is set. 5. The Tone setting is saved when the radio is switched off.
1 Monitor Studio Flat Arena Club MBass If you need any further advice, please call our Technical Helpline on :020 8758 0338 (Mon-Fri) 29
Using the Menu Function There are a number of system settings that can be accessed from the Menu function. List of system settings: Station Order Manual Tune Autoscan local Software version 1. Press the Menu button to access the list of system settings. 2. Push the Select button right or left to move the list forward or back until you find the desired system setting. 3. Press the Select button to choose the setting.
1 Backward Forward If you need any further advice, please call our Technical Helpline on :020 8758 0338 (Mon-Fri) 31
Station Order When the radio is switched on it compiles a list of stations. The Station Order functions can change the way this list is displayed on the Display Screen. The default Station Order is alphanumeric. Selecting Station Order from the system setting Menu list will display a sub menu. List of available arrangements: Alphanumeric Arranged in Number - Alphabetical order. Active Station Prioritises stations that a signal can be found for, and orders them alphanumerically.
If you need any further advice, please call our Technical Helpline on :020 8758 0338 (Mon-Fri) 33
Adjusting the Station Order 1. Push the Select button right or left to move the list forward or back until you find the desired function. 2. Press the Select button to select the function. 3. When the Station Order is set to Fav. Stations browsing the Station Order sub menu from the system settings menu will show an additional option - Favourite Presets. 4. Selecting the Favourite Presets function will allocate your favourite stations to the preset list - overwriting any existing presets.
Backward Forward 2 If you need any further advice, please call our Technical Helpline on :020 8758 0338 (Mon-Fri) 35
Autoscan Tuning Selecting Autoscan local from the system setting Menu list will prompt the radio to scan for all available stations. 1. A scanning message and progress bar are shown on the Display Screen. 2. The number on the right hand side of the Display Screen represents the number of stations found. The number will update as the scanning progresses. 3. The volume is muted while the scanning takes place, but the Volume Level icon does not change. 4.
If you need any further advice, please call our Technical Helpline on :020 8758 0338 (Mon-Fri) 37
Manual tuning Selecting Manual tune from the system setting Menu list allows you to tune the radio to a specified channel. To select a specific channel use the Select button to step through the list. 1. Push the Select button right or left to move the list forward or back until you find the desired channel. 2. Press the Select button to select the channel. 3. The Display Screen shows the signal strength bar. 4. To exit the Manual tune function press the Select button.
Backward Forward 2 If you need any further advice, please call our Technical Helpline on :020 8758 0338 (Mon-Fri) 39
Switching the Radio Off When the radio is switched off the current settings and station lists are saved for future use. If a reset is made before the radio is switched off then default settings will be saved. 1. Press the Power button on the top of the unit and hold for more than two seconds. 2. The Display Screen will illuminate and will display a power down message. 3. Release the Power button when the message clears. The radio is now off.
If you need any further advice, please call our Technical Helpline on :020 8758 0338 (Mon-Fri) 41
Reset The Reset function will erase all settings and station orders set by the user, and restores default settings. Default settings: Station List is empty All presets are empty Station order is alphanumeric Equalisation setting is MBass Display mode is scrolling DLS 1. Press the Menu button down and hold for more than two seconds. The Display Screen will show a message asking you to confirm the reset. 2. Press the Select button down to confirm the reset.
1 2 If you need any further advice, please call our Technical Helpline on :020 8758 0338 (Mon-Fri) 43
Troubleshooting The radio is not working and the Display Screen is blank. 1. Press the Power button. 2. Check the condition of the batteries. 3. Check the batteries have been inserted correctly. I cannot hear any sound through the earphones. 1. Plug the earphones into the Earphone Socket on the side of the unit. 2. Adjust the Volume level. The radio has locked up. 1. If the radio is switched on and playing but the buttons do not apear to work, check the Hold button is not in the “Hold” position. 2.
Troubleshooting The radio is receiving poor reception. 1. Check the Signal Strength icon shows that a suitable signal is being received. 2. Use the Autoscan function to rescan for all stations. 3. If the Autoscan function does not find a station use the Manual Tune function. 4. Ensure the aerial (earphone lead) is positioned for optimum reception. 5. Use the Signal Strength icon to find the best position.
General Do not allow this unit to be exposed to moisture e.g. dripping or splashing. Do not leave your radio where excessive heat could cause damage such as in a parked car where the heat from the sun can build up even though the outside temperature may not seem too high.
Specifications Battery: 3 x AA size Battery Life: Approx. ??hrs using alkaline batteries ?? Roberts to confirm External Power Supply: 4.5VDC 250mA, 2.1mm power jack positive tip (not supplied) Frequency coverage: 217.
Guarantee This radio is guaranteed for twelve months from the date of delivery to the original owner against failure due to faulty workmanship or component breakdown, subject to the procedure stated below. Should any component or part fail during this guarantee period it will be repaired or replaced free of charge. The guarantee does not cover: 1. Damage resulting from incorrect use. 2. Consequential damage. 3. Product with removed or defaced serial numbers.