
Specifications


corresponding hole in the chassis.
Step 5 – While still grasping the strain relief with the pliers,
guide the strain relief into the chassis hole. Firmly press the
compressed strain relief into the chassis hole (photo 6.25b).
Step 6 – Once the strain relief is installed, pull on the power cord
to verify that it is indeed firmly mounted.
Proceed to 6.26
Wiring the AC Power Cord Ground
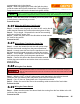
Step 1 – Loosely route the green wire from the AC cord to the #8
solder terminal nearest the rectifier tube socket (photo 6.26a).
Step 2 – Trim to length. Strip and tin the end of the remaining
green wire of the AC power cord.
Step 3 – Solder this green wire to the #8 solder terminal nearest
the rectifier tube socket.
Proceed to 6.27
Wiring Power Transformer Center Tap
Step 1 – Locate and untwist the red wire with yellow stripe
from the wire bundle coming from the power transformer.
Step 2 – Loosely route this wire from the transformer to the
#8 solder terminal located nearest the rectifier tube socket.
Step 3 – Trim to length. Strip and tin the end of this red wire
with yellow stripe coming from the power transformer.
Step 4 – Connect this wire to the shared #8 solder terminal
nearest the power switches and solder wires to this terminal
(photo 6.27a).
Proceed to 6.28
Wiring the Fuse Holder
Step 1 – Wire the “HOT” of the AC mains power cord (black wire in the USA) to the end
terminal of the fuse holder (video and photos show incorrect white wire here).
Step 2 – Cut a 3” piece of 18awg black wire. Strip and tin each end.
Step 3 – Solder one end of this wire to the remaining solder terminal of the fuse holder.
Proceed to 6.29
Wiring the Power Switch
Step 1 – Solder the other end of the above black wire coming from the fuse holder to the left
terminal of the power switch.
Proceed to 6.30
TubeDepot.com 25
By wiring the fuse holder as recommended, shock hazards associated with changing a
fuse are reduced because the source AC is at the far end of the fuse holder and not at the
cap end.
WARNING
6.28
There is a specific tool that makes installing strain reliefs simple. If you find yourself installing
strain reliefs on a regular basis, this tool is worth owning. See TubeDepot.com p/n TL-R-29
NOTE
Photo 6.26a
6.26
6.27
6.29
Photo 6.27a