
User Manual


STEERING FLUID MANAGEMENT CENTER
WARNING
It is extremely important to follow
these instructions. DO NOT attach any
hoses or accessories until instructed to
do so.
Always wear eye protection and
protective clothing with working with
refrigerants. Refrigerant can cause
injury. Read and follow all warnings
before operating this unit.
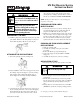
ASSEMBLING THE GUN
1. Install the plunger by pushing the ratchet lever up with
your thumb. Turn the teeth of the plunger so they face
down. Slide the plunger all the way into the gun.
ATTACHING THE DYE CARTRIDGE
1. To load the gun, flip open the cartridge lock.
2. Before installation, remove the red stopper in the end of
the cartridge. Squeeze the trigger to open the cartridge
lock enough to slide cartridge through the hole as
shown. Snap lock closed after cartridge installation.
3. Connect the R-12 or R-134a injector hose to the end of
the dye cartridge. The brass connector has self-tapping
threads that bite into the outside of the plastic tip as
you screw it on. The brass connector is also a check
valve that prevents any A/C system pressure from
entering the dye cartridge. Screw the brass connector
threads on one full turn. DO NOT OVERTIGHTEN.
NOTE: On the procedures below, see the following page
for pictures of the parts.
PURGING AIR FROM A NEW
INJECTOR HOSE
1. Connect the injector hose to the dye cartridge. If you
are using the automotive hose, make sure the R-12
adapter is assembled into the R-134a coupler.
2. Hold the hose vertically and depress the valve stem in
the center of the connector. Squeeze the trigger of the
gun two or three times until you see dye come out of
the connector. The hose will not need to be purged
again because there are valves at both ends of the hose.
PURGING AIR FROM A REPLACEMENT
DYE CARTRIDGE
1. Shake the cartridge well.
2. Assemble the cartridge to the gun as described
previously.
3. Remove the black cap and point the gun up.
4. Squeeze the trigger on the gun until the air bubble
disappears.
5. Assemble the injector hose to the dye cartridge.
APPLICATION OF DYE
1. Do not inject dye when the A/C system is in vacuum.
2. Do not attempt to inject dye into the high side of an
A/C system.
3. Run the A/C system during dye injection if possible.
The dye injection process is most easily accomplished
when performed at normal operating low side pres-
sure.
4. This product is not recommended for use on R-410A
(PURON TM) systems due to high operating pressures.
See next page for dosage and troubleshooting tips.
UV DYE DELIVERY SYSTEM
INSTRUCTION SHEET
123573 (Rev. B, 05/19/03) UV Dye Delivery Instruction © SPX Corporation
WARNING
Connect dye injector hoses to the LOW
SIDE of the A/C system only.