
Installation and Operation Guide


3
Mounting the Ironing Centre
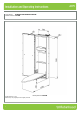
SURFACE MOUNT OPTION
o Make sure sold timber studs or mounting points are in suitable position for the mounting of the ironing centre.
o Due to many different installation possibilities no holes have been provided for these screws, Robinhood
suggest making 6 holes of suitable diameter for fixing to the customers preferred location. (it may be
necessary to purchase different length screws and/or wall anchors for correct fitting).
NOTE: Surface mounting Kit (Product Code ICSMK) is also available.
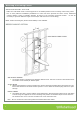
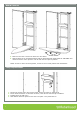
RECESS MOUNT OPTION
SIZE OF WALL OPENING
1. The Ironing Centre is designed to fit between 362mm studs. Take out a section of the wall and insert
two timber studs vertically at 362mm apart.
ATTACH BRACE
2. Attach horizontal brace (noggin) between the studs at the desired heights above and below the unit.
Ensure that the braces are level and the top brace is cut to allow the electrical plug and wire to pass
through.
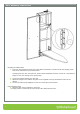
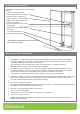
MOUNT CABINET
3. Lift cabinet into place, rest the cabinet on horizontal brace, plumb and shim cabinet to fit, and attach
to studs using the supplied six screws. Mounting hole position are indicated by the arrows. Remove
the electrical wire cover to access mounting hole on the right hand side.
Note - Be sure to allow for wall covering thickness behind cabinet face frame.