
User manual


3
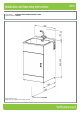
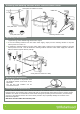
Installing the Supertub
Confirm if the door or washing machine waste inlet needs to be moved from right to left before securing the
unit to the wall. If they do need to be changed see page 6 of these installation instructions.
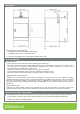
1. Fit the four adjustable feet supplied to the
bottom of the cabinet and adjust to align with
worktop or washing machine height. Use the
lock nut to secure the feet into position. Tilt
laundry tub slightly to assist with access. Check
the top of the laundry tub with a spirit level to
ensure that it is level and check that the cabinet
does not “rock” confirm that the door operates
correctly.
Locknut Bottom of the unit
2. Line up the laundry tub to the installation and confirm enough room, if necessary remove the skirting
board at the require distance 560 mm this will allow the unit to sit flush against the wall. (Check with
your local council for building regulations). Remove the laundry tub away from the wall.
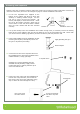
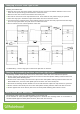
3. Fit the waste adapter from the installation kit this
must be glued in place, allow plenty of time for
the glue to dry before proceeding.
4. Connect the hot and cold 3 way ball valve from
the installation kit to the mains wingbacks using
suitable washers / hemp / ptfe tape.
If fittings are required standard parts are
available at most plumbing supply outlets.
Confirm that the ¾” washing machine cap is
secure and will not leak.
5. Fit the non return valve from the installation kit
into the hot 3 way ball valve, ensure that the
flow arrow is the correct way (fitted the wrong
way no water will come through the valve).
Apply plumbing PVC glue
Waste adapter
3 way ball valve
Non return valve
Direction of flow
Wing backs
O-ring inserted first
into the 3 way ball
valve