
Operation Manual


9
GB
or DIN 4102-B1. Wherever possible use rigid circular pipe which has a smooth interior, rather than
the expanding concertina type ducting.
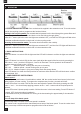
Maximum length of ducting run:
- 4 metres with 1 x 90° bend.
- 3 metres with 2 x 90° bends.
- 2 metres with 3 x 90° bends.
The above assumes our 150 mm (6 INS) ducting is being installed. Please note ducting components and
ducting kits are optional accessories and have to be ordered, they are not automatically supplied
with the chimney hood.
IN THE EXTRACTION MODE:
a. Place the anti-backow ats item 8 over the round outlet item 6 and connect the ducting 150mm (6
INS) over the round outlet on top of the canopy and secure the connections with appropriate clamp-
ing rings or adhesive tape (Fig. 12).
b. Remove the grease lters (see paragraph Maintenance) Fig. 11 being sure that the connector of the
mains cable is correctly inserted in the socket placed on the side of the fan. Before tting the chimney
to the canopy make the electrical connection as described in the section titled ELECTRICAL. When
the electrical connection has been made, test the lights and the fan motor.
c. Follow the instructions Fig. 8 to 3.
IN THE RECIRCULATION MODE:
a. Fit the recirculation spigot R onto the upper chimney wall bracket using the same xing screws (Fig.
12).
b. Connect the ducting 150mm (6 INS) not provided between motors item 6 and the recirculation spigot
and secure the connections with appropriate clamping rings or adhesive tape.
c. Remove the grease lters (see paragraph Maintenance) Fig. 11 being sure that the connector of
the feeding cable is correctly inserted in the socket placed on the side of the fan. Before tting the
chimney to the canopy make the electrical connection as described in the section titled ELECTRICAL.
When the electrical connection has been made, test the lights and the fan motor.
d. Insert the charcoal lter into the base of the motor housing and secure the lter with two metal secur-
ing straps item A as illustrated in Fig. 13.
e. Follow the instructions Fig. 8 to 3.