
Data Sheet


www.veear.eu
22 EasyVR 3 User Manual (1.0.8)
Quick start guide for using the Shield
Follow these few steps to start using your EasyVR Shield 3 and Arduino:
1. Insert the EasyVR Shield on top of your Arduino board
2. If you want audio output, either wire an 8Ω speaker into the SPEAKER connector (J5) on the
EasyVR module or connect headphones or amplified speakers to the LINE OUT 3.5mm audio jack
on the Shield
3. Connect the supplied microphone to the MIC connector (J6) on the EasyVR module
4. Install the EasyVR Arduino libraries
4
on your PC (details at http://arduino.cc/en/Guide/Libraries)
5. Connect your Arduino board to your PC via USB.
With Arduino Leonardo – Due (Native USB)
Test the Shield with Arduino
1. Make sure the Mode jumper (J7) is in the HW position
2. Open the example sketch TestEasyVR from your IDE menu “File” > “Examples” > “EasyVR”
3. Upload the sketch and open the “Serial Monitor” window
4. Send a question mark “?” (without quotes)
5. After a few seconds you should receive an “EasyVR detected” message
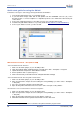
Test the Shield with the EasyVR Commander
1. Make sure the Mode jumper (J7) is in the HW position
2. Open and upload the example sketch TestEasyVR or EasyVRBridge (see menu “File” > “Examples”
> “EasyVR”)
3. Close the serial monitor window in the Arduino IDE
4. Open the EasyVR Commander and connect to the same serial port used by Arduino
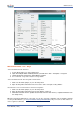
Download a new sound-table or firmware update
1. Make sure the Mode jumper (J7) is in the LEO position
2. Open and upload the example sketch TestEasyVR or EasyVRBridge (see menu “File” > “Examples”
> “EasyVR”)
3. Open the EasyVR Commander and select the Arduino serial port
4. While disconnected choose “Update Custom Data” from the “File” menu
4
The Arduino library archive file can be found in the EasyVR Commander program folder.