
Data Sheet


Options for Charging
Note that it is DANGEROUS to allow a LiPo battery to drop below it’s minimum voltage for
any length of time. They do include cut out circuitry to prevent this, but they still continue to
discharge over time. Always keep your LiPo charged.
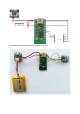
The most obvious way to charge the bridge battery is to connect the Adafruit charger board
to a micro USB cable and plug it in to a USB port. Once the Red LED goes out and the
Green one comes on, the battery is charged.
However, this is not always convenient, especially if you want a somewhat waterproof
bridge. You need to open the case, and connect things.
Something that has been used quite a bit is a Qi charger pad. Qi is a Near Field Wireless
charging standard used in Mobile phones etc. Adafruit (and their resellers) have a number
of these receiver pads, but you will want to get either of the models that have micro USB
connectors on them. You plug these in to the Adafruit charger board, and place the charger
receiver pad flat on the inside of one side of the bridge box you are using. You can then
place it on a Qi transmitter charger pad (available in lots of places for $20-$50 USD), which
commonly connects to a USB power supply of some sort.
Once placed on the Qi transmitter charger pad, the Red charger LED should light in the
bridge. You may need to move it around a bit to make sure the centre of the receiver pad is
over the centre of the transmitter pad. And that really is the only issue with the wireless
charging, that it can be easily knocked and the charging mistakenly interrupted.
The choice is entirely yours.
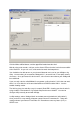
Updating the HM-1x module firmware
NOTE WELL: Seed Studio (www.seedstudio.com) and some other suppliers are
distributing HM-11 modules that are NOT genuine, and therefore this procedure will
not work with those modules. A genuine HM-11 module will respond to an
AT+NAME? command with “OK+NAMEHMSoft”, and will also advertise itself on BLE
as “HMSoft”. If your module does NOT respond with this name, or advertise itself
with this name, it is not genuine. However, it may still function just fine with xBridge2
wixel app, as the app will automatically detect the baud rate of the module and use it.
If you wish to be sure you have a genuine HM-11 module, I recommend ordering from
https://www.fasttech.com/product/1740900-hm-11-bluetooth-v4-0-transceiver-ble-
module. I have found this supplier to be reliable and responsive.
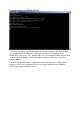
In order to ensure consistent operation of XBridge and the HM-1x modules, it is
recommended that once you assemble the hardware, you immediately update the firmware
of the HM-1x module you are using. This is necessary, because they are often delivered
with one of two SoC devices (cc2540 or cc2541), and various levels of firmware depending
on the source.
To rectify this, upgrade to at least level V534. This is the level that the wixel code for
XBridge has been tested against. Note: as long as your module responds to an AT
command with OK, it will work fine with xBridge2.