www.roboworks.com.au/support ROBOWORKS Multi-agent Control System Manual Prepared by: Wheeltec Inc. Translated by: Roboworks Pty. Ltd.
www.roboworks.com.au/support ROBOWORKS SUMMARY This document mainly explains the usage of the multi-robot formation function package named wheeltec_multi.
www.roboworks.com.au/support ROBOWORKS TABLE OF CONTENTS 1. Introduction to Multi-agent Algorithms 1.1 Multi-agent formation algorithms 1.2 Obstacle avoidance algorithms 2. Multi-agent Communications Setup 2.1 The steps to set up multi-agent communications 2.2 Automatic Wifi connection in ROS 3. Multi-agent Synchronisation Setup 3.1 Successful master-slave network connection 3.2 Troubleshooting network dis-connections 4. Multi-agent ROS Package 4.1 ROS package introduction 4.
www.roboworks.com.au/support ROBOWORKS INTRODUCTION TO MULTI-AGENT ALGORITHMS 1.1 Multi-agent formation algorithms This ROS package presents a typical problem of multi-agents in collaborative control during a formation drive. This tutorial lays a foundation for future development on this topic. Formation control algorithm refers to an algorithm that controls multiple agents to form a specific formation to perform a task.
www.roboworks.com.au/support ROBOWORKS when a robot could stop responding in front of an obstacle. This serves a purpose of better obstacle avoidance. MULTI-AGENT COMMUNICATION SETUP Multi-agent communication is one of the key steps to complete a multi-robot formation. When the relative positions of multiple robots are unknown, the robots need to share each other's information through communication to facilitate the establishment of connections.
www.roboworks.com.au/support ROBOWORKS 2.1 The steps to set up multi-agent communications 2.1.1 Set up ROS Controls in the same network There are 2 ways of setting up Master/Slave ROS Controls under the same network. Option 1: The Master Host creates a local wifi by running the Master node manager. Generally, one of the robots who is designated as the master creates this wifi network. Other robots or virtual machines join this wifi network as slaves.
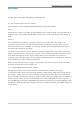
www.roboworks.com.au/support ROBOWORKS Fig 2-1-4 Environment Configuration File .bashrc ROS multi-machine communication is not constrained by ROS release version. In the process of multimachine communication, one should be aware of the following: 1) The operation of the ROS slave program depends on the ROS master program of the ROS master device. The ROS master program must launch first on the master device before executing the slave program on the slave device.
www.roboworks.com.au/support ROBOWORKS 7) You can use the Little Turtle simulation demo to verify whether the communication between the robots is successful: a. Run from the master roscore rosrun turtlesim turtlesim_node #launch ROS services #launch turtlesim interface b.
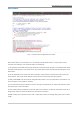
www.roboworks.com.au/support ROBOWORKS 2. Click the + button in Network Connections: Fig 2-2-2 Jetson Nano Connection to Wifi 3.
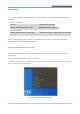
www.roboworks.com.au/support ROBOWORKS 4. In Control Panel, click Wifi option. Enter the Wifi name to connect in “Connection Name” and SSID fields. Select “Client” in “Mode” dropdown menu and select “wlan0” in “Device” dropdown menu. Fig 2-2-4 Jetson Nano Connection to Wifi 5. In Control Panel, click the "General" option and check "Automatically connect to this network…”. Set the connection priority to 1 in the "Connection priority for auto-activation" option.
www.roboworks.com.au/support ROBOWORKS Fig 2-2-5 Jetson Nano Connection to Wifi 6. Click “Wi-Fi Security” option in Control Panel. Select “WPA & WPA2 Personal” in “Security” field. Then enter the Wifi password in “Password” field.
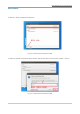
www.roboworks.com.au/support ROBOWORKS Note: If the robot cannot automatically connect to the wifi network after booting when the wifi priority is set to 0, it may be caused by a problem of weak wifi signal. In order to avoid this problem, you can choose to delete all the wifi options that have been connected in the past. Only keep the wifi network created by the host or the router. Click the "IPv4 Settings" option in the network settings control panel. Select "Manual" option in the “Method" field.
www.roboworks.com.au/support ROBOWORKS After all settings are configured, click "save" to save the settings. After the saving is successful, the robot will automatically connect to the network of the host or router when it is powered on. Note: 1) The IP address set here needs to be the same as the IP address set in the .bashrc file in Section 2.1. 2) The IP address of the master and each slave must be unique. 3) The master and slave IP addresses need to be in the same network segment.
www.roboworks.com.au/support ROBOWORKS MULTI-AGENT SYNCHRONISATION SETUP In the multi-agent formation project, the multi-agent time synchronization setting is a crucial step. In the process of the formation, many problems will be caused due to the asynchronous system time of each robot. Multi-agent time synchronization is divided into two situations, namely, the situation that both the master and slave robots are connected to the network and the situation that both are disconnected from the network. 3.
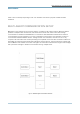
www.roboworks.com.au/support ROBOWORKS Fig 3-2-1 Steps to enter Broadcast Command sudo date -s “2022-01-30 15:15:00” # Manual time setup MULTI-AGENT ROS PACKAGE 4.1 ROS Package Introduction 4.1.1 Set up slave name In the wheeltec_multi function package, it is necessary to set a unique name for each slave robot in order to avoid errors. For example, No. 1 for slave1 and No. 2 for slave2 etc..
www.roboworks.com.au/support ROBOWORKS The purpose of setting different names is to group running nodes and distinguish them by different namespaces. For example, the radar topic of slave 1 is: /slave1/scan, and the LiDAR node of slave 1 is: / slave1/laser. 4.1.2 Set up slave coordinates The wheeltec_multi package can implement custom formations. When different formations are required, just modify the desired coordinates of the slave robots.
www.roboworks.com.au/support ROBOWORKS Fig 4-1-3 Initialisation Node of the Slave Position If the user wants to customize the initial position of the slave, he or she only needs to set the slave_x and slave_y values as shown in Figure 4-1-4 in wheeltec_slave.launch. The slave_x and slave_y values will be passed to turn_on_wheeltec_robot.launch and assigned to the pose_setter node. Just place the robot in a custom position before running the program. Fig 4-1-4 Slave initial position can be customised.
www.roboworks.com.au/support ROBOWORKS 4.1.4 Position Configuration In a multi-agent formation, the first problem to be solved is the positioning of the master and the slave. The master will construct a 2D map first. After creating and saving the map, run the 2D navigation package and use the adaptive Monte Carlo positioning algorithm (amcl positioning) in the 2D navigation package to configure the positioning of the master.
www.roboworks.com.au/support ROBOWORKS Fig 4-1-6 Speed Limitation The relevant parameters of the formation algorithm are as follows: Fig 4-1-7 Formation Algorithm 4.1.6 Obstacle avoidance in formation In a multi-agent formation, the master can use the move_base node to complete obstacle avoidance. However, the initialization of the slave does not use move_base node.
www.roboworks.com.au/support ROBOWORKS needs to be called in the slave program. The obstacle avoidance node is enabled by default in the package. If necessary, avoidance can be set to “false” to disable the obstacle avoidance node. Fig 4-1-8 Obstacle Avoidance Node for the Slaves Some relevant parameters of the obstacle avoidance node are shown in the figure below, where safe_distance is the obstacle safe distance limit, and danger_distance is the obstacle dangerous distance limit.
www.roboworks.com.au/support ROBOWORKS 4.2 Operation Procedure 4.2.
www.roboworks.com.au/support ROBOWORKS 4.2.2 Note: 1. Be sure to complete the time synchronization operation before executing the program. 2. When controlling the master of a multi-agent formation, the angular velocity should not be too fast. Recommended linear speed is 0.2m/s, angular speed degree below 0.3rad/s. When the master is making a turn, the farther the slave is from the master, the greater the linear speed is required.