Robustel GoRugged R3000 Dual SIM Industrial Cellular VPN Router For GPRS/EDGE/UMTS/HSPA/LTE Networks User Guide Document Name: Firmware : Date : Status : Doc ID : User Guide 1.01.00 2014-01-17 Confidential )RT_UG_R3000_v.2.0.0 www.robustel.
Robustel GoRugged R3000 User Guide About This Document This document describes hardware and software of Robustel R3000, Dual SIM Industrial 2G/3G/4G Router. Copyright© Guangzhou Robustel Technologies Co., Limited All Rights Reserved. Trademarks and Permissions Robustel are trademark of Guangzhou Robustel Technologies Co. Limited. All other trademarks and trade names mentioned in this document are the property of their respective holders.
Robustel GoRugged R3000 User Guide Important Notice Due to the nature of wireless communications, transmission and reception of data can never be guaranteed. Data may be delayed, corrupted (i.e., have errors) or be totally lost.
Robustel GoRugged R3000 User Guide Do not expose the router to extreme conditions such as high humidity / rain, high temperatures, direct sunlight, caustic / harsh chemicals, dust, or water. Do not try to disassemble or modify the router. There is no user serviceable part inside and the warranty would be void. Do not drop, hit or shake the router. Do not use the router under extreme vibrating conditions. Do not pull the antenna or power supply cable. Attach/detach by holding the connector.
Robustel GoRugged R3000 User Guide Regulatory and Type Approval Information Table 1: Directives 2002/95/EC Directive of the European Parliament and of the Council of 27 January 2003 on the restriction of the use of certain hazardous substances in electrical and electronic equipment (RoHS) 2002/96/EC Directive of the European Parliament and of the Council on waste electrical and electronic equipment (WEEE) Directive of the European Parliament and of the Council of 8 December 2003/108/EC 2003 amending di
Robustel GoRugged R3000 User Guide Revision History Updates between document versions are cumulative. Therefore, the latest document version contains all updates made to previous versions. Release Date Firmware Version Doc Version Details 2013-01-24 1.00 v.1.0.0 First Release 2014-01-17 1.01 v.2.0.0 Second Release RT_UG_R3000_v.2.0.0 Confidential 17.01.
Robustel GoRugged R3000 User Guide Contents Chapter 1. 1.1 1.2 1.3 1.4 Chapter 2. 2.1 2.2 2.3 2.4 2.5 2.6 2.7 2.8 2.9 Chapter 3. 3.1 3.2 3.3 3.4 3.5 3.6 3.7 3.8 3.9 3.10 3.11 3.12 3.13 3.14 3.15 3.16 3.17 3.18 3.19 3.20 3.21 3.22 3.23 3.24 3.25 3.26 Product Concept......................................................................................................................................... 8 Overview ................................................................................................
Robustel GoRugged R3000 User Guide 3.27 Configuration -> PPTP............................................................................................................................... 84 3.28 Configuration -> SNMP ............................................................................................................................. 88 3.29 Configuration -> VRRP .............................................................................................................................. 90 3.
Chapter 1. Product Concept 1.1 Overview Robustel GoRugged R3000 is a rugged cellular router offering state-of-the-art mobile connectivity for machine to machine (M2M) applications. Dual SIM redundancy for continuous cellular connections, supports 2G/3G/4G. WAN link management: cellular WAN/Ethernet WAN/WLAN WAN backup. VPN tunnel: IPSec/OpenVPN/PPTP/L2TP/GRE. Supports Modbus gateway (Modbus RTU/ASCII to Modbus TCP). Supports GPS (optional), provides real time location and tracking.
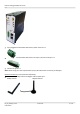
Robustel GoRugged R3000 User Guide 3-pin pluggable terminal block with lock for power connector x 1 7-pin pluggable terminal block with lock for serial port, I/O and console port x 1 CD with user guide x 1 Note: Please notify your sales representative if any of the above items are missing or damaged. Optional accessories (can be purchased separately): SMA antenna (Stubby antenna or Magnet antenna optional) x 1 Stubby antenna Magnet antenna RT_UG_R3000_v.2.0.0 Confidential 17.01.
Robustel GoRugged R3000 User Guide Ethernet cable x 1 Wall Mounting Kit 35mm Din-Rail mounting kit AC/DC Power Supply Adapter (12VDC, 1.5A) x 1 (EU, US, UK, AU plug optional) 1.3 Specifications Cellular Interface Standards: GSM/GPRS/EDGE/UMTS/HSPA/EVDO/FDD LTE GPRS/EDGE: 850/900/1800/1900 MHz HSUPA: 900/2100 or 850/1900 MHz optional, DL/UL 7.2/5.76 Mbps, fallback to 2G HSPA+: 850/900/1900/2100, DL/UL 21/5.
Robustel GoRugged R3000 User Guide SIM: 2 x (3V & 1.8V) Antenna Interface: SMA Female Ethernet Interface Number of Ports: 2 x 10/100 Mbps, 2 LANs or 1 LAN 1 WAN Magnet Isolation Protection: 1.5KV WLAN Interface (Optional) Standards: 802.11b/g/n up to 65 Mbps, AP and Client mode Frequency Band: 2.400 - 2.500 GHz (2.4 GHz ISM band) Security: Open ,WPA, WPA2 Encryption: AES, TKIP Antenna Interface: SMA Female Transmission Power: 802.11b: 17dBm, 802.
Robustel GoRugged R3000 User Guide Isolation: 3K VDC or 2K Vrms Digital Filtering Time Interval: Software selectable Interface: 3.5mm terminal block with lock Digital Output Type: 2 x DO, Sink Isolation: 3K VDC or 2K Vrms Absolute Maximum VDC: 36V Absolute Maximum ADC: 50mA Interface: 3.5mm terminal block with lock System LED Indicators: RUN, PPP/WLAN, USR, RSSI, NET, SIM Built-in RTC, Watchdog, Timer Expansion: 1 x USB 2.
Robustel GoRugged R3000 User Guide Physical Characteristics Housing & Weight: Metal, 500g Dimension: (L x W x H): 125 x 108 x 45 mm Installation: 35mm Din-Rail or wall mounting or desktop Regulatory and Type Approvals Approval & Detective: CE, R&TTE, FCC, RCM, RoHS, WEEE EMC: EN 61000-4-2 (ESD) Level 4, EN 61000-4-3 (RS) Level 4 EN 61000-4-4 (EFT) Level 4, EN 61000-4-5 (Surge) Level 3 EN 61000-4-6 (CS) Level 4, EN 61000-4-8, EN 61000-4-12 Environmental Limits Model No.
Robustel GoRugged R3000 User Guide Chapter 2. Installation 2.1 LED Indicators Name RUN Color Green Status Function Blinking Router is ready. On Router is starting. Off Router is power off. WLAN Indicator: Data is being transmitted. Blinking WLAN/P PP Green PPP Indicator: Null WLAN Indicator: Wi-Fi AP/Client is enabled. On PPP Indicator: PPP connection is up. WLAN Indicator: Wi-Fi AP/Client is disabled. Off USR RSSI On/Blinking VPN tunnel/PPPoE/DynDNS/GPS is up.
Robustel GoRugged R3000 User Guide 2.2 PIN assignment 1 PIN Debug RS232 2 1 RXD 3 2 TXD 4 3 GND 5 4 TXD 6 5 RXD 7 6 RTS 7 CTS Power Digital I/O RS485 GND 8 8 Positive 9 9 Negative 10 10 GND 11 Input 1 11 12 Input 2 12 13 Output 1 13 14 Output 2 14 15 GND 15 16 Data+(A) 16 17 Data- (B) 17 2.3 USB interface USB interface is used for batch firmware upgrade, cannot used to send or receive data from slave devices which with USB interface.
Robustel GoRugged R3000 User Guide 2.4 Reset Button Function Operation Reboot Push the button for 5 seconds under working status. Restore to factory default setting Push the button for 60 seconds once you power on the router until all the three LEDs at the left side (RUN, PPP, USR) blink at the same time for 5 times. Reset Button 2.5 Ethernet ports Each Ethernet port has two LED indicators (please check the following picture). The yellow one is Speed indicator and the green one is Link indicator.
Robustel GoRugged R3000 User Guide 2.6 Mount the Router Use 2 pcs of M3 screw to mount the router on the wall. Or mount the router on a DIN rail with 3 M3 screws. 2.7 Install SIM Card and Micro SD Card RT_UG_R3000_v.2.0.0 Confidential 17.01.
Robustel GoRugged R3000 User Guide 1. 2. 3. 1. 2. Inserting SIM Card or Micro SD Card Make sure power supply is disconnected. Use a screwdriver to unscrew the screw on the cover, and then remove the cover, you could find the SIM Card slots and the Micro SD slot. Insert the SIM card or Micro SD card, and you need press the card with your fingers until you hear “a cracking sound”. Then use a screwdriver to screw the cover. Removing SIM Card or Micro SD Card Make sure router is power off.
Robustel GoRugged R3000 User Guide Screw Note: This product is intended to be mounted to a well-grounded mounting surface, such as a metal panel. RT_UG_R3000_v.2.0.0 Confidential 17.01.
Robustel GoRugged R3000 User Guide Chapter 3. Configuration settings over web browser The router can be configured through your web browser. A web browser is included as a standard application in the following operating systems: Linux, Mac OS, Windows 98/NT/2000/XP/Me/Vista/7/8, etc. The product provides an easy and user-friendly interface for configuration. There are various ways to connect the router, either through an external repeater/hub or connect directly to your PC.
Robustel GoRugged R3000 User Guide 4. Select Internet Protocol (TCP/IP) and click Properties. RT_UG_R3000_v.2.0.0 Confidential 17.01.
Robustel GoRugged R3000 User Guide 5. Select the Obtain an IP address automatically and Obtain DNS server address automatically radio buttons. 6. Click OK to finish the configuration. 3.2 Factory Default Settings Before configuring your router, you need to know the following default settings. Item Username Password Eth0 Eth1 RT_UG_R3000_v.2.0.0 Confidential Description admin admin 192.168.0.1/255.255.255.0, LAN mode 192.168.0.1/255.255.255.0, LAN mode 17.01.
Robustel GoRugged R3000 User Guide DHCP Server Enabled. 3.3 Control Panel This section allows users to save configuration, reboot router, logout and select language. RT_UG_R3000_v.2.0.0 Confidential 17.01.
Robustel GoRugged R3000 User Guide Control Panel Item Description Button Save Click to save the current configuration into router’s flash. Reboot After save the current configuration, router needs to be rebooted to make the modification taking effect. Logout Click to return to the login page. Language Select from Chinese, English, German, French and Spanish. Refresh Click to refresh the status. Apply Click to apply the modification on every configuration page.
Robustel GoRugged R3000 User Guide Router Information Item Device Model Serial Number Device Name Firmware Version Hardware Version Kernel Version Radio Module Type Radio Firmware Version Uptime CPU Load RAM Total/Free System Time Description Show the model name of this device Show the serial number of this device Show the device name to distinguish different devices you have installed.
Robustel GoRugged R3000 User Guide IP Address Gateway NetMask DNS Server Keeping PING IP Address Keeping PING Interval Show the current WAN IP address Show the current gateway Show the current netmask Show the current primary DNS server and Secondary server Show the current ICMP detection server which you can set in “Configuration->Link Management”. Show the ICMP Detection Interval (s) which you can set in “Configuration->Link Management”. Cellular Information Item Current SIM Phone No.
Robustel GoRugged R3000 User Guide Signal Level (RSSI) Network Operator Network Service Type IMEI/ESN IMSI USB Status 6. Unknown. Show the current signal level. Show Mobile Country Code (MCC) +Mobile Network Code (MNC), e.g. 46001. Also it will show the Location Area Code (LAC) and Cell ID. Show the current network service type, e.g. GPRS. Show the IMEI/ESN number of the radio module. Show the IMSI number of the current SIM. Show the current status of USB host. 3.
Robustel GoRugged R3000 User Guide Note: This information will be shown when R3000 enable WiFi feature and works as AP mode. Note: This information will be shown when R3000 enable WLAN and works as Client mode. 3.6 Status -> Route This section displays the router’s route table. 3.7 Status -> VPN This section displays the router’s VPN status, which includes IPSec, L2TP, PPTP, OpenVPN and GRE. RT_UG_R3000_v.2.0.0 Confidential 17.01.
Robustel GoRugged R3000 User Guide 3.8 Status -> Services This section displays the router’s Services’ status, including VRRP, DynDNS, Serial and DI/DO. RT_UG_R3000_v.2.0.0 Confidential 17.01.
Robustel GoRugged R3000 User Guide 3.9 Status -> Event/Log This section displays the router’s event/log information. You need to enable router to output the log and select the log level first, then you can view the log information here. Also you can click Download System Diagnosing Data to download diagnose data. RT_UG_R3000_v.2.0.0 Confidential 17.01.
Robustel GoRugged R3000 User Guide Event/Log Item Download Log Level Description Select the log messages you want to download. Select the Log level in the drop-down menu: DEBUG, INFO, NOTICE, WARNING, ERR, CRIT, ALERT, EMERG. Download Sytem Diagnosing Data Click Download System Diagnosing Data to download diagnose file. Manual Refresh Select from “5 Seconds”, “10 Seconds”, “15 Seconds”, “30 Seconds” and “1 Minute”. User can select these intervals to refresh the log information. 3.
Robustel GoRugged R3000 User Guide Link Management Item Description Selected from “Cellular”, “Eth0”, “WiFi”. 1. Cellular: Select to make cellular as the primary WAN link. Primary Interface 2. Eth0: Select to make Eth0 as the primary WAN link. 3. WiFi: Select to make WiFi as the primary WAN link. Selected from “None”, “Eth0”, “WiFi”. 1. None: Do not select backup interface. Backup Interface 2. Cellular: Select Cellular as the backup WAN link. 3. Eth0: Select Eth0 as the backup WAN link. 4.
Robustel GoRugged R3000 User Guide Link”. RT_UG_R3000_v.2.0.0 Confidential 17.01.
Robustel GoRugged R3000 User Guide Basic @Cellular WAN Cellular Settings Item Network Provider Type APN Username Password Dialup No. PIN Type RT_UG_R3000_v.2.0.0 Confidential Description Select from “Auto”, “Custom” or the ISP name you preset in “Configuration”->”Cellular WAN”->”ISP Profile”. Auto: Router will get the ISP information from SIM card, and set the APN, username and password automatically. This option only works when the SIM card is from well-known ISP.
Robustel GoRugged R3000 User Guide Connection Mode Select from “Always Online” and “Connect On Demand”. Always Online: Auto activates PPP and keeps the link up after power on. Connect On Demand: After selection this option, user could configure Connection Mode Triggered by Serial Data, Triggered by Periodically Connect and Triggered by Time Schedule. Note: If you select several connect on demand polices, router only have to meet one of them to be triggered.
Robustel GoRugged R3000 User Guide Periodically Interval Connect Time Schedule Time Range Periodically Connect Interval for Periodically Connect. 300 Select the Time Range to allow router automatically connects to cellular NULL network during this time range. Adding the Time Range for Time Schedule. You can set the days of one week Null and at most three ranges of time of one day. Dual SIM Policy Set the preferred SIM card from SIM 1, SIM 2 or Auto.
Robustel GoRugged R3000 User Guide Advanced @Cellular WAN Item Phone No. Authentication MTU MRU Asyncmap Value Use Peer DNS Primary DNS Server Secondary DNS Server Address/Control Compression Protocol Compression Expert Options RT_UG_R3000_v.2.0.0 Confidential Field Description Set the SIM card’s phone number, and it will be showed in “Status”->”System”->”System”->”Cellular WAN Information”-“SIM Phone Number”.
Robustel GoRugged R3000 User Guide can be separated by a space. nobsdcomp ISP Profile This section allow users to preset some ISP profiles which will be shown in the selection list of “Configuration”->”Cellular WAN”->”Network Provider Type”. ISP Profile @Cellular WAN Item ISP Description Default Input the ISP’s name which will be shown in the selection list of Null “Configuration”->”Cellular WAN”->”Network Provider Type”. APN, Username, All these parameters were provided by the ISP.
Robustel GoRugged R3000 User Guide Eth0@Ethernet Item Ethernet Interface Type Enable Bridge @ LAN Interface IP Address, Netmask, MTU, Media Type@ LAN Interface Multiple IP Address @ LAN Interface Enable DHCP Server @ DHCP Server IP Pool Start, IP Pool End @ DHCP Server Description Default Eth0 can work under two different kinds of mode: LAN and WAN. LAN Enable to make Eth0 works under bridge mode with Eth1. Eth0 and Enable Eth1 will have the same IP address under this mode.
Robustel GoRugged R3000 User Guide Static Lease @ DHCP Define to lease static IP Addresses, which conform to MAC Address of Server the connected equipment. Null This section allows users to set the Ethernet WAN and LAN parameters of Eth1. Eth1@Ethernet Item RT_UG_R3000_v.2.0.0 Confidential Description Default 17.01.
Robustel GoRugged R3000 User Guide IP Address, Netmask, MTU, Media Type @ LAN Interface Multiple IP Address @ LAN Interface Enable DHCP Server @ DHCP Server Set the IP address, Netmask, MTU and Media Type of Eth1. These Null parameters will be un-configurable if you enable Bridge. Assign multiple IP addresses for Eth1. Null Enable to make router can lease IP address to DHCP clients which Enable connect to Eth1. 192.168.0.
Robustel GoRugged R3000 User Guide 3.13 Configuration -> WiFi This section allows users to set parameters of WiFi. Note: when R3000 enable WiFi feature and works as AP mode Note: when R3000 enable WiFi feature and works as Client mode Basic @ WiFi Item Enable WiFi Mode RT_UG_R3000_v.2.0.0 Confidential Description Default Click to enable WiFi feature. Null This item will show “AP” and “Client”, cannot be configured.
Robustel GoRugged R3000 User Guide Channel SSID Hide SSID Security mode Encryption Passphrase RT_UG_R3000_v.2.0.0 Confidential Ethernet-to-wireless (or LAN-to-WLAN) network adaptor. For example, a notebook computer equipped with an Ethernet adaptor but no wireless card can be connected to the router with an Ethernet cable to provide wireless connectivity to another AP.
Robustel GoRugged R3000 User Guide Key Renewal Interval(s) WiFi Network Settings complicated and as long as possible. For security reasons, this passphrase should only be disclosed to users who need it, and it should be changed regularly. When R3000 works as Client mode, enter access point’s passphrase which it wants to connect to. Input from 8 to 63 characters. Enter the time period of group key renewal. 3600 Note: Only for AP mode.
Robustel GoRugged R3000 User Guide BSSID SSID Mode Key Management Cipher Pairwise Cipher Group WPA State RT_UG_R3000_v.2.0.0 Confidential Status @ WiFi Show MAC address of R3000’s WiFi interface or the access point which R3000 connects to. Show SSID of R3000’s WiFi interface or the access point which R3000 connects to. Show current mode of R3000: AP or Client. Show current security mode of R3000 or the access point which R3000 connects to.
Robustel GoRugged R3000 User Guide Address Show the MAC address of R3000’s WiFi interface. Null Associated Clients @ AP Show current associated wireless client devices’ BSSID and IP address. Null mode Show current scan results of any wireless network (access point), such Scan Results @ Client as SSID, Channel, Signal Level, Flags (the security mode and encryption Null mode algorithm flags of access point). 3.14 Configuration -> Serial This section allows users to set the serial (RS232/RS485) parameters.
Robustel GoRugged R3000 User Guide When Select Protocol “Transparent Over Rlink”: When Select Protocol “Modbus Over Rlink”: When Select Protocol “AT Over COM”: When Select Protocol “GPS Report”: RS232 @ Serial Item Baud-rate Data bit Parity Stop bit Flow control Protocol RT_UG_R3000_v.2.0.0 Confidential Description Select from “300”, “600”, “1200”, “2400”, “4800”, “9600”, “19200”, “38400”, “57600” , “115200”and “230400”. Select from “7” and “8”. Select from “None”, “Odd” and “Even”.
Robustel GoRugged R3000 User Guide Mode @Transparent Local @Transparent Port “Modbus Over Rlink” “AT Over COM” and “GPS Report”. 1. None: Router will do nothing in RS232 serial port. 2. Transparent: Router will transmit the serial data transparently without any protocols. 3. Modbus: Router will translate the Modbus RTU data to Modbus TCP data and vice versa. 4.
Robustel GoRugged R3000 User Guide Enable Delimiter1/2 Delimiter1/2 @Transparent (Hex) Delimiter Process @Transparent Local IP @ Modbus Local Port @ Modbus Attached serial device type @Modbus Modbus @Modbus Slave Slave Address @ Modbus Slave Slave Port @ Modbus RT_UG_R3000_v.2.0.0 Confidential sent as soon it reaches the specified length. Note: Data will also be sent as specified by the interval timeout or delimiter settings even when data is not reaching the preset packet length.
Robustel GoRugged R3000 User Guide Slave ID @ Modbus Slave Enter the ID number of TCP server. Interval Timeout @ The serial port will queue the data in the buffer and send the data to the Cellular Transparent Over WAN/Ethernet WAN when it reaches the Interval Timeout in the field. Rlink Select From “Modbus RTU slave”, “Modbus ASCⅡ slave”. Attached serial device Modbus RTU slave: router connects to slave device which works under Modbus type @ Modbus Over RTU protocol.
Robustel GoRugged R3000 User Guide When Select Protocol “Modbus”: When Select Protocol “Transparent Over Rlink”: When Select Protocol “Modbus Over Rlink”: RS485 @ Serial Item Baud-rate Data bit Parity Stop bit Protocol Description Select from “300”, “600”, “1200”, “2400”, “4800”, “9600”, “19200”, “38400”, “57600” , “115200”and “230400”. Select from “7” and “8”. Select from “None”, “Odd” and “Even”. Select from “1” and “2”. Select from “None”, “Transparent” and “Modbus”.
Robustel GoRugged R3000 User Guide Note: when you do not enable any VPN tunnel, this item will not show up. The serial port will queue the data in the buffer and send the data to the Cellular WAN/Ethernet WAN when it reaches the Interval Timeout in the Interval Timeout field. @Transparent Note: Data will also be sent as specified by the packet length or delimiter settings even when data is not reaching the interval timeout in the field.
Robustel GoRugged R3000 User Guide Modbus section only displayed when you select “Modbus RTU master” or “Modbus ASCII master” in “Attached serial device type”. Slave Address @ This connection is usually used to connect to the Modbus slave devices Modbus Slave which as TCP server. Enter IP address of the TCP server. Slave Port @ Modbus Enter the port number of TCP server. Slave ID @ Modbus Slave Enter the ID number of TCP server.
Robustel GoRugged R3000 User Guide Enable DI Click to Enable DI. Select from “OFF”, “ON”, “EVENT_COUNTER”. OFF: Connect to GND (logic 0). When pin DI connects to GND, R3000 will detect there is a DI alarm input. Mode ON: Open from GND (logic 1). When pin DI does not connect to GND, R3000 will detect there is a DI alarm input. EVENT_COUNTER: under event counter mode. Software filtering is used to control switch bounces. Filtering Input from 0 to 10000ms. Available when DI under Event Counter mode.
Robustel GoRugged R3000 User Guide DO @ DI/DO Item Enable Description Click to enable DO. Digital Output initiates according to different alarm source. Selected from “DI Alarm”, “SMS Control”, “Call Control”, selections can be one or more. DI Alarm: Digital Output triggers the related action when there is alarm from Digital Alarm Source Input. SMS Control: Digital Output triggers the related action when receiving SMS from the number in the phone book.
Robustel GoRugged R3000 User Guide Available when enable Pulse in Alarm On Action/Alarm Off Action. The first pulse will be generated after a “Delay”. 0 Input from 0 to 30000ms. (0=generate pulse without delay) Available when enable Pulse in Alarm On Action/Alarm Off Action. In Pulse Output mode, the selected digital output channel will generate a square Low wave as specified in the pulse mode parameters. The low level widths are specified 10 here. Input from 1 to 30000 ms.
Robustel GoRugged R3000 User Guide Enable automatic update Click Enable to automatically update the configuration file of R3000 when Disable of configuration insert the USB storage devices which has R3000’s configuration file. Enable automatic update Click Enable to automatically update the firmware of R3000 when insert the Disable of firmware USB storage devices which has R3000’s firmware. 3.17 Configuration -> GPS This section allows users to set the GPS setting parameters.
Robustel GoRugged R3000 User Guide Made Good and Ground Speed(VTG)+ Recommended Minimum Specific GPS/TRANSIT Data(RMC). NMEA RMC: Recommended Minimum Specific GPS/TRANSIT Data(RMC). Set the interval to report GPS status to RS232 serial port of router. 1 RS232 Report Interval Index @ GPS Server Show the index of GPS Server. Setting Server Name @ GPS Show the type of GPS Server. Server Setting Add Click “Add” to add GPS Server. Select from “NMEA GGA+VTG”, “NMEA GGA+VTG+RMC” and “NMEA RMC”.
Robustel GoRugged R3000 User Guide GPS Status @ GPS Item GPS Status Satellites In Use Satellites In View UTC Latitude Longitude Altitude Speed Description Show the GPS Status. GPS status includes: Not Installed, Disabled, No Fix/Invalid, Standalone GPS Fix, Differential GPS Fix. Not Installed: No GPS module inside. Disabled: GPS function is not enabled (not click “Enable GPS” in item “GPS Setting” yet).
Robustel GoRugged R3000 User Guide 3.18 Configuration -> NAT/DMZ This section allows users to set the NAT/DMZ parameters. Port Forwarding @ NAT/DMZ Item Port Forwarding Defaul t Description Manually defining a rule in the router to send all data received on some range of ports on the internet side to a port and IP address on the LAN side. Set the remote IP address. The port of the internet side which you want to forward to LAN side.
Robustel GoRugged R3000 User Guide DMZ @ NAT/DMZ Item DMZ Enable DMZ DMZ Host Source Address Description DMZ host is a host on the internal network that has all ports exposed, except those ports otherwise forwarded. Select to enable the DMZ function. Enter the IP address of the DMZ host which on the internal network. Set the address which can talk to the DMZ host. Null means for any addresses. Default Null Enable 0.0.0.0 0.0.0.0 3.
Robustel GoRugged R3000 User Guide network resource unavailable to its intended users. Filtering @ Firewall Item Description Select from “Accept” and “Drop”. Accept: Router will reject all the connecting requests except the hosts which fit Default Filter Policy the filter list. Drop: Router will only accept the connecting requests from the hosts which fit the filter list. Add Filter List Click “Add” to add a filter list. Select from “Accept” and “Drop”.
Robustel GoRugged R3000 User Guide Mac-Binding @ Firewall Item Mac-IP Bounding Mac Address IP Address Description The defined host (MAC) on the LAN side only can use the defined IP address to communicate with router, or will be rejected. Enter the defined host’s Mac Address. Enter the defined host’s IP Address. Default Null Null Null 3.20 Configuration -> QoS This section allows users to set the QoS parameters. QoS Item RT_UG_R3000_v.2.0.0 Confidential Description Default 17.01.
Robustel GoRugged R3000 User Guide Enable QoS Downlink (kbps) Speed uplink Speed (kbps) Optimize for TCP Flags Default Priority Optimize for Serial Data Forwarding Optimize for ICMP MAC Address @ QoS MAC Control List Priority @ QoS MAC Control List RT_UG_R3000_v.2.0.0 Confidential Click to enable “QoS” function. Prescribe downlink speed of router. Note: Default setting“0” means that there is no limitation of downlink speed. Prescribe uplink speed of router.
Robustel GoRugged R3000 User Guide 100% of “Downlink Speed”. Premium: guarantees that the minimum global rate of router is 25% of “Downlink Speed”, and the maximum rate can reach to 100% of “Downlink Speed”. Express: guarantees that the minimum global rate of router is 15% of “Downlink Speed”, and the maximum rate can reach to 100% of “Downlink Speed”. Normal: guarantees that the minimum global rate of router is 10% of “Downlink Speed”, and the maximum rate can reach to 100% of “Downlink Speed”.
Robustel GoRugged R3000 User Guide Speed”, and the maximum rate can reach to 100% of “Downlink Speed”. Normal: guarantees that the minimum global rate of router is 10% of “Downlink Speed”, and the maximum rate can reach to 100% of “Downlink Speed”. Bulk: guarantees that the minimum global rate of router is 1% of “Downlink Speed”, and the maximum rate can reach to 100% of “Downlink Speed”.
Robustel GoRugged R3000 User Guide RIP @ IP Routing Item RIP Description Default RIP (Routing Information Protocol) is a distance-vector routing protocol, which employs the hop count as a routing metric. RIP prevents routing loops by Null implementing a limit on the number of hops allowed in a path from the source to a destination. Enable RIP Protocol Tick to enable RIP function. Setting RIP Protocol Version Select from “RIPv1” and “RIPv2”.
Robustel GoRugged R3000 User Guide This command sets the specified interface to passive mode. On passive mode interface, all receiving packets are processed as normal and Rip info does not send either multicast or unicast RIP packets except to RIP neighbors specified with neighbor command. The default is to be passive on all interfaces. Enable Default Enable to make router send the default route to the other routers which in the Disable Origination same IGP AS.
Robustel GoRugged R3000 User Guide DynDNS Item DynDNS Enable DynDNS Service Type hoastmen Username Password URL Force Update DynDNS Status Description The Dynamic DNS function allows you to alias a dynamic IP address to a static domain name, allowing users whose ISP does not assign them a static IP address to use a domain name.
Robustel GoRugged R3000 User Guide IPSec Basic @ IPSec Item Enable NAT Traversal Keepalive Interval RT_UG_R3000_v.2.0.0 Confidential Description Tick to enable NAT Traversal for IPSec. This item must be enabled when router under NAT environment. The interval that router sends keepalive packets to NAT box so that to avoid it to remove the NAT mapping. 17.01.
Robustel GoRugged R3000 User Guide IPSec Tunnel @ IPSec Item Add Enable IPSec Gateway Address IPSec Mode IPSec Protocol Local Subnet Local Subnet Mask Local ID Type Remote Subnet Remote Subnet Mask Remote ID Type RT_UG_R3000_v.2.0.0 Confidential Description Click Add to add new IPSec Tunnel Enable IPSec Tunnel, the max tunnel account is 3 Default Null Null Enter the address of remote side IPSec VPN server. Null Select from “Tunnel” and “Transport”.
Robustel GoRugged R3000 User Guide Negotiation Mode Encryption Algorithm Authentication Algorithm DH Group Authentication Secrets Life Time @ IKE Parameter SA Algorithm RT_UG_R3000_v.2.0.0 Confidential selected, type a name without any at sign (@) for the local security gateway, e.g., test.robustel.com. User FQDN: Uses a user FQDN type as the ID in IKE negotiation. If this option is selected, type a name string with a sign “@” for the local security gateway, e.g., test@robustel.com.
Robustel GoRugged R3000 User Guide PFS Group Life Time @ SA Parameter DPD Time Interval high confidentiality and security are required. Select from “PFS_NULL”, “MODP768_1”, “MODP1024_2” and “MODP1536_5”. PFS_NULL: Disable PFS Group MODP768_1: Uses the 768-bit Diffie-Hellman group. MODP1024_2: Uses the 1024-bit Diffie-Hellman group. MODP1536_5: Uses the 1536-bit Diffie-Hellman group. Set the IPSec SA lifetime.
Robustel GoRugged R3000 User Guide X.509 @ IPSec Item Select Cert Type CA Remote Public Key Local Public Key Local Private Key CRL Authentication Status Description Select the IPSec tunnel which the certification used for. Click “Browse” to select the correct CA file from your PC, and then click “Import” to import it to the router. Click “Export” you can export the CA file from router to your PC.
Robustel GoRugged R3000 User Guide Client @ Open VPN Item Enable Protocol Remote IP Address Port Interface Authentication Local IP Remote IP Enable NAT RT_UG_R3000_v.2.0.0 Confidential Description Enable OpenVPN Client, the max tunnel account is 3 Select from “UDP” and “TCP Client” which depends on the application. Enter the remote IP address or domain name of remote side OpenVPN server. Enter the listening port of remote side OpenVPN server.
Robustel GoRugged R3000 User Guide Ping Interval Ping -Restart Compression Encryption MTU Max Frame Size Verbose Level Expert Options Subnet&Subnet Mask@Local Route RT_UG_R3000_v.2.0.0 Confidential Set ping interval to check if the tunnel is active. Restart to establish the OpenVPN tunnel if ping always timeout during this time. Select “LZO” to use the LZO compression library to compress the data stream. Select from “BF-CBC”, “DES-CBC”, “DES-EDE3-CBC”, “AES128-CBC”, “AES192-CBC” and “AES256-CBC”.
Robustel GoRugged R3000 User Guide Server @ Open VPN Item Enable Server OpenVPN Tunnel name Listen IP Protocol Port Interface RT_UG_R3000_v.2.0.0 Confidential Description Default Tick to enable OpenVPN server tunnel. Disable Name the OpenVPN server tunnel. Tunnel_OpenVPN_ 0 You can enter the IP address of cellular WAN, Ethernet WAN or Ethernet LAN. Null or 0.0.0.0 stands for using the active WAN link currently-cellular WAN or Ethernet WAN.
Robustel GoRugged R3000 User Guide Authentication Local IP Remote IP Enable NAT Ping Interval Ping -Restart Compression Encryption MTU Max Frame Size Verbose Level Expert Options Client Manage RT_UG_R3000_v.2.0.0 Confidential device. Select from four different kinds of authentication ways: “Pre-shared”, “Username/Password”, “X.509 cert” and “X.509 cert+user”. Define the local IP address of OpenVPN tunnel. Define the remote IP address of OpenVPN tunnel. Tick to enable SNAT for OpenVPN.
Robustel GoRugged R3000 User Guide X.509 @ Open VPN Item Select Cert Type CA Public Key Private Key DH TA CRL Pre-Share Static Key Description Select the OpenVPN client or server which the certification used for. Click “Browse” to select the correct CA file from your PC, and then click “Import” to import it to the router. Click “Export” you can export the CA file from router to your PC.
Robustel GoRugged R3000 User Guide GRE Item Add Enable Remote IP Address Local Virtual IP Remote virtual IP Remote Subnet Description Click “Add” to add a GRE tunnel. Click to enable GRE (Generic Routing Encapsulation). GRE is a protocol that encapsulates packets in order to route other protocols over IP networks. Set remote IP Address of the virtual GRE tunnel. Set local IP Address of the virtual GRE tunnel. Set remote IP Address of the virtual GRE tunnel.
Robustel GoRugged R3000 User Guide L2TP Client @ L2TP Item Description Default Add Click “Add” to add a L2TP client. You can add at most 3 L2TP clients. Null Remote IP Address Username Password Enter your L2TP server’s public IP or domain name. Enter the username which was provided by your L2TP server. Enter the password which was provided by your L2TP server. Select from “Auto”, “PAP”, “CHAP”, “MS-CHAP v1” and “MS-CHAP v2”.
Robustel GoRugged R3000 User Guide Remote Subnet Remote Subnet Mask Enable NAT All traffic via this interface Enable Tunnel Authentication Tunnel Secret Show Advanced Port Local IP Remote IP server’s authentication method. When you select “Auto”, router will auto select the correct method based on server. Enter L2TP remote Protected subnet’s address. Enter L2TPremote Protected subnet’s mask. Click to enable NAT feature of L2TP.
Robustel GoRugged R3000 User Guide L2TP Server @ L2TP Item Enable L2TP Server Username Password Description Tick to enable L2TP server. Set the username which will assign to L2TP client. Set the password which will assign to L2TP client. Select from “PAP”, “CHAP”, “MS-CHAP v1” and “MS-CHAP v2”. Authentication L2TP client need to select the same authentication method based on this server’s authentication method.
Robustel GoRugged R3000 User Guide Show L2TP Server Tick to show the L2TP server advanced setting. Advanced Address/Control Used for PPP initialization. In general, you need to enable it as default. Compression Protocol Field Used for PPP initialization. In general, you need to enable it as default. Compression One of the L2TP initialization strings. In general, you don’t need to modify this Asyncmap Value value. Maximum Receiving Unit.
Robustel GoRugged R3000 User Guide PPTP Client @ PPTP Item Add Enable Disable Remote IP Address Username Password Authentication Enable NAT Enable MPPE All traffic via interface Show Advanced this RT_UG_R3000_v.2.0.0 Confidential Description Click “Add” to add a PPTP client Enable PPTP Client. The max tunnel accounts are 3. Disable PPTP Client. Enter your PPTP server’s public IP or domain name. Enter the username which was provided by your PPTP server.
Robustel GoRugged R3000 User Guide Local IP Remote IP Set the IP address of the PPTP client. You can enter the IP which assigned by PPTP server. Null means PPTP client will obtain an IP address automatically from PPTP server’s IP pool. Enter the remote peer’s private IP address or remote subnet’s gateways address. Address/Control Used for PPP initialization. In general, you need to enable it as default. Compression Protocol Field Used for PPP initialization. In general, you need to enable it as default.
Robustel GoRugged R3000 User Guide PPTP Server @ PPTP Item Enable PPTP Server Username Password Authentication Local IP IP Pool Start IP Pool End Enable MPPE Description Tick to enable PPTP server. Set the username which will assign to PPTP client. Set the password which will assign to PPTP client. Select from “PAP”, “CHAP”, “MS-CHAP v1” and “MS-CHAP v2”. PPTP client need to select the same authentication method based on this server’s authentication method. Set the IP address of PPTP server.
Robustel GoRugged R3000 User Guide MTU Link Detection Interval Maximum Transmission Unit. It is the identifier of the maximum size of packet, which is possible to transfer in a given environment. Specify the interval between PPTP client and server. To check the connectivity of a tunnel, the client and server regularly send PPP Echo to each other. If the client or server receives no response from the peer within a specified period of time, it retransmits the PPP echo.
Robustel GoRugged R3000 User Guide View @ SNMP Item View Name View Filter View OID Description Enter the View Name Select from “Include” and “Exclude”. Enter the Object Identifiers (OID) Default Null Include Null VACM @ SNMP Item Readwrite Network Community MIBview RT_UG_R3000_v.2.0.0 Confidential Description Select the access rights from “Readonly” and “ReadWrite”. Define the network from which is allowed to access. E.g. 172.16.0.0. Enter the community name.
Robustel GoRugged R3000 User Guide Trap @ SNMP Item Enable SNMP Trap Version Server Address Port Name Description Click to enable SNMP Trap feature. Select from “SNMPv1”, “SNMPv2” and “SNMPv3”. Enter SNMP server’s IP address. Enter SNMP server’s port number Enter SNMP server’s name. Default Disable SNMPv1 Null 0 Null 3.29 Configuration -> VRRP This section allows users to set the VRRP parameters. VRRP Item Enable VRRP Group ID Priority Interval Virtual IP Description Tick to enable VRRP protocol.
Robustel GoRugged R3000 User Guide This section allows users to set the IP Pass through parameters. IP Passthrough Item Description Tick to enable IP Passthrough feature. Enable IP Passthrough Note: Firstly you need to select “Cellular” as “Primary Interface” in tab “Configuration”-> “Link Management”. Mode User can only select “PPPoE” mode at present. Set the LAN interface from “LAN_0”, “LAN_1”. PPPoE client dials up to R3000 (PPPoE server) corresponding to different LAN interface.
Robustel GoRugged R3000 User Guide Retries and still do not receive correct respond packets from PPPoE client, it will send “LCP Terminal Request” packet to disconnect the connection between PPPoE server and PPPoE client. “Max Retries” ranges from 3 to 5 times. 3.31 Configuration -> AT over IP This section allows users to set the AT over IP parameters.
Robustel GoRugged R3000 User Guide Description Set the name to your relevant phone No. Null Phone No. Enter your phone No. Note: In some countries, the Phone NO. is required to be written in international format, starting with “+” followed by the country code. Null Phone Group Group Name Set the Group Name. Null Phone List Show the phone list in the Group. Null Add or remove the Click right arrow to add the phone no.to this group; Click left arrow to remove phone no.to/from Null the phone no.
Robustel GoRugged R3000 User Guide 3.33 Configuration -> SMS This section allows users to set the SMS Notification and SMS Control parameters. SMS Item Send SMS on power up Send SMS on PPP connect Send SMS on PPP disconnect Phone Group Enable @ SMS Control Description Default Enable to send SMS to specific user after router was powered up. Disable Enable to send SMS to specific user when router PPP up. Disable Enable to send SMS to specific user when router PPP down.
Robustel GoRugged R3000 User Guide Time @ Reboot Item Description Default Enable daily reboot, you should follow ahh:mm,24h time frame, or the data will Enable(ahh:mm,24h) Disable be invalid. Reboot Time1 Specify time1 when you need router reboot. Null Reboot Time2 Specify time2 when you need router reboot. Null Reboot Time3 Specify time3 when you need router reboot.
Robustel GoRugged R3000 User Guide 3.35 Configuration -> RobustLink This section allows users to configure parameters about RobustLink, which is an industrial-grade centralized management and administration system for the R3000. It allows you to monitor, configure and manage large numbers of remote devices on a private network over the web. RobustLink Item Enable RobustLink Server address Port Password Description Click to enable RobustLink feature. Enter IP address of RobustLink.
Robustel GoRugged R3000 User Guide Keep Days Log to Remote System and “EMERG” which from low to high. The lower level will output more syslog in detail. Specify the syslog keep days for router to clear the old syslog. Enable to allow router sending syslog to the remote syslog server. You need to enter the IP and Port of the syslog server. 14 Disable 3.37 Configuration -> Event This section allows users to set the Event parameters. Event Item Enable Event RT_UG_R3000_v.2.0.
Robustel GoRugged R3000 User Guide 3.38 Configuration -> USR LED This section allows users to change the display status of USR LED. Note: Please refer to “Status” -> “System” -> “LEDs Information” -> “USR”. USR LED Item USR LED Type Indication Description Default Select from “VPN”, “PPPoE”, “DynDNS” and “GPS”. VPN Select from “ON”, “Blink”. For example, if “USR LED Type” is set as “VPN” and “Indication” is set as “Blink”, ON when any VPN tunnel is up USR LED will blink. 3.
Robustel GoRugged R3000 User Guide This item allow users store different configuration profiles into different positions; or save one configuration profile into different positions just for Profile Standard configuration data backup. Selected from “Standard”, “Alternative 1”, “Alternative 2”, “Alternative 3”. Import: Click “Browse” to select the XML file in your computer, then click “Import” to import this file into your router.
Robustel GoRugged R3000 User Guide AT Debug @ Tools Item Send AT Commands Send Receive AT Commands Description Enter the AT commands which you need to send to cellular module in this box. Click this button to send the AT commands. Router will display the AT commands which respond from the cellular module in this box. Default Null Null Null Traceroute @ Tools Item RT_UG_R3000_v.2.0.0 Confidential Description Default 17.01.
Robustel GoRugged R3000 User Guide Trace Address Trace Hops Timeout Send Enter the trace destination IP address or domain name. Specify the max trace hops. Router will stop tracing if the trace hops has met max value no matter the destination has been reached or not. Specify timeout of Traceroute request. Click this button to start Traceroute request, and the log will be displayed in the follow box. Null 30 1 Null Sniffer @ Tools Item Interface Host Protocol Start RT_UG_R3000_v.2.0.
Robustel GoRugged R3000 User Guide Test @ Tools Item Description Click “Enable” to select the hardware component whose status you want to Enable check. Select from “SD Test”, “USB Test”, “Flash Test”, “Memory Test”, “Ethernet Test”, Description “SIM1 Test”, “SIM2 Test” and “Module Test”. Show the current status of the selected hardware component. There are 3 status “Testing”, “Success” and “Failure”. Testing: Router is testing the selected hardware component.
Robustel GoRugged R3000 User Guide Clock Item Real Time Clock PC Time Synchronize Enable NTP Client Description Router’s RTC can be showed and modified in this field. You PC’s time can be showed here. Synchronize router’s RTC with PC. Enable to synchronize the time from NTP server. Timezone @ Client Select your local time zone. Primary NTP Server Enter primary NTP Server’s IP address or domain name.
Robustel GoRugged R3000 User Guide Basic @ Web Server Item HTTP Port HTTPS Port HTTPS Certificate Description Enter the HTTP port number you want to change in R3000’s Web Server. On a Web server, port 80 is the port that the server "listens to" or expects to receive from a Web client. If you configure the router with other HTTP Port number except 80, only adding that port number then you can login R3000’s Web Server. Enter the HTTPS port number you want to change in R3000’s Web Server.
Robustel GoRugged R3000 User Guide Super @ User Management Item Super User Management Login Timeout Description One router has only one super user account. Under this account, user has the highest authority include modify and add management user accounts. Set Username and Password. Specify the login timeout value. You need to re-login after this timeout of user inactively.
Robustel GoRugged R3000 User Guide List you want to start up, as well as the running information. Enable: Click to enable the APP file. APP Name: Shows the name of the APP files. Options: It is an optional items, user can choose to configure startup parameters here. Memory (KB): Shows the memory resources occupied by the APP files. Running: Shows whether the APP files are running. Files @ SDK Management Item Import Files Custom File List Description Click to import configuration files in this item.
Robustel GoRugged R3000 User Guide “Update” button” to update. After updating successfully, you need to reboot router to take effect. RT_UG_R3000_v.2.0.0 Confidential 17.01.
Robustel GoRugged R3000 User Guide Chapter 4. Configuration Examples 4.1 Interface 4.1.1 Console port User can use the console port to manage the router via CLI commands, please check section Introductions for CLI. RT_UG_R3000_v.2.0.0 Confidential 17.01.
Robustel GoRugged R3000 User Guide 4.1.2 Digital Input There are two digital inputs of R3000, it just support dry contact (do not supports wet contact). Please check the connector interface of R3000, you can find out “V-” easily at one of the pin of power input connector. 4.1.3 Digital Output There are two digital outputs of R3000. Power negative of DC should connect to “GND” Please refer to connection diagram at the right site. Maximum voltage/current/output power of DO is 36VDC/0.05A/0.3W.
Robustel GoRugged R3000 User Guide 4.1.4 RS232 R3000 supports one RS232 for serial data communication. Please refer to the connection diagram at the right site. 4.1.5 RS485 R3000 supports one RS485 for serial data communication. Please refer to the connection diagram at the right site. RT_UG_R3000_v.2.0.0 Confidential 17.01.
Robustel GoRugged R3000 User Guide 4.2 Cellular 4.2.1 Cellular Dial-Up This section shows users how to configure the parameters of Cellular Dial-up which are with two different policies “Always Online” and “Connect on Demand”. Note: This section will be hidden if user selects “Eth0 Only” in “Configuration ->Link Management”. 1. Always Online Configuration-->Link Management-->Cellular Only The modifications will take effect after click “Apply” button. Configuration-->Cellular WAN -->Basic RT_UG_R3000_v.2.
Robustel GoRugged R3000 User Guide The modifications will take effect after click “Apply” button. If a customized SIM card is using, please select “Custom” instead of “Auto” in “Network Provider Type”, and some relative settings should be filled in manually. 2. Connect on Demand Configuration-->Link Management-->Cellular Only The modifications will take effect after click “Apply” button.
Robustel GoRugged R3000 User Guide Select the trigger policy you need. Note: If you select multiple trigger policies, the router will be triggered under anyone of them. 4.2.2 SMS Remote Status Reading R3000 supports remote control via SMS. User can use following commands to get the status of R3000, cannot set new parameters of R3000 at present. An SMS command has following structure: Password:cmd1,a,b,c;cmd2,d,e,f;cmd3,g,h,i;...;cmdn,j,k,n SMS command Explanation: 1.
Robustel GoRugged R3000 User Guide 4. The semicolon character (‘;’) is used to separate more than one commands packed in a single SMS. 5. E.g., 1234:0001 In this command, password is 1234, 0001 is the command to reset R3000.
Robustel GoRugged R3000 User Guide 4.3 Network 4.3.1 NAT This section shows users how to set the NAT configuration of router. Parameter Remote IP defines if access is allowed to route to the Forwarded IP and Port via WAN IP and “Arrives At Port”. Configuration--->NAT/DMZ--->Port Forwarding Note: This section will be hidden if user selects “Cellular as primary and if fail use Eth0” in “Configuration ->Link Management”. Explanations for above diagram: If there are two IP addresses 58.1.1.1 and 59.1.1.
Robustel GoRugged R3000 User Guide 58.1.1.1----------access to--------->58.1.1.2:9991----------be forwarded to------->10.1.1.2:8001 58.1.1.1----------access to--------->58.1.1.2:9992----------be forwarded to------->10.1.1.3:8002 UDP TCP&UDP 4.3.2 L2TP L2TP_SERVER: Configuration--->L2TP--->L2TP Server Tick “Enable L2TP Server”, and fill in the blank textbox RT_UG_R3000_v.2.0.0 Confidential 17.01.
Robustel GoRugged R3000 User Guide The modification will take effect after “Apply-->Save-->Reboot”. Note: The following diagrams with red color numbers mean these are the matches between server and client, and with the blue color number means it must be set locally for the tunnel. L2TP_CLIENT: Configuration--->L2TP--->L2TP Client Click “Add” button, and fill in the blank textbox The modification will take effect after “Apply-->Save-->Reboot”. RT_UG_R3000_v.2.0.0 Confidential 17.01.
Robustel GoRugged R3000 User Guide 4.3.3 PPTP Note: The following diagrams with red color numbers mean these are the matches between server and client, and with the blue color number means it must be set locally for the tunnel . PPTP_SERVER: Configuration--->PPTP--->PPTP Server Tick “Enable PPTP Server”, and fill in the blank textbox RT_UG_R3000_v.2.0.0 Confidential 17.01.
Robustel GoRugged R3000 User Guide The modification will take effect after “Apply-->Save-->Reboot”. PPTP_CLIENT: Configuration--->PPTP--->PPTP Client Click “Add” button, and fill in the blank textbox The modification will take effect after “Apply-->Save-->Reboot”. RT_UG_R3000_v.2.0.0 Confidential 17.01.
Robustel GoRugged R3000 User Guide 4.3.4 IPSEC VPN Note: The following diagrams with red color numbers mean these are the matches between server and client, and with the blue color number means it must be set locally for the tunnel. IPsecVPN_SERVER: Cisco 2811: RT_UG_R3000_v.2.0.0 Confidential 17.01.
Robustel GoRugged R3000 User Guide Note: Polices 1,4,6,7 are default for Cisco router and do not display at the CMD. IPsecVPN_CLIENT: Configuration--->IPSec--->IPSec Basic Then click “Apply”. Configuration--->IPSec--->IPSec Tunnel Tick “Enable IPSec Tunnel1” RT_UG_R3000_v.2.0.0 Confidential 17.01.
Robustel GoRugged R3000 User Guide The modification will take effect after “Apply-->Save-->Reboot”. 4.3.5 OPENVPN Note: The following diagrams with red color numbers mean these are the matches between server and client, and with the blue color number means it must be set locally for the tunnel. OPENVPN_SERVER: Configuration--->OpenVPN--->Server Tick “Enable OpenVPN Server”. RT_UG_R3000_v.2.0.0 Confidential 17.01.
Robustel GoRugged R3000 User Guide The modifications will take effect after click “Apply-->Save-->Reboot”. OPENVPN_CLIENT: Configuration--->OpenVPN--->Client Tick “Enable OpenVPN Client1”, and fill in the blank textbox RT_UG_R3000_v.2.0.0 Confidential 17.01.
Robustel GoRugged R3000 User Guide The modification will take effect after “Apply-->Save-->Reboot”. RT_UG_R3000_v.2.0.0 Confidential 17.01.
Robustel GoRugged R3000 User Guide Chapter 5. Introductions for CLI 5.1 What’s CLI and hierarchy level Mode The R3000 command-line interface (CLI) is a software interface providing another way to set the parameters of equipment from the console or through a telnet network connection.
Robustel GoRugged R3000 User Guide R3000> enable Password: ***** R3000# ? //check what commands can be used in Privileged exec mode debug Debug configure information enable Turn on privileged commands exit Exit from current mode export Export file using tftp syslog Export system log import Import file using tftp load Load configure information ping Ping test reload Halt and perform a cold restart tracert Tracert test write Write running configuration tftp Copy from tftp: file syste
Robustel GoRugged R3000 User Guide 5.2 How to configure the CLI Following is a list about the description of help and the error should be encountered in the configuring program. Commands /tips Description ? Ctrl+c Invalid command “xxx” Incomplete command % Invalid input detected at '^' marker Typing a question mark “?” will show you the help information. Press these two keys at the same time, except its “copy” function but also can be used for “break” out of the setting program.
Robustel GoRugged R3000 User Guide Building configuration... OK R3000#reload !Reboot the system?'yes'or 'no':yes //reload to take effect Example 3: Set link-management R3000> enable Password: ***** R3000# R3000# configure R3000(config)# set link-management wan link : 1.Cellular Only 2.Eth0 Only 3.Eth0 as primary and if fail use Cellular 4.Cellular as primary and if fail user Eth0 ->please select mode(1-4)*1+:2 ->ICMP detection primary server[]:8.8.8.8 ->ICMP detection second server[]:8.8.8.
Robustel GoRugged R3000 User Guide ICMP detection interval : 30 seconds ICMP detection timeout : 3 seconds ICMP detection retries :3 reset the interface : no ********************************************* R3000 # configure R3000 (config) # set eth0 ethernet interface type: WAN type select: 1. Static IP 2. DHCP 3. PPP0E ->please select mode (1-3) [1]: ->IP address [192.168.0.1]:58.1.1.1 ->Netmask [255.255.255.0]:255.0.0.0 ->gateway [192.168.0.254]:58.1.1.
Robustel GoRugged R3000 User Guide ICMP detection timeout : 3 seconds ICMP detection retries :3 reset the interface : no ********************************************* R3000 (config) # set cellular 1. set SIM_1 parameters 2. set SIM_2 parameters ->please select mode (1-2)[1]: SIM 1 parameters: network provider 1. Auto 2. Custom 3. china-mobile ->please select mode(1-3)[1]: ->dial out using numbers[*99***1#]: ->pin code[]: connection Mode: 1. Always online 2.
Robustel GoRugged R3000 User Guide max connect try :3 main SIM select : SIM_1 when connect fail : yes when roaming is detected : no month date limitation : no SIM phone number : network select Type : Auto authentication type : AUTO mtu value : 1500 mru value : 1500 asyncmap value : 0xffffffff use peer DNS : yes primary DNS : 0.0.0.0 secondary DNS : 0.0.0.