
User Manual


- 02 -
Chapter 2 POWERING ON
1. Pull out of the insulator at battery compartment to activate CR2032
coin cell backup battery.
NOTE: Backup battery(included) doesn't support time display but can back
up time & alarm setting.
2. Connect the adapter line to DC jack , then plug into a 100~240V AC wall
power outlet.
- 01 -
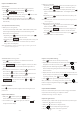
Chapter 1 LOCATION OF CONTROLS
Chapter 3 TIME SETTING
1. Press once button, display starts flashing.
2. Rotate button to adjust the hour, press button
to confirm hour setting.
3. Rotate button to adjust the minute, press button to
confirm minute setting or wait for another 10 seconds to confirm
automatically.
4. Hold press button to change 12/24H time format.
12/24H
12/24H
12 13
DC I N
+
-
USB CHARGING
5V 1 A
1
2
14
15
16
17 18 19 20 21 22 23
24
RINGER
OFF
SUNRISE
OFF
1 2 3 4 5 6
7
11
10
8 9
+
-
1
2
12 /24 H
DST
ALARM
OFF
SNOOZE
1. Alarm 1 Button 2. Alarm OFF Button 3. Alarm 2 Button
4. Sunrise Duration Button 5. Ring Tone Button 6. Volume Button
7. Time Digits Dimmer& DST Button
8. Set Time & 12/24H Button
9. Light Button 10. Sleep Button 11. OK & SNOOZE Button
12. USB Charging Port 13. DC IN Port 14. Alarm 1 Indicator
15. Alarm 2 Indicator 16. Time Display 17. Volume Indicator
18. Sunrise Indicator 19. Light Indicator 20. SNOOZE Indicator
21. Sleep Indicator 22. Sunrise Indicator 23. Ringer Indicator
24. DST Indicator
CR1013
Wakeup Alarm Clock
CREATE YOUR PERFECT SLEEP ENVIRONMENT
ROCAM
R
1
2
Version 1.1
Mad e in China
Http://www.yelaw.net
support@yelaw.net
Contact our experts