362-21173 Manual, AC3 Domestic 2/17/04 11:26 AM Page 1 ® Owner’s Booklet
362-21173 Manual, AC3 Domestic 2/17/04 11:26 AM Page 2
62-21173 Manual, AC3 Domestic 2/17/04 11:26 AM Page 1 Dear Accu-Chek ® System Owner, Thank you for choosing the Accu-Chek Advantage System! Congratulations on your decision to take control of your diabetes. We’ve designed your new Accu-Chek Advantage System with comfort, convenience, and control in mind – to help make living with diabetes a little easier. This booklet will help you get the most from your Accu-Chek Advantage System. We also invite you to visit www.accu-chek.
362-21173 Manual, AC3 Domestic 2/17/04 11:26 AM Page 2 The Accu-Chek Advantage System Your new Accu-Chek Advantage Meter and accessories work together to measure the amount of sugar (glucose) in your blood to help you and your doctor control your diabetes.
362-21173 Manual, AC3 Domestic 2/17/04 11:26 AM Page 3 Important Information About Your New Meter • Your blood glucose meter is designed and approved for testing fresh capillary whole blood samples (like blood taken from fingertips) outside the body (in vitro diagnostic use). It should not be used to diagnose diabetes. • Be sure to use only Accu-Chek Comfort Curve Test Strips or Accu-Chek Advantage Test Strips with the meter. Other test strips may produce inaccurate results.
362-21173 Manual, AC3 Domestic 2/17/04 11:26 AM Page 4 Contents Chapter 1: Understanding Your New System ..............................................................6 Installing (or Changing) the Battery ..........................................................................8 Setting the Time and Date .......................................................................................9 Setting the Beeper ............................................................................................
362-21173 Manual, AC3 Domestic 2/17/04 11:26 AM Page 5 Storing Your Supplies ..............................................................................................25 Proper Testing Conditions ......................................................................................26 Understanding Your Test Results ............................................................................26 Chapter 4: Using Your Meter’s Memory ....................................................................
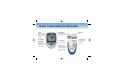
362-21173 Manual, AC3 Domestic 2/17/04 11:26 AM Page 6 Chapter 1: Understanding Your New System Display – Shows blood sugar results, messages, and results stored in memory. Left and Right Arrow Buttons – Press to enter memory, adjust settings and scroll through results. On/Off Button – Press this button to turn the meter on or off. Test Strip Slot – Insert test strip here. Battery Cover – Push tab in direction of arrow to remove cover and replace battery.
362-21173 Manual, AC3 Domestic 2/17/04 11:26 AM Page 7 Protective Cover Silver-colored bars Yellow Window Test Strip Test Strip Vial Cap with Comfort Dial Depth Selection Ejector Lancet Release Button Lancet Device 7 Plunger
362-21173 Manual, AC3 Domestic 2/17/04 11:26 AM Page 8 Installing (or Changing) the Battery 1. Flip open the battery cover by pushing tab toward arrow. 2. Insert the battery with the plus (+) side up or facing you. 3. Replace the battery cover and snap it closed. Notes: • The meter uses a 3-volt lithium battery. It is best to use a longlasting lithium battery and to keep an extra on hand. • Be sure the battery goes in plus-side up or facing you.
362-21173 Manual, AC3 Domestic 2/17/04 11:26 AM Page 9 Setting the Time and Date Setting the time and date is important if you use the meter’s memory or connect to a computer. 1. Press and release (On/Off button) to turn on the meter. Wait for the flashing test strip or “---”. 2. Press and hold until “set” appears, and then release it. The word “On” and the beeper symbol appear. 3. Press and release to see the hour flash in the upper left corner.
362-21173 Manual, AC3 Domestic 2/17/04 11:26 AM Page 10 4. Press and release either or (left or right arrow button) to change the hour. 5. Repeat steps 3 and 4 to set the minutes, month, day and year. (The flashing number is the one that can be changed.) 6. Press and hold down to finish setup. The flashing test strip appears.
362-21173 Manual, AC3 Domestic 2/17/04 11:26 AM Page 11 Setting the Beeper When you first get your meter, the beeper is set to “On” (but you can turn it off and not affect your test results in any way). It beeps whenever: • A strip is inserted. • An error occurs while testing. The beeper sounds when an error occurs, even if the • Blood or control solution is applied to a strip. beeper is turned off. • A result is displayed. • Buttons are pushed. To turn the beeper off: 1.
362-21173 Manual, AC3 Domestic 2/17/04 11:26 AM Page 12 Setting the Hypoglycemic (Hypo) Indicator You may set the meter to warn you when your results indicate hypoglycemia (low blood sugar) anywhere between 60-80 mg/dL. Before you set the hypoglycemic indicator, ask your healthcare professional to help you decide what level is best for you. New meters have the hypo indicator turned off by default. To turn on and set the hypo indicator: 1. Press and release to turn on the meter.
362-21173 Manual, AC3 Domestic 2/17/04 11:26 AM Page 13 Coding the Meter ! ▲ Change the code key every time you open a new box of test strips. 1. With the meter off, slide the code key into the code key slot. It should easily snap into place. 2. Press and release the meter on. to turn 3. Make sure the code on the display matches the code on the test strip vial. Notes: • If “---” appears on the display, turn off the meter, make sure the code key is all the way in, then turn on the meter again.
362-21173 Manual, AC3 Domestic 2/17/04 11:26 AM Page 14 Using Your Test Strips You may use either Accu-Chek Comfort Curve or Accu-Chek Advantage Test Strips with this meter. Accu-Chek Comfort Curve Test Strips are recommended because they’re faster and require less blood than Accu-Chek Advantage Test Strips. This means easier and more convenient testing for you. • For accurate results, use only approved test strips. • Note the expiration “Use By” date on the test strip vial.
362-21173 Manual, AC3 Domestic 2/17/04 11:26 AM Page 15 Using Accu-Chek Comfort Curve Test Strips Silver-colored bars Yellow window Touch and hold a drop to the edge – not the top – of the yellow window. Fill the yellow window completely. This owner’s booklet will help you learn to test with Accu-Chek Comfort Curve Test Strips.
362-21173 Manual, AC3 Domestic 2/17/04 11:26 AM Page 16 Chapter 2: Control Testing Why Run Control Tests Control tests ensure that both the meter and the test strips are working properly and giving reliable results.
362-21173 Manual, AC3 Domestic 2/17/04 11:26 AM Page 17 Running a Control Test For control testing, you’ll need your meter, a test strip, the bottle of control solution, and a napkin or paper towel. 1. Insert a test strip with silver-colored bars into the meter, yellow window facing up. 2. Make sure the code on the meter matches the code on the test strip vial. 3. When you see the flashing drop on the display, press and release once to select the L1 control.
362-21173 Manual, AC3 Domestic and 2/17/04 11:26 AM Page 18 When the test is done, if the meter shows the test result then “OK”, your results are within range. If the meter does not show “OK”, see page 19. 6. Throw away the used test strip. If the result is not in the acceptable range, see Understanding Control Test Results on page 19. Level 2 Testing Level 1 testing is all you need to do most of the time.
362-21173 Manual, AC3 Domestic 2/17/04 11:26 AM Page 19 Understanding Control Test Results Range (mg/dL) Level 1 (LO) 42–72 Level 2 (HI) 290–328 Example Example and When a control test result is within the acceptable range, your test strips and meter are working properly. The label on your test strip vial shows the acceptable ranges for Level 1 and Level 2 test solutions. Your control test results should be within the listed range.
362-21173 Manual, AC3 Domestic 2/17/04 11:26 AM Page 20 Troubleshooting Checks Action 1. Check the expiration dates of the test strips and control solutions. Replace solution or strips that have expired or solution you opened more than three months ago. 2. Make sure the caps were tight on the test strip vial and control solution bottles. If either has been open for a while, replace the test strips or control solution. 3. Check if the code on the meter matches the code on the test strip vial.
362-21173 Manual, AC3 Domestic 2/17/04 11:26 AM Page 21 Chapter 3: Testing Your Blood Sugar Preparing the Accu-Chek Softclix Lancet Device 1. Pull off the cap. 2. Insert a lancet until it clicks. 3. Twist off the lancet’s protective cover. Note: You can refer to the First Time Guide or the Quick Reference Guide for a simple testing summary.
362-21173 Manual, AC3 Domestic 4. Snap the cap back on after lining up the notches. The cap easily snaps into place. 2/17/04 11:26 AM Page 22 5. Twist the cap to set the lancet depth. Start at 2 or 3. For tougher skin dial to a higher number. 6. Press the plunger (like a pen) until it clicks. The release button turns yellow when the device is ready. Set aside until later in the test. Release Button Notes: • The best depth setting is the lowest number that lets you get enough blood for a test.
362-21173 Manual, AC3 Domestic 2/17/04 11:26 AM Page 23 Running a Blood Sugar Test Before running your first test, make sure you set up your meter properly and run a control test. See Chapters 1 and 2 for details. 1. Wash and dry your hands. 2. Take one test strip from the test strip vial. Close the test strip vial cap tightly. 3. Insert the end of the test strip with the silver-colored bars into the meter, with the yellow window facing up. The meter turns on automatically. 4.
362-21173 Manual, AC3 Domestic 2/17/04 11:26 AM Page 24 6. Gently squeeze your fingertip until you get a drop of blood. 7. Touch and hold the blood drop to the edge – not the top – of the yellow window. Make sure the yellow window fills completely. If you still see yellow, apply another drop of blood within 15 seconds or start over with a new test strip. 8. An hourglass flashes on the screen, and the test result appears. 9.
362-21173 Manual, AC3 Domestic 2/17/04 11:26 AM Page 25 Flagging Test Results To help you remember specific events that might have influenced your results, you can add a flag– an asterisk– to mark those results. 1. Perform a blood test. 2. While a test result is displayed and the test strip is still in the meter, press and release either or . An asterisk appears on the display in the lower-right corner. Recording Your Results Always record your blood sugar results after testing.
362-21173 Manual, AC3 Domestic 2/17/04 11:26 AM Page 26 Proper Testing Conditions • The temperature range must be between 57 to 104ºF (14 to 40ºC). At temperatures outside this range, the results are displayed with a thermometer symbol. • Humidity must be below 85% so that moisture doesn’t condense on or inside the meter. • Let the meter return to room temperature and thoroughly dry before turning it on.
362-21173 Manual, AC3 Domestic 2/17/04 11:26 AM Page 27 Symptoms of High or Low Blood Sugar Being aware of the symptoms of high or low blood sugar can help you understand your test results and decide what to do if they seem unusual. Here are the most common symptoms: High blood sugar (hyperglycemia): fatigue, increased appetite or thirst, frequent urination, blurred vision, headache, or general aching.
362-21173 Manual, AC3 Domestic 2/17/04 11:26 AM Page 28 Chapter 4: Using Your Meter’s Memory Storing Test Results Viewing Test Results Your meter automatically stores up to 480 test results, and you can review them at any time. If you’ve set the time and date on the meter (see page 9), this information is stored and displayed with your test results. If you haven’t, test results are simply stored in order, from the newest to the oldest. The meter can also display 7, 14, and 30-day averages. (left or 1.
362-21173 Manual, AC3 Domestic 2/17/04 11:26 AM Page 29 Notes Do not change your therapy based on an individual result recorded in memory. • Results stored in memory will not be lost when you replace the battery, but you will be prompted to verify time and date if previously set. • Once 480 results are in memory, adding a new test result causes the oldest one to be deleted.
362-21173 Manual, AC3 Domestic 2/17/04 11:26 AM Page 30 Chapter 5: Maintenance and Troubleshooting Cleaning Your Meter Caring for your Accu-Chek Advantage Meter is easy – just keep it free of dust. But if you need to clean it, following these guidelines carefully will help you get the best performance possible: Do Do Not • Make sure the meter is turned off.
362-21173 Manual, AC3 Domestic 2/17/04 11:26 AM Page 31 Maintenance and Testing Your meter needs little or no maintenance with normal use. It automatically tests its own systems every time you turn it on and lets you know if something is wrong. (See page 32 for error messages and what to do about them.) If you drop the meter or think it’s not giving accurate readings, make sure that your test strips and control solution haven’t expired, then run a control test (see page 16).
362-21173 Manual, AC3 Domestic 2/17/04 11:26 AM Page 32 Screen Messages and Troubleshooting ! ▲ Never make treatment decisions based on an error message. If you have any concerns, please call Accu-Chek Customer Care at 1-800-858-8072, 24 hours a day, 365 days a year. The meter isn’t coded or the code key isn’t all the way in. Turn off the meter and recode it. See page 13. The meter is ready for a drop of blood to be put on the strip. The meter is in “set” mode, waiting for you to change settings.
362-21173 Manual, AC3 Domestic 2/17/04 11:26 AM Page 33 Battery power is low. Change the battery soon. Your blood sugar result is below your defined hypo (low blood sugar) level. Battery is almost out of power. Change the battery now. Blood sugar is higher than the measuring range of the system. See pages 26–27. The meter is being operated outside of the appropriate temperature range. Move to an area where the temperature is appropriate for running a test, wait five minutes and repeat the test.
2-21173 Manual, AC3 Domestic 2/17/04 11:26 AM This test result was flagged. See page 25. } Page 34 The code key is faulty or was removed while the meter was on. Turn off the meter and reinsert the code key. If this doesn’t fix the problem, call Accu-Chek Customer Care at 1-800-858-8072. Your blood sugar may be extremely low, an incorrect amount of blood was applied, or the test strip is damaged or inserted improperly. If you see this error message after you put blood on the test strip, see page 27.
362-21173 Manual, AC3 Domestic 2/17/04 11:26 AM Page 35 Average can not be calculated. No results obtained on meter for last 7 days. The meter has failed its internal electronic checks. Turn the meter off, then on again. If you still see this display, call Accu-Chek Customer Care at 1-800-858-8072. Your blood sugar may be extremely high or a meter or strip error has occurred. See page 27. This is a display check.
362-21173 Manual, AC3 Domestic 2/17/04 11:26 AM Page 36 Chapter 6: Technical Information Product Limitations Please read the literature packaged with your test strips to find the latest information on product specifications and limitations.
362-21173 Manual, AC3 Domestic 2/17/04 Relative humidity operating range Atmospheric pressure Memory capacity Dimensions Weight Construction Lancet device depths 11:26 AM Page 37 Less than 85% > 53.3 kPa 480 blood glucose results with time and date 3.3 x 2.2 x 0.8 inches (84 x 56 x 20 mm) 1.8 oz. (57 g) without battery Hand-held 0.80, 0.95, 1.10, 1.25, 1.40, 1.55, 1.70, 1.85, 2.00, 2.15, 2.
362-21173 Manual, AC3 Domestic 2/17/04 11:26 AM Page 38 Accu-Chek Advantage Limited 3-Year Warranty Roche Diagnostics warrants to the original purchaser of the meter, that your Accu-Chek Advantage Meter will be free from defects in materials and workmanship for 3 years from the date of purchase.
362-21173 Manual, AC3 Domestic 2/17/04 11:26 AM Page 39 Some states do not allow limitations on how long an implied warranty will last or the exclusion of incidental or consequential damages, so the above elimination and exclusion may not apply to you. This warranty gives you specific legal rights, which vary from state to state.
362-21173 Manual, AC3 Domestic ▲ ! 2/17/04 11:26 AM Page 40 CAUTION: A RESTRICTED LICENSE LIMITS USE OF THE ACCU-CHEK ADVANTAGE SYSTEM – READ CAREFULLY THE LIMITATIONS RECITED BELOW. The Accu-Chek Softclix Lancet Device and its use are protected by U.S. Patent Nos. 4,924,879 and Re. 35,803. A license to use the Accu-Chek Softclix Lancet Device is only granted when Accu-Chek Softclix Lancets are used as a part of the Accu-Chek Softclix Lancet Device.
362-21173 Manual, AC3 Domestic 2/17/04 11:26 AM Page 41 restricted license applies regardless of any additional offers found in Accu-Chek Advantage or Accu-Chek Comfort Curve Test Strip packages. If you do not agree to the terms and conditions of the restricted license, you may return, at the place of purchase, the unused Accu-Chek Advantage System for a full refund. If you have any questions, please call Accu-Chek Customer Care at 1-800-858-8072.
362-21173 Manual, AC3 Domestic 2/17/04 11:26 AM Page 42 Additional Supplies The following supplies and accessories are available from your authorized Roche Diagnostics Diabetes Healthcare Center, pharmacies or your medical/surgical supply dealer: Test Strips Accu-Chek Comfort Curve Test Strips Accu-Chek Advantage Test Strips Cat. Nos. 2030365, 2030373, 2030381, 3000141 Cat. Nos.
362-21173 Manual, AC3 Domestic 2/17/04 11:26 AM Page 43 Information for Professional Caregivers ! ▲ Healthcare Professionals: Follow the infection control procedures appropriate for your facility. References 1. Stedman, Thomas Lathrop. Stedman’s Medical Dictionary, 27th Edition, 1999, pg. 755. 2. American Diabetes Association, “Clinical Practice Recommendations 2003.” Diabetes Care, Vol. 26, Supplement 1, pg. S22.
362-21173 Manual, AC3 Domestic Index Accu-Chek Softclix Lancet Device, 21 - 22, 31 appetite, increased, 27 battery, changing, 8 battery, installing, 8 battery, type, 8 beeper settings, 11, 32 blood sugar, high, 27 blood sugar, low, 27 blood sugar, testing, 23 – 24 blurred vision, 27 button, on/off, 6 button, arrow, 6 code key, 13 computer, connecting your meter to, 29 Index 2/17/04 11:26 AM Page 44 control solution, 16, 42 control test results, understanding, 19 – 20 control test, acceptable range, 19
362-21173 Manual, AC3 Domestic product limitations, 36 product specifications, 36 professional caregivers, 43 rapid heartbeat, 27 results, control test, understanding, 19 – 20 results, logging, 25 results, test, understanding, 26 settings, meter, 9 – 12 Softclix Lancet Device, 21 – 22, 31 specifications, meter, 36 supplies, 42 sweating, 27 symbols, 37 Index 2/17/04 11:26 AM Page 45 technical information, 36 – 37 test results, understanding, 26 test results, unusual, 27 test strips, Accu-Chek Advantage
362-21173 Manual, AC3 Domestic 2/17/04 11:26 AM Page 46 Notes Notes 46 Accu-Chek Customer Care 1-800-858-8072
362-21173 Manual, AC3 Domestic 2/17/04 11:26 AM Page 47 Notes Notes 47 Accu-Chek Customer Care 1-800-858-8072
362-21173 Manual, AC3 Domestic 2/17/04 11:26 AM Page 48 Notes Notes 48 Accu-Chek Customer Care 1-800-858-8072
362-21173 Manual, AC3 Domestic 2/17/04 11:26 AM Page 49
362-21173 Manual, AC3 Domestic 2/17/04 11:26 AM Page 50 Accu-Chek® Advantage Accu-ChekSM Customer Care 1-800-858-8072 www.accu-chek.com ©2004 Roche Diagnostics. All rights reserved. Roche Diagnostics 9115 Hague Road Indianapolis, IN 46256 ACCU-CHEK, ADVANTAGE, COMFORT CURVE, and SOFTCLIX are trademarks of a Member of the Roche Group.