
Operator`s manual

Introduction
22
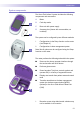
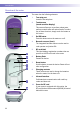
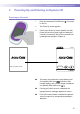
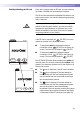
Overview of the meter
The meter has the following elements:
1 Test strip port
Insert the test strip here.
2 Touchscreen
(touch-sensitive display)
This screen allows you to perform patient tests,
perform controls tests, and review results. To select
any of these functions, simply touch the button on
the screen.
3 On/Off button
Press this button to turn the meter on or off.
4 Barcode scanner (laser)
The integrated barcode scanner can be used to
read operator and patient IDs.
5 RF card label
This label displays registration numbers that are
specific to the RF card used in the meter.
6 Battery Pack
Powers the device.
7 Reset button
Use this button to reset the device. Reset will not
alter configuration.
8 Charging contacts
These contacts are used to charge the batteries
when the meter is in the base unit.
9 Infrared interface
Facilitates data communication with code key
reader and base unit.
10 Cover for RF card
If your meter is equipped with this option, the
RF card for the wireless network (WLAN) is located
behind this cover.
1
2
3
4
6
9
8
7
10
5