
User`s guide

HP 300-121
Page 4 of 5
Reviewed/Revised 06/26/13
15. After the sample has been obtained, apply gentle pressure to the puncture with a clean gauze square
or cotton ball site for several minutes.
16. The measurement is complete when the result is displayed on the screen. Depending upon how high
or low the result is, it may appear in a numeric or non-numeric format. See Reporting Results section
below for interpretation of each result format.
17. Remove the test strip and dispose of it in plain trash.
18. Touch to enter up to three appropriate comment(s) as required in the “General Policies”
section of this manual.
19. Touch the button to confirm the result and send the result from the meter wirelessly or place the
meter in the base unit to send the result and record the result into the electronic data management
system. The base unit also charges the meter.
20. Documentation of the result in the patient’s electronic medical record occurs automatically, as long as
the patient’s FIN number is entered correctly.
21. Follow up on any results that exceed critical or reportable limits according to policy.
22. Clean and disinfect as necessary with Clorox wipes.
23. Error messages:
If the error message “Strip Defect Error” appears on the display, the test strip may be defective or
the blood glucose result may be extremely low and below the meter’s measurement range. Refer
to the test strip package insert, perform a quality control test using a new test strip, review proper
testing procedure, and repeat the blood glucose test, or follow your facility’s testing policy.
If the meter displays “Type Bad Dose,” there may be insufficient amount of blood on the test strip.
Repeat the test using a new test strip, ensuring proper sample application, or refer to the test strip
package insert.
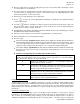
Guidance for Interpreting On-Screen Message and Error Codes:
All error messages displayed by the system have a letter identifying the message type, a
number and a description of the error to help the operator take action to resolve the problem.
The different message types are in the table below.
E
Identifies the notification as an Error. The information notifies the
operator that an error has occurred.
W
Identifies the notification as a Warning. The information does not block
the operator from continuing, but rather gives the operator information
that may suggest an alternate workflow is required.
I
Identifies the notification as Informational only. Informational
notifications present the operator with contextual information, and allow
the operator to proceed after confirming the notification.
D
Identifies a Decision point. Decision notifications provide the operator
with a choice based on contextual information.
Linearity Testing Procedure
Linearity testing, also known as calibration verification, is a means of testing the ACCU-CHEK Inform II
system’s ability to give correct readings through a broad range of glucose levels. It is used as a periodic
check on system performance. Linearity testing is performed on 10% of meters during new instrument
implementation, then on all subsequent meters or as part of troubleshooting related to questionable meter
performance.
Proficiency Testing Procedure
Participation in proficiency testing is part of the quality assurance program to ensure proper on-going
performance of the ACCU-CHEK Inform II system and the competence of staff performing tests. At least
10% of meters are tested during each proficiency cycle by staff routinely using the device. Results are
submitted to CAP without consulting with any other survey subscribers. The survey report is reviewed by