Rocket R 58 Dual Boiler Espresso Coffee Machine _____________________________________________________________________________________________ Subject to change without notice.
Contents Rocket RE 58 Dual Boiler espresso machine 3 Important safeguards 4 Introduction 5 Instruction for use 6 Installation 10 Technical data 11 Start up 12 Programming the machine 13 Preparing espresso 18 Dispensing steam 20 Dispensing hot water 21 How to make great espresso 22 How to texture milk 23 How to clean your Rocket R 58 25 How to disassemble/dismantle the machine 27 Routine Maintenance 28 Espresso glossary and recipes 29 Trouble shooting 30 Setting the pump
Rocket R 58 Dual Boiler espresso machine Most dual boiler PID espresso machines measure the water temperature used for the extraction in the brew boiler. The boiler temperature reading is then converted into a “group extraction” temperature. This information is misleading and inaccurate, as the digital readout does not display the real temperature at the group rather the temperature the manufacturer wishes the user to see. Rocket Espresso measure the boiler temperature and display the boiler temperature.
Important Safeguards 1. Read all Instructions 2. Do not touch hot surfaces. Use handle or knobs. 3. To protect against electric shock do not immerse cord and plugs in water or other liquid. 4. This appliance is not intended for use by persons (including children) with reduced physical, sensory or mental capabilities or lack of experience and knowledge, unless they have been given supervision or instruction concerning use of the appliance by a person responsible for their safety.
Introduction Please read this technical handbook carefully since it provides important information on the correct installation, use and maintenance of your coffee machine. The information contained in this manual is necessary for the safe installation and operation of your coffee machine. It should be retained in a safe place for future reference. Copies are available from your local dealer.
Instructions for use This machine has been designed for the sole purpose of producing coffee, hot water and steam for hot beverages. All other uses are outside of the scope of this machine and, therefore, dangerous and hazardous. The machine has been designed from safe, accessible, durable components and materials and manufactured to the highest standards for use only in home / domestic environment. The machine should not be exposed to elements such as sunlight, rain, snow, extreme temperatures etc.
It is the responsibility of the user to ensure that the location of the machine is hygienic, and that its continued safe operation can be guaranteed. When the machine is not being used for long periods of time, the hydraulic systems should be drained completely and the machine stored in a temperature above freezing (0°C or 32°F). This will prevent the hydraulic system from freezing which could damage internal pipes and boiler.
• Avoid using the machine with wet hands. • Never operate the machine with bare feet. Never operate the machine without ensuring the water reservoir contains water. The machine must be operated with soft, clean drinking water. This means that there must be a minimum content of mineral in the water. If the local water supply has a high mineral content use a water softener.
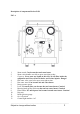
Description of components Rocket R 58 FIG. A 1 2 3 4 5 6 7 8 9 10 11 12 13 Steam wand. Can become hot and cause burns. Steam valve handle: turn left to open, turn right to shut. Cups tray. Never pour any liquid on this tray! It will filter inside the equipment and cause electrical shocks and serious injuries. Danger! Hot water valve: turn left to open, turn right to shut. Hot water wand. Can become hot and cause burns. Pump pressure gauge Lever. It’s metal parts can become hot and cause burns.
Installation All machines are designed to ensure maximum possible user safety. It is, however, an important responsibility of the user to observe the following safety codes to further enhance safe installation and operation. • Always ensure that hazardous packing items such as plastic bags, Styrofoam, nails, etc. are properly disposed of to prevent accidental injury to children or other persons. • If there is evidence of defect or damage to the machine an authorised Rocket Espresso Ltd.
Technical data Bodywork Brewing head Pre-infusion Dual boiler system Boilers Heaters Pump Temperature control of boilers Pressure gauges Stainless steel steam wand Electronically controlled Safety valve Water supply Dimensions (WxDxH) Weight Additionally All stainless steel (AISI 304). Commercial brewing head. Weight 4.05 kg (9 lb). Dual pre-infusion system: mechanical pre-infusion system with progressively working piston and static pre-infusion chamber.
Start up Parts which can become hot and cause injuries. Caution! Never touch the following parts.
Programming your Rocket R 58 espresso machine Your machine is factory set to optimum working parameters. Nevertheless you can set your personal parameters using the remote controller (with display) to be connected to the machine. You can change the settings of the following parameters: ■ Language ■ Hard plumbing to mains or pour over operation ■ Service boiler heating on or off. The service boiler is the one providing steam and hot water.
The display reads: Key 1 Brew boiler temperature 105°C ok Key 3 P Key 2 This means the machine is in normal operation mode. Please proceed as follows to enter programming mode. 1. Keep Key 3 pressed for at least 5 seconds until display reads “Language”. 2. Press Key 1 or key 2 until the display reads the desired language. 3. Press Key 3 to confirm and to move to the next setting which is the selection of “Water reservoir operation” or “hard plumbing operation” of the machine. 4.
We assume the machine is properly installed To use the machine with the direct water connection to the hydraulic circuit instead of the water reservoir refer to page 33. Before starting using the machine, please control the following: 1. Lever (7) is completely down. 2. Steam handle (2) is closed. 3. Hot water handle (4) is closed. 4. On/off switch (12) is on position “0” =machine switched off 5. Machine is unplugged. 6. Drip tray (10) and its grid are properly positioned into the machine.
Now please proceed as follows: (A) (B) 1. Remove the cover from the water reservoir Fig. B-2 2. Remove the water reservoir (Fig. B-2 and clean it carefully with food quality cleaning products. It’s very important that the water reservoir is always clean! Please repeat this operation every day and whenever necessary. 3. Fill the water tank with fresh drinking water to just over ¾ full. 4. Place the tank inside the machine taking care not to spill water. 5.
6. Put on the cover on top of the water reservoir. 7. Plug in the machine. 8. Turn the on/off switch (A-12) to the on position “1” and open the steam handle (A-2). Boiler water fill starts (you will hear the pump’s noise). 9. When the boiler is properly filled with water, the pump will stop (=no more noise). Now close the steam handle (A-2). 10. The heating up of the boiler water starts. 11. Wait till the boiler pressure gauge (A-11) reads approximately 1 bar. 12.
Preparing one or two cups of espresso. For the correct espresso preparation technique see page 30 Preparing a single espresso 25ml 1. Use one cup filter handle (with 1 spout) 2. Position the metal one cup filter basket firmly inside the filter holder 3. Fill the single filter basket with freshly ground coffee and tamp the coffee until the finished height, is level with the internal reference line in the filter basket. 4. Tamp the ground coffee gently using the tamper supplied with the machine 5.
Preparing TWO cups or a double espresso coffee. 50 to 60 mls. 1. Use the two cup filter handle (with 2 spouts) 2. Position the metal two cups filter basket firmly inside the filter holder 3. Fill the single filter basket with freshly ground coffee and tamp the coffee until the finished height, is level with the internal reference line in the filter basket. 4. Tamp the ground coffee gently using the tamper supplied with the machine 5. Tighten the filter holder firmly into the brewing head (A-8). 6.
Dispensing steam to froth or heat up liquids 1. Fill a suitable ideally stainless steel pitcher (used for food only) with an insulated grip with the liquid to be heated up or frothed. 2. Position the steam nozzle of the steam wand (A-1) just below the surface of the liquid inside the liquid in the recipient. To avoid personal injury always ensure that the end nozzle of the steam pipe (A-1) is below the surface of the liquid to be steamed. 3. Turn on steam valve (A-2) fully. 4.
5. When enough foam is achieved, submerge nozzle (going sidewise) and keep it in that position finishing heating milk until the pitcher is too warm to touch. Please remember that milk should never be steamed over app. 76°C (168°F). Milk steamed to over this temperature is scalded. 6. Close steam valve (A-2) rapidly, then remove milk pitcher from steam wand. 7.
_____________________________________________________________________________________________ Subject to change without notice.
_____________________________________________________________________________________________ Subject to change without notice.
_____________________________________________________________________________________________ Subject to change without notice.
_____________________________________________________________________________________________ Subject to change without notice.
_____________________________________________________________________________________________ Subject to change without notice.
How to disassemble/dismantle the machine The machine has to be disassembled and dismantled by an authorized technician. Disassembling of the machine: Operations to be effected with machine in working conditions at operating temperature. 1. Place a recipient (with insulated grip) under the hot water wand (A-1). 2. Open the hot water valve (A-4) and let hot water flow in the recipient. 3. When no more hot water comes out, close the hot water valve (A-4). 4.
Routine Maintenance Simple, routine care of your espresso machine is your best defence against poor quality shots, as well as preventing breakdowns or, even worse, personal injuries. After each use: 1. Wipe the steam wand (A-1) immediately after using with a non abrasive clean damp towel without touching it directly with any part of the body to avoid injury or damage due to the hot surface of steam wand end nozzle. Do not let the milk bake onto the steam wand.
_____________________________________________________________________________________________ Subject to change without notice.
_____________________________________________________________________________________________ Subject to change without notice.
_____________________________________________________________________________________________ Subject to change without notice.
Setting the pump pressure operating on the by-pass screw 1. Loose fixing nut. 2. Turn setting screw clockwise (“-“ ) to decrease and anti clock (“+”) to increase pump pressure. Factory setting is 9 Bar. Please do not set lower than 8 Bar or higher than 10 Bar. 3. Tighten fixing nut again. Please check pump pressure with pressure gauge (Fig. A/6). _____________________________________________________________________________________________ Subject to change without notice.
Hard plumbing the machine Your Rocket R 58 espresso machine is built with a full commercial rotary pump. This feature enables the user to connect the machine directly to the mains water supply. With your Rocket R 58 espresso machine there is the choice to use the 2.5 litre water reservoir or alternatively use a mains water connection. The machine is preset at the factory to use the supplied 2.5 litre water reservoir.
Alarm messages The microprocessor controls the main functions of the machine as i.e. the water level controls (water reservoir, service boiler and coffee water brewing boiler) and the proper function of the temperatures probes inside the service and coffee water boiler. Alarm messages can be read out on the display connecting the setting device to the machine. If the device is not connected, please note that some alarm information is given by flashing of the control light (Fig. A/13).
_____________________________________________________________________________________________ Subject to change without notice.