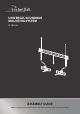
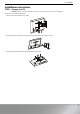
UNIVERSAL SOUNDBAR MOUNTING SYSTEM RF-SBM102 ASSEMBLY GUIDE Before using your new product, please read these instructions to prevent any damage.
Contents Introduction . . . . . . . . . . . . . . . . . . . . . . . . . . . . . . . . . . . . . . . . . . . . . . . . . . . . . . . . . . . . . . . . . . . . . . . . . . . . . . . . . . . . . . . . . . . . . . . . . . . . . . . . . .2 IMPORTANT SAFETY INSTRUCTIONS . . . . . . . . . . . . . . . . . . . . . . . . . . . . . . . . . . . . . . . . . . . . . . . . . . . . . . . . . . . . . . . . . . . . . . . . . . . . . . . . . . . 2 Specifications . . . . . . . . . . . . . . . . . . . . . . . . . . . . . . . .
RF-SBM102 Specifications • • • • Maximum soundbar weight: 20 lbs. (9.0 kg) Overall dimensions (H × W): 20.1 x 25 in. (51 cm x 63.5 cm) Soundbar mount weight: 2.9 lbs. (1.3 kg). For customer service, call: 1-800-620-2790 CAUTION: The weight of your TV, PLUS your soundbar mount, your soundbar, and any accessories, MUST BE LOWER than the maximum weight rating of your TV mount. See your TV mount's manual for maximum weight allowed.
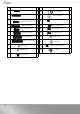
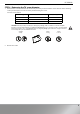
Lbl. 05 06 07 08 Hardware # Lbl. Hardware M4 × 30 mm screw 4 16 16 mm spacer 2 4 17 Interface washer 2 4 18 4 19 4 M4 × 50 mm screw M6 × 30 mm screw M6 × 50 mm screw M4 × 10 mm screw # 2 M4 × 16 mm screw 2 20 M5 × 16 mm screw 2 4 21 M6 × 16 mm screw 2 4 22 M4/M5 washer 2 4 23 M6 washer 2 p 09 10 11 12 4 M8 × 30 mm screw M8 × 40 mm screw M8 × 50 mm screw M8 × 65 mm screw 13 M4 washer 4 24 14 M8/M6 washer 4 25 15 2.
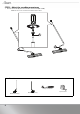
RF-SBM102 Installation instructions STEP 1 - Prepare your TV CAUTION: Follow your TV mount’s manual for instructions on how to safely remove your TV and TV bracket. If your TV has a wall mount installed: 1 Remove any cables attached to your TV. 2 Remove your TV and bracket assembly from your wall plate, arm assembly, or pillar. 3 Remove the TV bracket assembly and hardware from your TV.
STEP 2 - Adjust the soundbar mount arms 1 Remove the screws (P) from the soundbar arm brackets (02 and 03). Note: Save the screws. You will need to reattach them in STEP 3.
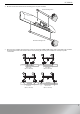
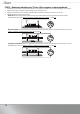
RF-SBM102 2 Measure the distance between the mounting holes on your soundbar. Back mounting holes Bottom mounting holes 3 Based on your soundbar measurements, rotate the arm brackets (02 and 03) left or right to align with your soundbar mounting holes. Make sure that the arms do not overhang the ends of your soundbar or cover up any cable connections. 6.6 to 19.5" (16.7 to 49.5 cm) 12 to 22.5" (30.5 to 57.2 cm) 20 to 31" (50.8 to 78.7 cm) 22.5 to 35.5" (57.2 to 90.
STEP 3 - Assemble your soundbar mount Note: The flat side of the arm brackets (02 and 03) rest on the soundbar. Note: The channel in the horizontal bracket (01) rests on your TV. Soundbar TV 1 Insert the soundbar arm brackets (02 and 03) into the horizontal bracket (01). Note: Holding the lever inward helps to slide the arms. Lever 2 Reattach the screws (P) onto the arm brackets (02 and 03). CAUTION: The screws (P) must be installed to secure the arms to the horizontal bracket (01).
RF-SBM102 STEP 4 - Determine the TV screw diameter 1 Determine the screw diameter that fits the back of your TV. If you don't know the correct diameter of the mounting screws your TV requires, test various sizes by hand threading the screws.
STEP 5 - Determine whether your TV has a flat, irregular, or obstructed back 1 2 3 4 Carefully place your TV face-down on a cushioned, clean surface to protect the screen from damages and scratches. Temporarily lay your soundbar mount assembly on the back of your TV. Align the screw holes in the horizontal soundbar bracket with the mounting screw holes on your TV. Identify which type of back your TV have: • Flat back: The bracket lays flush against the back of your TV and doesn’t block any jacks.
RF-SBM102 STEP 6 - Install the soundbar mount on your TV CAUTION: To offset the shift in height of your TV bracket caused by the soundbar bracket (01), you must use the spacers (16) in the top hole locations and the washers (17) in the bottom hole locations. 1 If your TV has a flat back, place the 16mm spacers (16) over your TV’s top mounting holes and the interface washers (17) over the bottom mounting holes.
2 Center the soundbar horizontal bracket (01) over the interface washers (17) on your TV’s bottom mounting holes. 3 Center your TV mount bracket(s) on top of the 16 mm spacers (16) and the soundbar bracket (01). Secure the TV mount and soundbar mount to your TV using the supplied TV screws and washers. CAUTION: Make sure that you use the correct length screws.
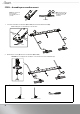
RF-SBM102 STEP 7 - Install your soundbar to the arms 1 Center your soundbar at the bottom of your TV, then adjust the arms of the soundbar mount over your soundbar mount holes. Note: Holding the lever inward helps to slide the arms. 2 Look at the mounting holes on the back or bottom of your soundbar to determine which method you need to use.
STEP 7A - Back-mounted key hole slots 1 2 Assemble the knobs (25) and keyhole screws (24). Attach the soundbar arm brackets (02) and (03) to your soundbar using the knob assemblies. 3 Tighten the screws (L) to secure the arms in place.
RF-SBM102 STEP 7B - Back-mounted threaded inserts 1 Attach the soundbar arm brackets (02 and 03) to your soundbar using two screws (18, 19, 20, or 21) and washers (22 or 23). Screws Washers 2 Tighten the screws (L) to secure the arms in place.
STEP 7C - Bottom-mounted threaded inserts Align the bottom brackets (04) with your soundbar mounting holes and attach using two screws (18, 19, 20, or 21) and washers (22 or 23). If the supplied screws are too long for your soundbar, use the 2.5 mm spacers (15). Washers Screws You’ll need 18 M4 × 10 mm screw (2) 20 M5 × 16 mm screw (2) 19 M4 × 16 mm screw (2) 21 M6 × 16 mm screw (2) 22 M4/M5 washer (2) 23 M6 washer (2) 16 04 Bottom bracket (2) 15 2.
RF-SBM102 3 4 Remove the screws (S) and washers (W) from the bottom brackets (04). Install the bottom brackets (04) to the soundbar arms using the screws (S) and washers (W). 5 Tighten the screws (L) to secure the arms in place.
STEP 8 - Hang your TV 1 Adjust the release cord (R) height to the bottom of your soundbar, for easy access during adjustments. 2 Make sure that soundbar doesn’t touch the wall when you mount your TV. Adjust the depth of your soundbar as needed by loosening screw (L). Tighten the screw (L) after adjustments. 3 Follow the instructions in your TV wall mount installation manual to hang your TV assembly.
RF-SBM102 STEP 9 - Adjust the soundbar height (optional) Note: Depending on the type of TV wall mount you have, you may need to remove your TV from the wall to adjust the soundbar height. • Pull and hold the release cord (R) to raise or lower your soundbar. CAUTION: Make sure that you support your soundbar with one hand while moving it.
STEP 10 - Adjust the soundbar depth (optional) Note: Depending on the type of TV wall mount you have, you may need to remove your TV from the wall to adjust the soundbar height. 1 Loosen the knobs (25) or screws (18, 19, 20, or 21), (depending on your installation option), on the back of your soundbar. Loosen the locking screws (L) that secure the arm brackets (02 and 03).
RF-SBM102 3 For a back-mounted installation, move your soundbar to the position you want. OR For a bottom-mount installation, loosen the screws that secure the bottom bracket (4) to the bottom of your soundbar, then slide your soundbar in or out. 4 Tighten all knobs and screws when you finish adjusting the depth. For customer service, call: 1-800-620-2790 (U.S.
LIFETIME LIMITED WARRANTY Definitions: The Distributor* of Rocketfish branded products warrants to you, the original purchaser of this new Rocketfish-branded product ("Product"), that the Product shall be free of defects in the original manufacturer of the material or workmanship for a period of one (1) year from the date of your purchase of the Product ("Warranty Period").
Part # 6907-302024 www.rocketfishproducts.com 1-800-620-2790 (U.S. and Canada) ROCKETFISH is a trademark of Best Buy and its affiliated companies. Registered in some countries. Distributed by Best Buy Purchasing, LLC 7601 Penn Ave South, Richfield, MN 55423 U.S.A. ©2019 Best Buy. All rights reserved.