
User Manual
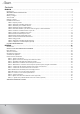
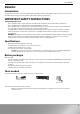

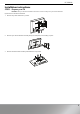
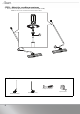
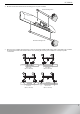

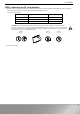

Table Of Contents
- Contents
- ENGLISH
- Introduction
- Specifications
- Before you begin
- Tools needed
- Package contents
- Installation instructions
- STEP 1 - Prepare your TV
- STEP 2 - Adjust the soundbar mount arms
- STEP 3 - Assemble your soundbar mount
- STEP 4 - Determine the TV screw diameter
- STEP 5 - Determine whether your TV has a flat, irregular, or obstructed back
- STEP 6 - Install the soundbar mount on your TV
- STEP 7 - Install your soundbar to the arms
- STEP 7A - Back-mounted key hole slots
- STEP 7B - Back-mounted threaded inserts
- STEP 7C - Bottom-mounted threaded inserts
- STEP 8 - Hang your TV
- STEP 9 - Adjust the soundbar height (optional)
- STEP 10 - Adjust the soundbar depth (optional)
- LIFETIME LIMITED WARRANTY
- ESPAÑOL
- Introducción
- Especificaciones
- Antes de comenzar
- Herramientas requeridas
- Contenido del paquete
- Instrucciones de instalación
- PASO 1 - Prepare su televisor
- PASO 2: Ajuste los brazos de montaje de la barra de sonido
- PASO 3 - Ensamble el montaje de la barra de sonido
- PASO 4 - Determine el diámetro del tornillo para el televisor
- PASO 5 - Determine si su televisor tiene una parte posterior plana, irregular u obstruida.
- PASO 6 - Instalación del montaje de la barra de sonido en su televisor
- PASO 7 - Instalación de su barra de sonido a los brazos
- PASO 7A: Ranuras de bocallave para el montaje posterior
- PASO 7B: Insertos con rosca de la parte posterior
- PASO 7C - Insertos con rosca de la parte inferior
- PASO 8 - Sujete su televisor
- PASO 9: Ajuste de la altura de la barra de sonido (opcional)
- PASO 10 - Ajuste de la profundidad de la barra de sonido (opcional)
- GARANTÍA LIMITADA DE POR VIDA

3
RF-SBM102
ENGLISH
Introduction
Congratulations on your purchase of a high-quality Rocketfish product. Your RF-SBM102 represents the state of the art in
soundbar-mount design and is designed for reliable and trouble-free performance.
IMPORTANT SAFETY INSTRUCTIONS
SAVE THESE INSTRUCTIONS
• This soundbar mount is only designed for use with TV wall mounts that meet UL/TUV safety certifications.
• This soundbar mount is ONLY designed to mount BELOW the television.
• This soundbar mount is designed to be installed and utilized only as specified in this manual. The manufacturer is
not responsible for improper assembly, use, or handling of this product.
• Your wall must be capable of supporting five times the weight of your TV, TV mount, and soundbar combined.
• Failure to follow these instructions could result in an unstable situation that may result in property damage or
personal injury.
• WARNING: This product contains small items that could be a choking hazard if swallowed. Before starting assembly,
make sure that all parts are included and undamaged. If any parts are missing or damaged, do not return the
damaged item to your dealer. Contact Customer Service. Never use damaged parts!
Specifications
• Maximum soundbar weight: 20 lbs. (9.0 kg)
• Overall dimensions (H × W): 20.1 x 25 in. (51 cm x 63.5 cm)
• Soundbar mount weight: 2.9 lbs. (1.3 kg).
• For customer service, call: 1-800-620-2790
CAUTION: The weight of your TV, PLUS your soundbar mount, your soundbar, and any accessories, MUST BE LOWER than the
maximum weight rating of your TV mount. See your TV mount's manual for maximum weight allowed.
Before you begin
Make sure that:
• Your TV, soundbar, soundbar mount, and any accessories you plan to install DO NOT EXCEED the specified weight
limit of your TV wall mount.
• You refer to the documentation that came with your soundbar, your TV, and your TV wall mount for additional
guidance.
• You read and understand these directions.
• You have the tools needed for installation.
Tools needed
You need the following tools to assemble your new soundbar mount:
Your TV wall mount must be UL/TUV certified.
Note: Your TV wall mount may vary from the illustrations throughout this assembly guide, but the procedure to install the
soundbar is the same.
LevelPhillips screwdriver
Tape measure