
User Manual
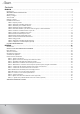
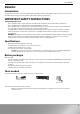

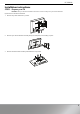
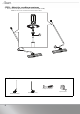
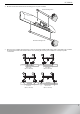

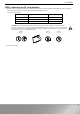

Table Of Contents
- Contents
- ENGLISH
- Introduction
- Specifications
- Before you begin
- Tools needed
- Package contents
- Installation instructions
- STEP 1 - Prepare your TV
- STEP 2 - Adjust the soundbar mount arms
- STEP 3 - Assemble your soundbar mount
- STEP 4 - Determine the TV screw diameter
- STEP 5 - Determine whether your TV has a flat, irregular, or obstructed back
- STEP 6 - Install the soundbar mount on your TV
- STEP 7 - Install your soundbar to the arms
- STEP 7A - Back-mounted key hole slots
- STEP 7B - Back-mounted threaded inserts
- STEP 7C - Bottom-mounted threaded inserts
- STEP 8 - Hang your TV
- STEP 9 - Adjust the soundbar height (optional)
- STEP 10 - Adjust the soundbar depth (optional)
- LIFETIME LIMITED WARRANTY
- ESPAÑOL
- Introducción
- Especificaciones
- Antes de comenzar
- Herramientas requeridas
- Contenido del paquete
- Instrucciones de instalación
- PASO 1 - Prepare su televisor
- PASO 2: Ajuste los brazos de montaje de la barra de sonido
- PASO 3 - Ensamble el montaje de la barra de sonido
- PASO 4 - Determine el diámetro del tornillo para el televisor
- PASO 5 - Determine si su televisor tiene una parte posterior plana, irregular u obstruida.
- PASO 6 - Instalación del montaje de la barra de sonido en su televisor
- PASO 7 - Instalación de su barra de sonido a los brazos
- PASO 7A: Ranuras de bocallave para el montaje posterior
- PASO 7B: Insertos con rosca de la parte posterior
- PASO 7C - Insertos con rosca de la parte inferior
- PASO 8 - Sujete su televisor
- PASO 9: Ajuste de la altura de la barra de sonido (opcional)
- PASO 10 - Ajuste de la profundidad de la barra de sonido (opcional)
- GARANTÍA LIMITADA DE POR VIDA

9
RF-SBM102
STEP 4 - Determine the TV screw diameter
1 Determine the screw diameter that fits the back of your TV. If you don't know the correct diameter of the mounting
screws your TV requires, test various sizes by hand threading the screws.
Select the screws that fit:
CAUTION: To avoid potential personal injuries and property damage, make sure that the screws have adequate
threads to secure the washer and spacer combination AND all brackets. If you encounter resistance, stop immediately
and contact customer service. Using hardware that is too long may damage your TV. However, using a screw that is
too short may cause your TV to fall from the mount.
2 Remove the screws.
Screw type Part number Quantity
M4 05 or 06 4
M6 07 or 08 4
M8 09, 10, 11, or 12 4
Screw is
too long
Screw fits
correctly
Screw is
too short