RF-RBKIT_10-1329_MAN_V5.
RF-RBKIT_10-1329_MAN_V5.
RF-RBKIT_10-1329_MAN_V5.fm Page 3 Friday, November 4, 2011 12:06 PM Rocketfish Rocketboost™ Wireless HD Audio Starter Kit Contents Introduction ...................................................................... 3 Important safety instructions ..................................... 5 Features .............................................................................. 9 Setting up your wireless kit .......................................15 Using your wireless kit........................................
RF-RBKIT_10-1329_MAN_V5.fm Page 4 Friday, November 4, 2011 12:06 PM With a maximum 150-foot broadcast range, this powerful system transmits through walls, floors, and ceilings. The audio signal is uncompressed digital audio so your audio is the highest quality and is free from interference. The system can be used with any of your audio components, like your CD/DVD player, home theater system, or even audio output from a computer or mp3 player.
RF-RBKIT_10-1329_MAN_V5.fm Page 5 Friday, November 4, 2011 12:06 PM Important safety instructions The lightning flash with arrowhead symbol, within an equilateral triangle is intended to alert the user to the presence of uninsulated "dangerous voltage" within the product's enclosure that may be of sufficient magnitude to constitute a risk of electric shock to persons.
RF-RBKIT_10-1329_MAN_V5.fm Page 6 Friday, November 4, 2011 12:06 PM 10 Protect the power cord from being walked on or pinched particularly at 11 12 13 14 15 16 plugs, convenience receptacles, and the point where they exit from the apparatus. Only use attachments/accessories specified by the manufacturer. Unplug this apparatus during lightning storms or when unused for long periods of time. Refer all servicing to qualified service personnel.
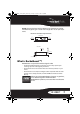
RF-RBKIT_10-1329_MAN_V5.fm Page 7 Friday, November 4, 2011 12:06 PM Bottom: Place on the level surface. Maintain an adequate air path for ventilation by placing on a stand with a height of 3-15/16" (10 cm) or more. Receiver ventilation requirements Front view 5- 15 /16 " 5- 15 /16 " (15 cm) (15 cm) Side view 5- 15 /16 " (15 cm) 5- 15 /16 " (15 cm) 3-15 /16 " (10 cm) What is Rocketboost™? Rocketboost™ is expandable wireless digital audio.
RF-RBKIT_10-1329_MAN_V5.fm Page 8 Friday, November 4, 2011 12:06 PM How does Rocketboost™ work? Rocketboost technology can connect all audio devices throughout your home to form a home audio network. Rocketboost products include “wireless senders,” which send or transmit audio streams, and “wireless receivers,” which receive the audio. This lets you listen to music from your wireless sender in other rooms using your wireless receiver. Rocketboost is expandable.
RF-RBKIT_10-1329_MAN_V5.fm Page 9 Friday, November 4, 2011 12:06 PM Features • High-Performance Audio - Uncompressed digital CD-quality sound, adjustable volume control • Strong Wireless Signal - 150 ft.
RF-RBKIT_10-1329_MAN_V5.fm Page 10 Friday, November 4, 2011 12:06 PM Wireless sender front panel TM 1 # 2 3 4 5 6 7 8 9 10 Feature Description Turns red when the wireless sender is in standby mode. 2 Standby indicator Power/Pair button 5&9 HD A/B button 6&8 Source A/B button 7 Source A/B indicator Press repeatedly to toggle between CD and HD audio link modes for input A and input B, respectively. When HD is activated, the audio quality is enhanced.
RF-RBKIT_10-1329_MAN_V5.fm Page 11 Friday, November 4, 2011 12:06 PM Wireless sender back panel 1 2 3 4 # Feature Description 1 DC IN jack Plug the AC power adapter into this jack. 2&4 3 5 6 5 6 SPEAKER IN A/B Use for an amplified output such as that from a wireless receiver or other home theater system. Connect these inputs to your audio source's speaker out jacks just like you would connect passive speakers.
RF-RBKIT_10-1329_MAN_V5.fm Page 12 Friday, November 4, 2011 12:06 PM Wireless receiver front panel 10 9 TM 1 2 3 4 5 6 7 8 # Feature 1 Standby indicator Turns red when wireless receiver is in standby mode. 2 Power/Pair button Press to turn the wireless receiver on. Press and hold to initiate pairing. Press again to go to standby mode. The indicator will turn solid when it is paired in a network, if the device is not in a network, the indicator blinks slowly.
RF-RBKIT_10-1329_MAN_V5.fm Page 13 Friday, November 4, 2011 12:06 PM Wireless receiver back panel SPEAKER-OUT (4-8 Ohm) AC IN 120V~,60Hz L R 1 2 3 4 # Feature Description 1 & 3 Slots for removable cable spool Use to mount the cable spool on the wireless 2 AC IN connector receiver. Plug the AC power cord into this connector. 4 SPEAKER OUT jacks Connect your unamplified speakers to these jacks.
RF-RBKIT_10-1329_MAN_V5.fm Page 14 Friday, November 4, 2011 12:06 PM Remote control 4 1 5 2 6 7 8 3 TM # 1 2 Feature Description /| Standby/On button Press to turn the wireless receiver on. Press again to enter standby mode. Press to adjust the volume of the wireless receiver. 3 Volume / buttons (device) BASS button Press to enable/disable the BASS enhancement. 4 Input A Press to toggle between SPEAKER-In A or Pre-In A of the wireless sender.
RF-RBKIT_10-1329_MAN_V5.fm Page 15 Friday, November 4, 2011 12:06 PM Setting up your wireless kit Rocketboost products include “wireless senders,” which send audio streams, and “wireless receivers,” which receive the audio. This lets you listen to music from your wireless sender through the speakers connected to your wireless receiver. The Wireless HD sender and wireless receiver can be installed in different configurations, depending on your need.
RF-RBKIT_10-1329_MAN_V5.fm Page 16 Friday, November 4, 2011 12:06 PM Wireless Surround Sound for 5.1-Channel home theater This example shows how to wirelessly connect your rear or surround sound home theater speakers. The amplifier surround sound speaker outputs are connected to the wireless sender. The surround sound speakers are connected to the wireless receiver.
RF-RBKIT_10-1329_MAN_V5.fm Page 17 Friday, November 4, 2011 12:06 PM To connect the wireless sender to an amplifier: Caution: Turn off your amplifier when connecting the devices. Note: If you already had your speakers connected to the back of your home theater system, you will need to disconnect them before you can set up your wireless sender and wireless receiver.
RF-RBKIT_10-1329_MAN_V5.fm Page 18 Friday, November 4, 2011 12:06 PM Notes: Make sure the exposed tips of the speaker wires do not touch each other, and that they are fully inserted into the terminals. Make sure that you connect your amplifier using the speaker output terminals. Make sure that the amplifier volume is not set to zero, or no sound will be transmitted. 2 Connect the AC power adapter to the wireless sender and plug into an AC power outlet.
RF-RBKIT_10-1329_MAN_V5.fm Page 19 Friday, November 4, 2011 12:06 PM Optimizing your surround sound Wireless links create a short latency between the wireless sender and wireless receiver. Many home theater receivers let you adjust the delay between the various speakers in your surround system. To optimize your system, we suggest that you subtract about 15 ms from the delay to the surround speakers. This will perfectly match your surround system. Wireless Surround Sound for 7.
RF-RBKIT_10-1329_MAN_V5.fm Page 20 Friday, November 4, 2011 12:06 PM Note: When setting up your system, you can identify which channel is connected to which wireless receiver by pressing the SOURCE button on the wireless receiver. The source indicator on the wireless sender briefly flashes so you can visually identify the correct wireless receiver. Connecting the wireless sender Notes: Make sure that the wireless sender is located at least 18” from any WiFi router.
RF-RBKIT_10-1329_MAN_V5.fm Page 21 Friday, November 4, 2011 12:06 PM 1 Connect the Right Rear speaker terminals of your home theater system to the right speaker terminals of the wireless sender on the Input A side by connecting the red speaker wire to the red (+) terminals, and the black speaker wire to the black (-) terminals.
RF-RBKIT_10-1329_MAN_V5.fm Page 22 Friday, November 4, 2011 12:06 PM 5 Connect the AC power adapter to the wireless sender and plug into an AC power outlet. The wireless sender automatically turns on when initially connecting to an AC outlet. 6 If the Source A indicator is not lit, press the Source A button. Repeat for Source B. Connecting the wireless receiver Note: Make sure that the wireless receiver is located at least 18” from any WiFi router.
RF-RBKIT_10-1329_MAN_V5.fm Page 23 Friday, November 4, 2011 12:06 PM Connecting the additional wireless receiver Note: This additional wireless receiver (RF-RBREC) is purchased separately. To connect the additional wireless receiver: 1 Connect the Left Rear speaker to the right speaker-out terminals on the wireless receiver by connecting the red speaker wire to the red (+) terminals, and the black speaker wire to the black (-) terminals.
RF-RBKIT_10-1329_MAN_V5.fm Page 24 Friday, November 4, 2011 12:06 PM • The power indicator lights steadily if the pairing was successful. • The power indicator blinks slowly if the pairing was not successful. See “Establishing communication” on page 32 for more information. Configuring 4-channel lock 4-Channel Lock is a special feature used for 4-channel wireless surround sound applications (for example if you are using Rocketboost for wireless rear and side surround sound in a 7.1 home theater system).
RF-RBKIT_10-1329_MAN_V5.fm Page 25 Friday, November 4, 2011 12:06 PM If you try to select a 4-channel lock mode source, depending on your system the following happens: 1) If there are no other wireless senders in the network, the power indicator on the wireless receiver flashes five times to show that four-channel lock is active on the wireless sender.
RF-RBKIT_10-1329_MAN_V5.fm Page 26 Friday, November 4, 2011 12:06 PM Listening to music throughout your home This example shows how to listen to your music source throughout your house. The amplifier's line-level audio output is connected to the wireless sender Pre-In inputs. Then you can listen to that audio in other rooms where you have installed the wireless receiver and speakers.
RF-RBKIT_10-1329_MAN_V5.fm Page 27 Friday, November 4, 2011 12:06 PM In addition to working with your home theater system, the wireless sender can be used with any of your audio components, like your CD/DVD player, or even audio output from a computer or mp3 player. Also, Rocketboost is expandable. Each Rocketboost wireless receiver can select the audio from any wireless sender in your Rocketboost audio network.
RF-RBKIT_10-1329_MAN_V5.fm Page 28 Friday, November 4, 2011 12:06 PM Note: For best audio quality, make sure that the volume setting on the audio source connected to the Pre-In jacks is turned up to at least 80%. Caution: Plug in the AC power adapter only after your amplifier/external audio device is connected to the wireless sender. 2 Plug one end of the AC power cord into the AC IN jack on the back of the wireless receiver, then plug the other end of the cord into an AC power outlet.
RF-RBKIT_10-1329_MAN_V5.fm Page 29 Friday, November 4, 2011 12:06 PM 4 Turn the wireless receiver On by pressing . Right Speaker Left Speaker SPEAKER-O UT (4-8 O hm ) A C IN 1 2 0 V ~ ,6 0 H z R L Note: Make sure the exposed tips of the speaker wires do not touch each other and that they are fully inserted into the terminals.
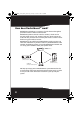
RF-RBKIT_10-1329_MAN_V5.fm Page 30 Friday, November 4, 2011 12:06 PM 2 Aim the remote control at the IR sensor on the front of the wireless receiver from a maximum distance of 23 ft. (7 m) away and a maximum angle of +/- 30 degrees from the center line. To replace the battery: 1 Press the battery tray lock to the right, then slide out the battery tray. You can remove the battery door with your fingernails by using the spaces set back in the remote control.
RF-RBKIT_10-1329_MAN_V5.fm Page 31 Friday, November 4, 2011 12:06 PM 2 Match the polarity on the lithium cell with a plus sign (+) on the battery tray. Replace the battery with a CR2025 or equivalent. 3 Slide the tray with the new battery into the battery compartment until it clicks into place. Warnings: Danger of explosion if battery is incorrectly replaced. Replace only with the same or equivalent type of battery.
RF-RBKIT_10-1329_MAN_V5.fm Page 32 Friday, November 4, 2011 12:06 PM 2 If the wireless sender is off, press lights. to turn it on. The power indicator To turn the wireless receiver on and off: 1 To turn off the device, press . The power indicator turns off and the standby indicator turns red. 2 If the wireless receiver is off, press to turn it on. The power indicator lights.
RF-RBKIT_10-1329_MAN_V5.fm Page 33 Friday, November 4, 2011 12:06 PM Pairing the wireless sender with the wireless receiver The wireless sender and wireless receiver must be “paired” or wirelessly connected to each other, so that audio can be sent from the wireless sender to the wireless receiver. Note: Use this procedure only if you need to rejoin the wireless sender and wireless receiver and this is your only Rocketboost-enabled product.
RF-RBKIT_10-1329_MAN_V5.fm Page 34 Friday, November 4, 2011 12:06 PM • The power indicators blink slowly if the pairing was not successful. Power on indicator Note: Rocketboost devices have their own memory. After the devices are paired once, they will remember each other and pair automatically when your devices are powered on again. Because of this, you can pair all of your network components in the same room before installing them in their permanent locations throughout the house.
RF-RBKIT_10-1329_MAN_V5.fm Page 35 Friday, November 4, 2011 12:06 PM • The power indicators blink slowly if the pairing was not successful. Note: Rocketboost devices have their own memory. After the devices are paired once, they will remember each other and pair automatically when your devices are powered on again. Because of this, you can pair all of your network components in the same room before installing them in their permanent locations throughout the house.
RF-RBKIT_10-1329_MAN_V5.fm Page 36 Friday, November 4, 2011 12:06 PM Adjusting the volume balance for surround sound If you are using the Wireless HD Audio Starter Kit for wireless surround sound, the volume control on the wireless receiver is only used to adjust the volume balance between the front and surround speakers. When you are first setting up your home theater system, use the volume control to balance the sound.
RF-RBKIT_10-1329_MAN_V5.fm Page 37 Friday, November 4, 2011 12:06 PM Controlling the stream volume Rocketboost systems have a special mode where you can change the volume of the audio stream sent by a wireless sender. Then the volume level at each wireless receiver that is receiving that audio stream will change automatically. This is useful if you want to easily change the volume level at all the wireless receivers that are receiving the same audio stream.
RF-RBKIT_10-1329_MAN_V5.fm Page 38 Friday, November 4, 2011 12:06 PM Muting all devices Rocketboost also features a global mute feature that instantly silences all audio streams in the network. To mute all devices in the network: 1 Press ALL (mute) on the remote control. All audio streams in your network are muted. TM 2 Pressing ALL (mute), while aiming at a specific Rocketboost wireless receiver, will “unmute” the stream that was last heard at that wireless receiver.
RF-RBKIT_10-1329_MAN_V5.fm Page 39 Friday, November 4, 2011 12:06 PM Expanding your Rocketboost System Rocketboost technology is expandable. Each Rocketboost wireless receiver can select the audio from any wireless sender in your Rocketboost audio network. The following shows an example Rocketboost network. You can set up your network to meet your specific needs.
RF-RBKIT_10-1329_MAN_V5.fm Page 40 Friday, November 4, 2011 12:06 PM • The Rocketboost Wireless HD Starter Kit (RF-RBKIT) includes a wireless sender device and the RF-RBREC, amplified wireless receiver. This product can be used for home theater wireless surround sound or for multi-room audio. • The Rocketboost Wireless Headphones (RF-RBWHP01) include a wireless sender device and wireless headphones. Audio sources connected to the wireless sender can be listened to using the wireless speakers.
RF-RBKIT_10-1329_MAN_V5.fm Page 41 Friday, November 4, 2011 12:06 PM Troubleshooting Check this information for a possible solution before calling for assistance. General troubleshooting • Every Rocketboost network must contain only one hub device, which helps other Rocketboost devices join the network. • You can turn any Rocketboost wireless sender or wireless sender/receiver into a hub by using the HUB STATUS or HUB ENABLE switch on the back of the device. The network can only have one hub.
RF-RBKIT_10-1329_MAN_V5.fm Page 42 Friday, November 4, 2011 12:06 PM Problem Solution My Rocketboost remote will not control the volume. I can’t turn the volume up or down. The sound/audio is really quiet coming out of my wireless speakers. Sound interference • Make sure you have removed the insulation sheet in the battery tray of the Rocketboost remote. • To maximize your volume level through the system, make sure your source devices (i.e., A/V receiver, iPod, etc.
RF-RBKIT_10-1329_MAN_V5.fm Page 43 Friday, November 4, 2011 12:06 PM Audio output Transmission delay Power supply Power consumption High efficiency, class D, speaker level Support for 4- to 8-ohm speakers Audio power output: 2 × 42 W (RMS) into 4 ohms 15 - 20 ms AC 120V~60 Hz (RF-RBKIT) AC 220-240V~50 Hz (RF-RBKIT-05A) 30 W Legal notices FCC and IC Information: This device complies with Part 15 of the FCC Rules and RSS-210 of the IC Rules.
RF-RBKIT_10-1329_MAN_V5.fm Page 44 Friday, November 4, 2011 12:06 PM FCC & IC Radiation Exposure Statement This equipment complies with FCC radiation exposure limits set forth for an uncontrolled environment and meets the exemption from the routine evaluation limits in section 2.5 of RSS 102. 1. This Transmitter must not be co-located or operating in conjunction with any other antenna or transmitter. 2. This equipment complies with FCC RF radiation exposure limits set forth for an uncontrolled environment.
RF-RBKIT_10-1329_MAN_V5.fm Page 45 Friday, November 4, 2011 12:06 PM One-year limited warranty Rocketfish Products (“Rocketfish”) warrants to you, the original purchaser of this new RF-RBKIT (“Product”), that the Product shall be free of defects in the original manufacture of the material or workmanship for one (1) year from the purchase of the Product (“Warranty Period”). This Product must be purchased from an authorized dealer of Rocketfish brand products and packaged with this warranty statement.
RF-RBKIT_10-1329_MAN_V5.
RF-RBKIT_10-1329_MAN_V5.fm Page 48 Friday, November 4, 2011 12:06 PM www.rocketfishproducts.com (800) 620-2790 Distributed by Best Buy Purchasing, LLC 7601 Penn Avenue South, Richfield, MN 55423-3645 USA © 2011 BBY Solutions, Inc. All rights reserved. ROCKETFISH is a trademark of BBY Solutions, Inc. All other products and brand names are trademarks of their respective owners. For model number RF-RBKIT-05A: Distributed by: Best Buy Europe Distributions Limited.