Printed in China 1230-60843-01 -E 010920 R O C K F O R D F O S G AT E . C O M 600 South Rockford Drive • Tempe, Arizona 85281 United States Direct: (480) 967-3565 • Toll Free: (800) 669-9899 www.rockfordfosgate.
Introduction Dear Customer, If, after reading your manual, you still have questions regarding this product, we recommend that you see your Rockford Fosgate dealer. If you need further assistance, you can call us direct at 1-800-669-9899. Be sure to have your serial number, model number and date of purchase available when you call. Congratulations on your purchase of the world’s finest brand of audio products.
Specifications PMX-5CAN Model Operating Voltage 10.5V - 16V Fuse Rating 15A 25 W X 4 @ 4 Ohms RMS 50 W x 4 @ 2 Ohms Peak Power Output Max. RCA Output Voltage 4V Output Impedance 500Ω Frequency Response 20 - 20kHz FM Frequency Range 87.5MHz - 107.9MHz AM Frequency Range 526.5kHz - 1606.5kHz 162.40 - 162.55 WB Frequency Range (US & Canada) Tuner Presets 18 FM / 12 AM / 6 WB Clock No Clock Display 2.7” Color TFT Bluetooth 3.0+EDR, A2DP 1.3 USB Compatibility 2.
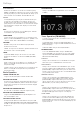
Design Features SUB Buttons These buttons allow you to adjust the subwoofer output UP or DOWN (0-20). REV / FWD button Use this button to skip back and forward through channels or tracks with a short press. Long pressing will activate manual seek mode. SRC (Power) Button This button allows you to switch between sources and power the unit ON and OFF. Rotary Encoder This knob is for adjusting main volume, zone volumes, menu navigation and setting adjustments.
ANTENNA RED WHITE BLACK B A BLACK BLACK USB BLACK WHITE FRONT LINE OUT GREY B GRAY RED BLACK ORANGE/WHITE RED WHITE A RED GREEN GREEN/BLACK REAR LINE OUT BLACK 15A FUSE WHITE/BLACK SWC RED WHITE GRAY/BLACK SiriusXM (OPTIONAL) PURPLE GREEN RED RED(AUX IN RIGHT) WHITE(AUX IN LEFT) SUB - W OUT BLACK RED(ZONE2 LINE OUT RIGHT) WHITE(ZONE2 LINE OUT LEFT) BLACK PURPLE/BLACK (OPTIONAL PMX-CAN) CAN BUS PURPLE BLUE/WHITE Wiring Diagram REMOTE CABLE ORIENTATION PIN NO.
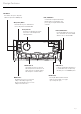
Installation / Mounting Contents • Source Unit • Trim Bezel • Mounting Plate Mounting • Power / Speaker Harness To mount the unit, you will need to find a flat surface with adequate clearance behind that provides enough clearance for the unit and all it’s necessary wiring. • Installation & Operation Manual 1. Once you have determined a mounting location, you will need to cut a rectangular shaped hole in the panel (7” X 2.1” / 180mm X 52mm). 2.
Settings wish to change. (7 BAND EQ>CROSSOVER>PEQ>REAR RCA>AUX INPUT>SOURCE GAIN>INTERNAL AMPLIFIER) 7 BAND EQ Short press the encoder button to access the 7 BAND EQ settings. Use the rotary encoder to scroll through the EQ settings. (FLAT > ROCK > CLASSIC > ACOUSTIC > DANCE > ELECTRONIC > HIP-HOP > CUSTOM) When setting up the CUSTOM EQ, short press the encoder button to set the first frequency. Once active, rotate the encoder to adjust the frequency settings.
Settings DISCOVERABLE SELECTING A ZONE Rotate the encoder button to select if unit is discoverable for pairing. (ENABLE > DISABLE) Once enabled, the source unit is now discoverable and ready for pairing to your device. Open the Bluetooth settings on your device to find the source unit labeled “Rockford PMX” and select.
Operation LOCAL REMOVE PRESETS Short press the encoder button to access the LOCAL options. Once selected, use the rotary encoder to select ON or OFF. The local option tunes to nearby radio stations with sufficiently strong signals for good reception. In areas where reception is poor, switching to distance tuning enables the unit to tune in to more distant stations. Distance tuning is the default. Short press the encoder button on the REMOVE PRESETS option.
Operation AUX Operation After your device is plugged into the source unit, this feature allows you to play music from your device. Select the AUX source option on the source unit and use your plugged in device to control song/track selection, PLAY/PAUSE and track skip FWD/REV. This feature allows you to control the app from the source unit directly (Android users will have to use Bluetooth only, iOS users can app on use both USB and Bluetooth).
Operation PRESETS Short press the encoder button to access the PRESETS list. Using this feature allows you to see what PRESETS are saved on the unit. ADD PRESETS Short press the encoder button on the ADD PRESETS option. You will need to be on both the channel and PRESET group you want to add first (SXM1>SXM2>SXM3). Using this feature allows you to save channels to the unit. Once selected, use the rotary encoder to select the PRESET number (1-6) you want the channel saved to.
Troubleshooting Symptom / Advisory Diagnosis Remedy Basic Source unit does not turn on. Blown fuse Check fuse of the unit, replace with correct rating. Vehicle’s ignition is off If connected following the instructions, the unit will not operate with ignition off. Voltage applied to Red wire is not between 10.5 & 16 volts or there is no voltage present Check battery, connections and fuses and repair or replace as necessary.
Troubleshooting SiriusXM Check Antenna Check Tuner The radio has detected a fault with the SiriusXM antenna. The antenna cable may be either disconnected or damaged. The radio is having difficulty communicating with the SiriusXM Connect Tuner. The tuner may be disconnected or damaged. Verify that the antenna cable is connected to the SiriusXM Connect Tuner Inspect the antenna cable for damage and kinks. Replace the antenna if the cable is damaged.
Français Boutons SUB (Fig. 1) Ces boutons permettent d’ajuster la sortie du subwoofer ou la ligne arrière vers le haut ou vers le bas (0-20). Bouton SRC (Alimentation) Ce bouton permet de commuter entre les sources (pression courte) et d’activer et de désactiver l’appareil (pression longue). Encodeur rotatif Ce bouton sert à ajuster le volume principal, les volumes de zones, la navigation du menu et les réglages des paramètres.
Français les paramètres EQ. (FM TUNER > AM TUNER > WB TUNER > USB > AUX > BLUETOOTH > PANDORA > SiriusXM) RENOMMER Pour renommer ZONE, appuyer brièvement sur le bouton d’encodeur pour régler la première lettre du nouveau nom. Une fois activé, faire tourner l’encodeur pour ajuster les lettres. Effectuer une autre pression courte sur le bouton d’encodeur pour régler la prochaine lettre. Répéter jusqu’à ce que la ZONE ait été renommée.
Français Appuyer sur le bouton SUB + ou SUB- pour régler le niveau de sortie (0-20). RÉGLAGE DE LA LUMINOSITÉ DE L’ÉCRAN Appuyer brièvement sur le bouton LUMINOSITÉ DE L’ÉCRAN pour ajuster le niveau de luminosité. Il existe deux niveaux de luminosité. SÉLECTIONNER UNE SOURCE À JOUER Appuyer brièvement sur le bouton SRC pour afficher les différentes options de source (FM TUNER>AM TUNER>WB TUNER>USB>AUX>BL UETOOTH>PANDORA>SiriusXM).
Français DES STATIONS PRÉRÉGLÉES. Il faudra se trouver sous le groupe des STATIONS PRÉRÉGLÉES que l’on souhaite ajuster en premier (AM1>AM2). Utiliser cette fonction pour pouvoir supprimer des stations sauvegardées sur l’unité. Une fois sélectionnée, utiliser l’encodeur rotatif pour sélectionner le numéro de STATION PRÉRÉGLÉE (1-6) de la station que l’on souhaite supprimer.
Français • Appeler le SiriusXM Listener Care en composant le 1-866-635-2349 Pour les abonnements canadiens, contacter : • Consulter www.siriusxm.ca/activatexm • Appeler le SiriusXM Listener Care en composant le 1-877-438-9677 Dans le cadre du processus d’activation, les satellites SiriusXM enverront un message d’activation au tuner.
Français Symptôme/Avertissement Diagnostic Solution De base L'unité source ne se met pas en marche. Fusible grillé Vérifier le fusible de l'unité, remplacer avec le calibre approprié. L'allumage du véhicule est désactivé Si connectée selon les instructions, l'unité ne fonctionnera pas avec l'allumage désactivé.
Español Botones SUB (Fig. 1) Estos botones le permiten ajustar la salida del subwoofer para SUBIR (UP) o BAJAR (DOWN) (0-20). Botón SRC (encendido) Este botón le permite conmutar entre fuentes y encender (ON) o apagar (OFF) la unidad. Codificador giratorio Esta perilla es para ajustar el volumen principal, volúmenes de zona, menú de navegación y ajustes de la configuración.
Español USB > AUX > BLUETOOTH > PANDORA > SiriusXM) RENAME (CAMBIO DEL NOMBRE) Para cambiar el nombre de ZONE, presione brevemente el botón del codificador para configurar la primera letra del nombre nuevo. Una vez activado, haga girar el codificador para ajustar letras. Presione brevemente de nuevo el botón del codificador para ajustar la letra siguiente. Repita hasta que se haya cambiado el nombre de ZONE. Presione brevemente MENU para salir y volver a subir un nivel.
Español del brillo. Hay dos niveles de brillo. SELECCION DE UNA FUENTE PARA REPRODUCIR Presione brevemente el botón SRC para mostrar las distintas opciones de fuente (FM TUNER>AM TUNER>WB TUNER>USB>AUX>BLUETOOTH>P ANDORA>SiriusXM). Use el codificador giratorio o presione brevemente SCR para desplazarse por las fuentes.
Español Para reproducir o pausar una canción, presione brevemente el botón PLAY/PAUSE. Para omitir una pista y avanzar, presione brevemente el botón FWD. Para omitir una pista y retroceder, presione brevemente el botón REV. Para acceder a una configuración específica de USB, presione brevemente el botón MENU para visualizar una lista de configuraciones (BROWSER>REPEAT>SHUFFLE). Use el codificador para seleccionar la opción a cambiar.
Español demorar hasta una hora. Su radio deberá estar encendida y recibiendo la señal de SiriusXM para recibir el mensaje de activación. SETTINGS (CONFIGURACIÓN) Para acceder a SiriusXM SETTINGS, presione brevemente el MENU al utilizar la fuente SiriusXM . Esto le permite acceso a las configuraciones específicas de SiriusXM (SXM>PRESETS>ADD PRESETS>REMOVE PRESETS>CHANNELS>CATEGORY).
Español Síntoma / Asesoramiento Diagnóstico Acción correctiva Básica No se enciende la unidad fuente Fusible quemado Compruebe el fusible de la unidad cambie por uno con la calificación correcta. La ignición del vehículo está apagada Si conecta siguiendo las instrucciones, la unidad no funcionará con la ignición apagada. El voltaje aplicado al alambre rojo no está entre 10.
Deutsch SUB-Tasten (Fig. 1) Über diese Tasten wird der Subwoofer-Ausgang nach oben (UP) oder unten (DOWN) eingestellt (0-20). SRC (Netzschalter)-Taste Diese Taste ermöglicht das Umschalten zwischen Sources und Ein- und Ausschalten des Geräts ON/OFF. Drehgeber Mit diesem Knopf werden Hauptlautstärke, Zonenlautstärke, Menünavigation und Anpassungen der Einstellungen eingestellt.
Deutsch SOURCE GAIN (Source-Verstärkung) Zum Einstellen des Levels der Gerät-Eingangsverstärkung durch die Eingänge (FM TUNER>AM TUNER>WB TUNER>USB>AUX>BLUETOOTH> PANDORA>SiriusXM) zum Gerät blättern, das eingestellt werden soll, und den Drehgeber-Knopf kurz drücken, um auf die Verstärkungseinstellungen zuzugreifen. Den Drehgeber-Knopf drehen, um das Verstärkungslevel einzustellen.
Deutsch Zone (ZONE 1>ZONE>ALL) (ZONE 1>ZONE>ALLE) einzustellen. Den Drehgeber-Knopf nach links oder rechts auf die gewünschte Lautstärke (0-40) drehen. Die aktuelle Lautstärke wird während der Einstellung angezeigt. EINSTELLUNG DES SUBWOOFER-AUSGANGS Die Tasten SUB + oder SUB- drücken, um den Ausgangspegel einzustellen (0-20). EINSTELLUNG DER BILDSCHIRM-HELLIGKEIT Die Taste SCREEN BRIGHTNESS kurz drücken, um die Helligkeit einzustellen. Es gibt zwei Helligkeitsstufen.
Deutsch Nach der Auswahl mit dem Drehgeber die PRESET-Nummer (1-6) wählen, auf der der Sender gespeichert werden soll. REMOVE PRESETS (Voreinstellungen entfernen) Den Drehgeber-Knopf kurz drücken, um auf die Option REMOVE PRESETS zuzugreifen. Es muss die PRESET-Gruppe angezeigt sein, die man zuerst einstellen möchte (AM1>AM2). Mit dieser Funktion kann man gespeicherte Sender auf dem Gerät entfernen. Nach der Auswahl mit dem Drehgeber die PRESET-Nummer (1-6) des Senders wählen, der entfernt werden soll.
Deutsch oder F. In den USA kann das Abo online oder durch Anruf bei SiriusXM Listener Care aktiviert werden: • Besuchen Sie www.siriusxm.com/activatenow. • Kontaktieren Sie SiriusXM Listener Care unter 1-866-635-2349. Für kanadische Abonnements kontaktieren Sie bitte: • Besuchen Sie www.siriusxm.ca/activatexm. • Kontaktieren Sie XM Customer Care unter 1-877-438-9677. Als Teil des Aktivierungsverfahrens sendet SiriusXM eine Aktivierungsnachricht an den Tuner.
Deutsch Symptom / Beschreibung Diagnose Lösung Grund Sicherung durchgebrannt Die Sicherung des Geräts prüfen und ggf mit der richtigen Stärke ersetzen. Falls nach den Anleitungen angeschlossen wird das Gerät bei ausgeschalteter Zündung nicht Zündung des Fahrzeugs ist ausgestellt. Source-Gerät kann nicht eingeschaltet werden. funktionieren. Die auf den roten Draht angelegte Spannung liegt nicht zwischen 10,5 und 16 Volt oder die Spannung ist unzureichend.
Italiano Pulsanti SUB (Fig. 1) Questi pulsanti regolano l’uscita del subwoofer UP (su) o DOWN (giù) (0-20). Pulsante SRC (Alimentazione) Questo pulsante consente di scegliere la fonte e accendere l’unità ON e spegnerla OFF Encoder rotativo La manopola regola il volume principale, i volumi delle zone, lo spostamento nei menu e la regolazione delle impostazioni. Pulsanti PRESET (Predefiniti) Con questi pulsanti si impostano i predefiniti e consentono l’accesso rapido dopo l’impostazione.
Italiano accedere al sottomenu. Usare l’encoder rotativo per scorrere attraverso le impostazioni EQ. (FM TUNER > AM TUNER > WB TUNER > USB > AUX > BLUETOOTH > PANDORA > SiriusXM) RENAME (Rinomina) Per rinominare ZONE, premere brevemente il pulsante dell’encoder e digitare la prima lettera del nuovo nome. Una volta attivato, ruotare l’encoder per regolare le lettere. Premere brevemente di nuovo il pulsante dell’encoder per impostare la prossima lettera. Ripetere fino a quando ZONE è stato rinominato.
Italiano REGOLARE L’USCITA DEL SUBWOOFER Premere i pulsanti SUB+ o SUB- per regolare il livello di uscita (0-20). REGOLARE LA LUMINOSITÀ DELLO SCHERMO Premere brevemente il pulsante SCREEN BRIGHTNESS per regolare il livello di luminosità. Ci sono due livelli di luminosità. SELEZIONARE UNA FONTE PER LA RIPRODUZIONE Premere brevemente il pulsante SRC per visualizzare le varie fonti (FM TUNER>AM TUNER>WB TUNER>USB>AUX>BLUETOOTH>PANDORA>S iriusXM).
Italiano Dopo avere collegato il dispositivo all’unità di fonte, questa funzione consente di controllare la riproduzione dal dispositivo direttamente dall’unità. Selezionare l’opzione fonte USB sull’unità di fonte. Per riprodurre o sospendere un brano, premere brevemente il pulsante PLAY/PAUSE. Per saltare avanti di un brano, premere brevemente il pulsante FWD. Per saltare indietro di un brano, premere brevemente il pulsante REV.
Italiano • Visitare www.siriusxm.ca/activatexm • Chiamare XM Customer Care al 1-877-438-9677 Durante il processo di attivazione i satelliti SiriusXM inviano un messaggio di attivazione al tuner. Quando la radio rileva che il tuner ha ricevuto il messaggio di attivazione, il display della radio visualizza: “Subscription Updated” (Abbonamento aggiornato). Una volta abbonati è possibile sintonizzarsi sui canali del programma di abbonamento.
Italiano Sintomo / Descrizione Diagnosi Soluzione Di base L'unità di fonte non si accende. Fusibile bruciato Controllare il fusibile sull'unità, cambiarlo con la portata corretta. L'accensione del veicolo è spenta Se collegata seguendo le istruzioni, l'unità non funzionerà con l'accensione spenta. La tensione applicata al cavo rosso non è tra 10,5 e 16 Volt o Controllare la batteria, i collegamenti e i fusibili e riparare o cambiare se necessario. Se la non vi è tensione presente.
Warranty Rockford Corporation offers a limited warranty on Rockford Fosgate products on the following terms: Length of Warranty POWER Amplifiers – 2 Years BMW® Direct Fit Speakers – 2 Years PUNCH® & PRIME® Amplifiers – 1 Year Speakers, Signal Processors, Accessories and Capacitors – 1 Year All marine, motorcycle, motorsport products - 2 Years Any Factory Refurbished Product – 90 Days (receipt required) What is Covered This warranty applies only to Rockford Fosgate products sold to consumers by authorized Ro
FCC STATEMENT 1. This device complies with Part 15 of the FCC Rules. Operation is subject to the following two conditions: (1) This device may not cause harmful interference,and (2) This device must accept any interference received, including interference that may cause undesired operation. 2. Changes or modifications not expressly approved by the party responsible for compliance could void the user's authority to operate the equipment.
1. DOCUMENT HISTORY REV DESCRIPTION PROCESSED BY A INITIAL RELEASE ENG. SERVICES B RELEASED TO WEB ENG. SERVICES D REV C SKIPPED - REV D UPDATED MENU STRUCTURE ITEMS ENG. SERVICES E UPCADTED PANDORA LOGO ENG.
1230-60843-01-E Final Audit Report Created: 2020-01-09 By: Richard Dudley (richard.dudley@rockfordcorp.com) Status: Signed Transaction ID: CBJCHBCAABAAoHBIvFMU8JxjlYRQFgSY5ZmO3C6jX7Is 2020-01-09 "1230-60843-01-E" History Document created by Richard Dudley (richard.dudley@rockfordcorp.com) 2020-01-09 - 3:59:42 PM GMT- IP address: 52.229.31.138 Document emailed to Brad Marvin (brad.marvin@rockfordcorp.com) for signature 2020-01-09 - 4:00:01 PM GMT Email viewed by Brad Marvin (brad.