4-Channel Amplifier R300-4 Installation & Operation Installation et fonctionnement Instalación y funcionamiento Einbau und Betrieb Installazione e funzionamento Serial Number: Date of Purchase:
INTRODUCTION Dear Customer, Congratulations on your purchase of the world's finest brand of car audio amplifiers. At Rockford Fosgate we are fanatics about musical reproduction at its best, and we are pleased you chose our product.Through years of engineering expertise, hand craftsmanship and critical testing procedures, we have created a wide range of products that reproduce music with all the clarity and richness you deserve.
GETTING STARTED Welcome to Rockford Fosgate! This manual is designed to provide information for the owner, salesperson and installer. For those of you who want quick information on how to install this product, please turn to the Installation Section of this manual. Other information can be located by using the Table of Contents.We, at Rockford Fosgate, have worked very hard to make sure all the information in this manual is current.
DESIGN FEATURES 1 R300-4 3 8 4 9 5 6 8 7 10 6 5 4 3 2 11 1. Power LED – This Blue LED illuminates when the unit is turned on. 2. Protect LED – This Red LED illuminates if a short circuit or too low of an impedance is detected at the speaker connections.The amplifier will automatically shut down if this occurs. 3. Punch Bass – This Punch level control is adjustable between 0dB, +6dB and +12dB @ 45Hz. 4.
INSTALLATION This section focuses on some of the vehicle considerations for installing your new amplifier. Pre-planning your system layout and best wiring routes will save installation time.When deciding on the layout of your new system, be sure that each component will be easily accessible for making adjustments. CAUTION:If you feel unsure about installing this system yourself, have it installed by a qualified technician.
INSTALLATION WIRING THE SYSTEM CAUTION:If you do not feel comfortable with wiring your new unit, please see your local Authorized Rockford Fosgate Dealer for installation. CAUTION:Before installation, disconnect the battery negative (-) terminal to prevent damage to the unit, fire and/or possible injury. CAUTION:Avoid running power wires near the low level input cables, antenna, power leads, sensitive equipment or harnesses.
INSTALLATION CAUTION: This amplifier is not recommended for impedance loads below 2 and 4 bridged.
OPERATION ADJUSTING GAIN Do the following individually for each channel. To adjust the gain setting, turn the amplifier gains all the way down (counter-clockwise).Turn the source unit volume up until distortion is audible and then turn it down a bit until the distortion is inaudible.This will be about all the way up on most source units. Next, increase the amplifier gain setting until adequate volume is achieved. NOTE:Best signal to noise and dynamic range are realized with the gain at minimum.
TROUBLESHOOTING NOTE:If you are having problems after installation follow the Troubleshooting procedures below. Procedure 1: Check Amplifier for proper connections. Verify that POWER light is on. If POWER light is on skip to Step 3, if not continue. 1. Check in-line fuse on battery positive cable. Replace if necessary. 2. Check fuse(s) on amplifier. Replace if necessary. 3. Verify that Ground connection is connected to clean metal on the vehicle’s chassis. Repair/replace if necessary. 4.
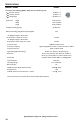
SPECIFICATIONS MODEL- PRIME R300-4 Continuous Power Rating (RMS) - Measured at 14.4 Battery Volts 4 2 4 Load Per Channel Load Per Channel Load Bridged Dimensions: 50 Watts x 4 75 Watts x 4 150 Watts x 2 Height Width Length 2.40" (6.10cm) 7.67" (19.49cm) 17.09" (43.
LIMITED WARRANTY INFORMATION Rockford Corporation offers a limited warranty on Rockford Fosgate products on the following terms: Length of Warranty Speakers, Signal Processors, PRIME and PUNCH Amplifiers – 1 Year POWER Amplifiers – 2 Years Any Factory Refurbished Product – 90 days (receipt required) What is Covered This warranty applies only to Rockford Fosgate products sold to consumers by Authorized Rockford Fosgate Dealers in the United States of America or its possessions.
INTRODUCTION Français Cher client, Toutes nos félicitations pour avoir acheté la meilleure marque d'amplificateurs pour automobile. Chez Rockford Fosgate nous sommes des mordus de la reproduction musicale à son meilleur. C’est pourquoi nous sommes heureux que vous ayez choisi notre produit. Des années d’expertise en ingénierie, de savoir-faire et d’essais poussés nous ont permis de créer une vaste gamme de produits capables de reproduire toute la clarté et la richesse musicales que vous méritez.
AVANT DE COMMENCER Bienvenue à Rockford Fosgate ! Ce manuel vise à informer le propriétaire, le vendeur et l’installateur de l’appareil. Si vous désirez apprendre rapidement comment installer ce produit, consultez la section Installation du manuel. Reportez-vous à la Table des matières pour d’autres informations. Nous nous efforçons de faire en sorte que toutes les informations contenues dans ce manuel soient à jour.
PARTICULARITÉS TECHNIQUES 3 4 5 6 7 6 5 4 3 2 Français 1 R300-4 8 9 8 10 11 1. DEL d'alimentation – Cette DEL s'illumine lorsque l'appareil est allumé. 2. DEL de protection – Cette DEL jaune s'illumine si un court-circuit ou une impédance trop basse est détecté au niveau des connexions de haut-parleur. L'ampli s'éteint automatiquement si cela se produit. 3. Punch Bas – Permet de régler le niveau d'une bande étroite à 45Hz sur 0dB, +6dB ou +12dB. 4.
INSTALLATION CONSIDÉRATIONS CONCERNANT L’INSTALLATION Voici la liste d’outils requis pour l’installation : Porte-fusible et fusible.
INSTALLATION Français Montage dans l’habitacle Le montage de l’ampli dans l’habitacle passager est acceptable à condition qu’il reçoive suffisamment d’air pour se refroidir. Si vous comptez installer l’ampli sous le siège du véhicule, prévoyez un écartement d’au moins 2,54 cm (1 po) autour du dissipateur thermique de l’ampli. Un écartement inférieur à cela n’assure pas un refroidissement satisfaisant, nuit à la performance de l’ampli et est, pas conséquent, fortement déconseillé.
INSTALLATION volts. La tension commutée provient généralement du câble d'allumage d'ampli de la source audio. Si la source audio ne comporte pas une telle sortie, nous recommandons de raccorder un interrupteur mécanique en ligne avec une source de 12 volts pour activer l'ampli. 7. Montez solidement l’ampli sur le véhicule ou le rack d’ampli. Prenez soin de ne pas le fixer sur des panneaux en carton ou en plastique.
FONCTIONNEMENT Français RÉGLAGE DU GAIN Pour régler le gain, tournez le bouton de gain de l'ampli vers son niveau le plus bas (sens anti-horaire).Augmentez le volume de la source audio jusqu'à produire une distorsion audible, puis baissez-le jusqu'à ce que la distorsion devienne inaudible. Cela correspondant généralement au maximum du volume sur la plupart des unités source.Augmentez ensuite le gain de l'ampli jusqu'à ce que le volume soit adéquat.
DÉPANNAGE REMARQUE : si vous éprouvez des difficultés après l’installation,appliquez les procédures de dépannage ci-dessous. Procédure 1 :vérifiez que les connexions de l’ampli sont bien mises. Vérifiez que le voyant POWER est allumé.Si c'est le cas,passez à l'étape 3,sinon poursuivez. 1. Vérifiez le fusible en ligne du câble positif de batterie.Effectuez un remplacement au besoin. 2. Vérifiez les fusibles de l'ampli.Effectuez un remplacement au besoin. 3.
CARACTÉRISTIQUES Français MODÈLE - PRIME R300-4 Puissance nominale en continu (RMS) - Mesurée à 14,4 V (batterie) Charge de 4 par voie Charge de 2 par voie Charge de 4 pontée Dimensions : Hauteur Largeur Longueur 50 watts x 4 75 watts x 4 150 watts x 2 6,10 cm 19,49 cm 43,40 cm Fusible Interne Amplificateur Capacité du fusible de la batterie (Ampères) externe (non fourni) Rapport signal/bruit (pondéré A) À 1 watt dans 4 Ohms Rapport signal/bruit (pondéré A) Pour une puissance nominale dans 4 Ohms Pent
INFORMATIONS SUR LA GARANTIE LIMITÉE Rockford Corporation offre une garantie limitée sur les produits Rockford Fosgate selon les termes suivants : Durée de la garantie Sources audio, haut-parleurs, processeurs de signaux et amplificateurs PRIME, PUNCH — 1 an Amplificateurs POWER — 2 ans Tout produit remis à neuf en usine — 90 jours (reçu obligatoire) Couverture Cette garantie s'applique uniquement aux produits Rockford Fosgate vendus à des consommateurs par des distributeurs agréés Rockford Fosgate, aux
INTRODUCCIÓN Estimado cliente, Español Felicitaciones por su compra de la mejor marca del mundo de amplificadores para automóviles. En Rockford Fosgate somos fanáticos de la mejor reproducción musical y estamos agradecidos de que haya escogido nuestro producto. Con muchos años de experiencia en ingeniería, conocimiento del oficio y procedimientos de prueba críticos, hemos creado una amplia gama de productos para reproducción musical con toda la claridad y la riqueza que usted merece.
INICIO ¡Bienvenidos a Rockford Fosgate! Este manual ha sido creado para proporcionarle información al dueño, vendedor y técnico de instalación. Para quienes desean información rápida sobre cómo instalar este producto, por favor vean la Sección Instalación de este manual. El resto de la información puede encontrarse usando el Índice de Materias. Nosotros, en Rockford Fosgate hemos trabajado arduamente para asegurarnos que toda la información de este manual esté actualizada.
CARACTERÍSTICAS DEL DISEÑO Español 1 R300-4 3 8 4 9 5 6 8 7 10 6 5 4 3 2 11 1. LED de alimentación – Este LED se ilumina cuando se enciende la unidad. 2. LED de protección – Este LED se ilumina si se detecta un corto circuito o una impedancia demasiado baja en las conexiones del altavoz. El amplificador se apagará automáticamente si esto sucede. 3. Punch Bass – Se puede ajustar este control de nivel Punch entre 0dB, +6dB y +12dB a 45Hz. 4.
INSTALACIÓN CONSIDERACIONES PARA LA INSTALACIÓN La siguiente es una lista de las herramientas necesarias para la instalación: Portafusibles y fusible (Consulte la capacidad de los fusibles en las especificaciones) Voltímetro / Ohmetro Pelacables Tenaza engarzadora de cables Cortador de cables Destornillador Phillips No.
INSTALACIÓN Instalación en la cabina de pasajeros Español Se puede montar el amplificador en la cabina de pasajeros, siempre que usted proporcione una cantidad suficiente de aire al amplificador para que pueda enfriarse. Si planea montar el amplificador debajo del asiento del vehículo, deberá dejar un espacio mínimo de 1 pulgada (2,54 cm) alrededor del disipador térmico del amplificador.
INSTALACIÓN amplificador remoto. Si la unidad de fuente no tiene esta salida disponible, la solución recomendada es cablear un interruptor mecánico en línea con una fuente de 12 voltios para activar el amplificador. 7. Monte el amplificador seguramente al vehículo o al soporte del amplificador.Tenga cuidado de no montar el amplificador sobre paneles de cartón o plástico porque los tornillos pueden salirse del panel debido a la vibración o las frenadas repentinas del vehículo. 8.
FUNCIONAMIENTO AJUSTE DE GANANCIA Español Para ajustar la ganancia, gire las ganancias del amplificador totalmente hacia abajo (sentido contra horario). Suba el volumen de la unidad de origen hasta que pueda escuchar la distorsión y luego gire hacia abajo un poco hasta que no se pueda escuchar la distorsión. Esto será hasta arriba en la mayoría de las unidades fuentes. Luego, aumente el ajuste de ganancia del amplificador hasta que se obtenga un volumen adecuado. Las unidades fuentes.
SOLUCIÓN DE PROBLEMAS NOTA: Si tiene problemas después de la instalación,siga los procedimientos de solución de problemas descritos a continuación. Procedimiento 1:Verifique que el amplificador esté bien conectado. Compruebe que esté encendida la luz de ALIMENTACIÓN (POWER).Si la luz de ALIMENTACIÓN (POWER) está encendida vaya al Paso 3,de otra manera,continúe. 1. Compruebe el fusible en línea en el cable positivo de la batería.Cambie si es necesario. 2. Compruebe los fusibles en el amplificador.
ESPECIFICACIONES MODELO - PRIME R300-4 Clasificación de potencia continua (Valor eficaz) – Medida a 14.4 voltios en la batería 4 Carga por canal 50 vatios x 4 2 Carga por canal 75 vatios x 4 4 Carga con puente 150 vatios x 2 Español Dimensiones: Altura Anchura Longitud 6,10 cm 19,49 cm 43,40 cm Amplificador Interno de Fusibles (2) 25A ATC Capacidad del fusible de la batería (Amp) externo (No provisto) 50A Relación señal-ruido media ponderada “A” En relación a 1 vatio en 4 ohmios.
INFORMACIÓN SOBRE LA GARANTÍA LIMITADA Rockford Corporation ofrece una garantía limitada para los productos Rockford Fosgate bajo los siguientes términos: Duración de la garantía Unidades Fuente, altavoces, procesadores de señales y amplificadores PRIME, PUNCH—1 año Amplificadores POWER—2 años Cualquier producto de fábrica restaurado—90 días (comprobante de compra requerido) Qué está cubierto Esta garantía se aplica solamente a los productos Rockford Fosgate vendidos a consumidores por Concesionarios Auto
EINLEITUNG Liebe Kundin, lieber Kunde, wir gratulieren Ihnen zu Ihrem Kauf von Autoaudioverstärkern der besten Marke weltweit.Wir bei Rockford Fosgate sind Fanatiker, wenn es um die beste musikalische Reproduktion geht, und freuen uns darüber, dass Sie unser Produkt gewählt haben. Durch jahrelange Ingenieurserfahrung, Handwerkskunst und kritische Testverfahren haben wir ein weites Spektrum an Produkten geschaffen, die die Musik mit aller Klarheit und Klangschönheit reproduziert, die Sie verdienen.
HIER GEHT’S LOS Willkommen bei Rockford Fosgate! Diese Anleitung bietet dem Besitzer, Verkäufer und Einbauenden Informationen. Kurzgefasste Informationen zum Einbau dieses Produkts finden sich im Abschnitt „Einbau“ dieser Anleitung. Andere Informationen können Sie mithilfe des Inhaltsverzeichnisses auffinden. Wir bei Rockford Fosgate haben uns sehr darum bemüht, dass alle in dieser Anleitung enthaltenen Informationen auf dem neusten Stand sind.
DESIGNCHARAKTERISTIKEN 1 Deutsch R300-4 3 8 4 9 5 6 8 7 10 6 5 4 3 2 11 1. Betriebs-LED – Diese LED leuchtet auf, wenn das Gerät betriebsbereit ist. 2. Schutz-LED – Diese LED leuchtet auf, wenn ein Kurzschluss oder eine zu geringe Impedanz an den Lautsprecheranschlüssen erkannt wird.Wenn dies eintritt, schaltet sich der Verstärker automatisch aus. 3. Punch Bass – Dies ist ein Punch-Bass-Regler, der bis zu 0dB, +6dB, +12dB bei 45 Hz einstellbar ist. 4.
EINBAU EINBAUÜBERLEGUNGEN Die nachfolgenden Werkzeuge werden für den Einbau benötigt: Sicherungsfassung und Sicherung. (Siehe Technische Daten für Bemessungsstrom) Spannungs- und Widerstandsmesser Abisolierzange Drahtkripper Drahtschere Kreuzschraubenzieher Nr.
EINBAU Einbau im Innenraum Befestigung des Verstärkers im Innenraum ist möglich, solange gewährleistet ist, dass der Verstärker genügend Luftzufuhr hat, um sich selbst zu kühlen.Wenn Sie den Verstärker unter dem Fahrzeugsitz befestigen, muss ein Luftspalt von wenigstens 2,54 cm um den Kühlkörper des Verstärkers herum vorhanden sein.
EINBAU Fernbedienungsanschluss einführen und die Einstellschraube zur Befestigung des Kabels anziehen. Das andere Ende des Fernbedienungskabels an eine geschaltete, positive 12 V-Quelle anschließen. Die geschaltete Spannung wird gewöhnlich vom Einschaltanschluss für externe Verstärker am Source-Gerät genommen. Ist ein solcher Anschluss am Source-Gerät nicht vorhanden, wird empfohlen, einen mechanischen Schalter in eine Leitung mit einer 12 VQuelle einzubauen, um den Verstärker zu aktivieren.. 7.
BETRIEB LAUTSTÄRKE (GAIN) EINSTELLEN Zur Einstellung der Lautstärke die Lautstärkeregler des Verstärkers ganz nach unten stellen (nach links drehen). Die Lautstärke des Source-Geräts erhöhen, bis eine Verzerrung hörbar ist, dann ein wenig verringern, bis die Verzerrung nicht mehr hörbar ist.An den meisten Source-Geräten bedeutet dies ganz nach oben.Als Nächstes die Lautstärkeeinstellung des Verstärkers erhöhen, bis eine adäquate Lautstärke erreicht ist.
FEHLERBESEITIGUNG HINWEIS: Falls Sie nach dem Einbau Probleme haben,befolgen Sie die nachfolgenden Verfahren zur Fehlerbeseitigung: Verfahren 1:DenVerstärker auf ordnungsgemäße Anschlüsse überprüfen. Prüfen,ob die BETRIEBS-LED aufleuchtet.Leuchtet die BETRIEBS-LED auf,bei Schritt 3 weitermachen,falls nicht, hier weitermachen. 1. Die Sicherung auf dem positiven Batteriekabel überprüfen und nach Bedarf ersetzen. 2. Die Sicherung(en) am Verstärker überprüfen und nach Bedarf ersetzen. 3.
TECHNISCHE DATEN MODELL- PRIME R300-4 Kontinuierliche Nennleistung (Mittelwert) - Bei 14,4 Batterie-Volt gemessen 4 2 4 -Belastung pro Kanal -Belastung pro Kanal -Belastung überbrückt Maße: Höhe Breite Länge Interne Sicherung Verstärker 50 Watt x 4 75 Watt x 4 150 Watt x 2 6,10 cm 19,49 cm 43,40 cm (2) 25A ATC Deutsch Bemessungsstrom der Batteriesicherung (Amp) Extern (Liegt nicht bei) A-gewichteter Rauschabstand Referenzwert bei 1 W an 4 Ohm A-gewichteter Rauschabstand Referenzwert bei Nennstromwe
INFORMATIONEN ZUR BESCHRÄNKTEN GARANTIE Rockford Corporation bietet für Rockford Fosgate Produkte eine beschränkte Garantie zu folgenden Bedingungen: Laufzeit der Garantie Source-Geräte, Lautsprecher, Signalprozessoren und PRIME, PUNCH-Verstärker – 1 Jahr POWER-Verstärker – 2 Jahre Alle werkseitig aufgearbeiteten Produkte – 90 Tage (Quittung erforderlich) Was gedeckt ist Diese Garantie erstreckt sich nur auf Rockford Fosgate Produkte, die von Rockford Fosgates Vertragshändlern an Verbraucher in den Verein
INTRODUZIONE Egregio cliente, Congratulazioni per aver acquistato la miglior marca di amplificatori per auto a livello mondiale.Alla Rockford Fosgate, siamo fanatici per quanto riguarda la miglior riproduzione musicale e siamo compiaciuti che abbiate scelto il nostro prodotto. Dopo anni di competenza ingegneristica, maestria manuale e procedure di prova critica, abbiamo creato una larga gamma di prodotti che riproducono la musica con la limpidezza e la pienezza che vi meritate.
PRIMI PASSI Benvenuti alla Rockford Fosgate! Questo manuale è stato concepito per fornire ragguagli al proprietario, al rivenditore e all’installatore. Per coloro che desiderano informazioni rapide circa l’installazione di questo prodotto, vi preghiamo di consultare la sezione Installazione di questo manuale. Altri ragguagli sono disponibili attraverso l’Indice. Alla Rockford Fosgate, abbiamo fatto di tutto per assicurarci che tutte le informazioni contenute in questo manuale fossero d’uso corrente.
CARATTERISTICHE DEL DESIGN 1 Italiano R300-4 3 8 4 9 5 6 8 7 10 6 5 4 3 2 11 1. LED alimentazione – Questo LED si accende quando l'unità viene accesa. 2. LED di protezione – Questo LED si accende se viene rilevato un corto circuito o un'impedenza troppo bassa ai collegamenti con i diffusori. In tal caso, l'amplificatore si spegne automaticamente. 3. Punch Basso – Il comando del Basso Punch rappresenta una regolazione di banda stretta a 45Hz, regolabile tra 0dB e +6dB e +12dB. 4.
INSTALLAZIONE CONSIDERAZIONI SULL’INSTALLAZIONE Segue un elenco degli utensili necessari per eseguire l’installazione: Portafusibile e fusibile. (Per informazioni sulla portata dei fusibili, consultare le specifiche.) Voltmetro/ohmetro Pinze spelafili Pinze raggrinzafili Pinze tagliafili Cacciavite a croce no.
INSTALLAZIONE Montaggio nello scampartimento passeggeri Se montate l’amplificatore nell’abitacolo, esso funzionerà finché possiate fornire una quantità sufficiente di aria per permettere all’amplificatore di raffreddarsi. Se avete intenzione di montare l’amplificatore sotto il sedile del veicolo, dovete lasciare un vuoto d’aria di almeno 2,54 cm attorno al dissipatore di calore dell’amplificatore.
INSTALLAZIONE Volt. La tensione commutata proviene generalmente cavo dell'accensione remota dell'amplificatore dell’unità di fonte. Qualora l'unità sorgente non avesse tali uscite disponibili, la soluzione consigliata consiste nel cablare un commutatore meccanico in linea con una fonte da 12 volt per attivare l’amplificatore. 7. Montate l’amplificatore saldamente al veicolo o all’apposita struttura di supporto.
FUNZIONAMENTO REGOLAZIONE DEL GUADAGNO Per regolare l'impostazione per il guadagno, abbassare completamente i guadagni per l'amplificatore (ruotando in senso antiorario).Alzare il volume dell’unità di fonte finché la distorsione non diventi udibile, e poi abbassarlo finché la distorsione non sia più udibile. Nella maggior parte delle unità, ciò avviene quasi al volume massimo. Quindi aumentare il guadagno dell'amplificatore fino a quando il volume è al livello desiderato.
INDIVIDUAZIONE/RIPARAZIONE GUASTI NOTA: Se incontraste dei problemi dopo l’installazione,seguite le procedure per la localizzazione e la riparazione dei guasti elencate di sotto. Procedura 1:Controllate che l’amplificatore abbia i collegamenti adeguati. Controllate che la spia dell’ACCENSIONE sia accesa.Se la spia di ACCENSIONE è accesa,passare al numero 3, altrimenti continuare 1. Controllare il fusibile in linea sul cavo positivo della batteria.Sostituire,se necessario. 2.
SPECIFICHE MODELLO - PRIME R300-4 Potenza continua a regime (RMS) – Misurata a 14,4 volt da batteria Carico da 4 per canale Carico da 2 per canale Carico da 4 in parallelo Dimensioni: Altezza Larghezza Lunghezza 6,10 cm 19,49 cm 43,40 cm Fusibili Amplificatore Interno (2) 25A ATC Portata fusibili batteria (Amp) Esterno (Non fornito) Italiano 50 watts x 4 75 watts x 4 150 watts x 2 Rapporto segnale pesato “A” a disturbi Riferito a 1 W in 4 ohm Rapporto segnale pesato “A” a disturbi Riferito a uscit
INFORMAZIONI INERENTI ALLA GARANZIA LIMITATA La Rockford Corporation offre una garanzia limitata sui prodotti della Rockford Fosgate alle seguenti condizioni: Lunghezza della garanzia Unità di fonte, altoparlanti, elaboratori di segnali e amplificatori PRIME, PUNCH — 1 anno Amplificatori POWER — 2 anni Prodotti rimessi a nuovo dalla fabbrica — 90 giorni (è necessaria la ricevuta) Ciò che è coperto dalla garanzia Questa garanzia è solamente applicabile ai prodotti della Rockford Fosgate venduti a clienti d
Installation assistance availible at: www.rockfordfosgate.com/rftech Rockford Fosgate Rockford Corporation 600 South Rockford Drive Tempe, Arizona 85281 U.S.A. In U.S.A., (480) 967-3565 - Customer Service 1-800-669-9899 www.rockfordfosgate.com 11/2008 B.M. 12/2008 E.R.