USER'S MANUAL May be covered by one or more of the following: U.S. Patents #4538297, 4647876, 4696044, 4745309, 4881047, 4893099, 5124657, 5263091, 5268527, 5319713, 5333201, 5402498, 5493617 and 5638452. Other patents pending. Foreign patents pending.
Your Intellifex® Online has been tested and complies with the following Standards and Directives as set forth by the European Union: Council Directive(s): 89/336/EEC Electromagnetic Compatibility Standard(s): EN55013, EN50082-1 This means that this product has been designed to meet stringent guidelines on how much RF energy it can emit, and that it should be immune from other sources of interference when properly used.
Contents 1. Introduction ................................................................................................................. 1 2. Quick Setup ................................................................................................................. 2 3. Front Panel .................................................................................................................. 3 4. Rear Panel ..............................................................................................
1. Introduction Congratulations on your purchase of the Rocktron Intellifex ® Online! The Intellifex Online features presets created and uploaded by Rocktron users from all over the world to Rocktron's World Wide Web site. These presets can be easily updated from the "Patch Bay" at Rocktron's web page. In addition, you can also upload your own custom presets to share with other online users. For instructions on downloading and uploading Intellifex presets, please visit our web site at "http://www.rocktron.
2. Quick Setup Rcalling a Stored Intellifex Online Preset Storing Modified Parameter Values STEP 1 STEP 1 To recall a stored Intellifex Online preset, first turn the PRESET control to the desired preset number you wish to recall. The display will alternate between the preset number/title selected and: STORE TO PRESET PRESS RECALL FOR STEP2 To call up the preset you have selected, press the RECALL button. The display will now show only the new preset number/title.
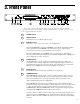
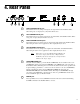
3. Front Panel Some of the controls on the Intellifex Online front panel have more than one function, dependent upon what mode the unit is currently operating in. Please read this section to become better aquainted with these functions. 1 POWER switch 2 RECALL button: This button is used to recall the displayed preset. 3 PRESET control: The function of this control is dependent on the CONFIG button.
PARAMETER ADJUST control: This control is used to adjust the displayed parameter value. When the parameter is changed from its original value, the LED above the STORE button will light until either (a) the new value is stored, (b) a new preset is selected or (c) the parameter is returned to its original value. 8 STORE button: This button is used to store values into the Intellifex Online memory when modified. See Chapter 8, section C, "Storing Modified Parameters" for more information.
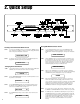
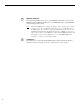
4. Rear Panel 1 RIGHT CHANNEL INPUT jack: This standard 1/4" mono jack provides input to the right channel of the Intellifex Online. When using only one input (mono), this jack should be used. 2 LEFT CHANNEL INPUT jack: This standard 1/4" mono jack provides input to the left channel of the Intellifex Online. When using only one input, this jack should not be used. 3 RIGHT CHANNEL OUTPUT jack: This standard 1/4" mono jack provides an output for the right channel of the Intellifex Online.
7 MIDI OUT/THRU jack: This standard 5-pin DIN connector passes on the MIDI information that is received at the MIDI IN jack to other MlDI-compatible devices via a MIDI cable. It also outputs MIDI data when performing a memory dump. Note: 8 6 Inherently in MIDI there is a limit to the number of devices which can be chained together (series connected).
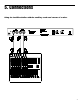
5.
Using the Intellifex Online with a keyboard and a mixer 8
Using the Intellifex Online with a guitar rack system !! CAUTION !! Note: Never connect the outputs of a power amplifier or guitar amplifier to the inputs of the Intellifex Online. This could damage the Intellifex Online. For best results when using the Intellifex Online with high gain distortion, always put the Intellifex Online after the distortion in the signal chain, never before it.
6. Principle of Operation A. MIXER SECTION The first function accessible when turning the FUNCTION SELECT control in any preset is the Mixer function. This digital mixer allows you to control the signal levels pertaining to each preset’s configuration and stores these levels for each preset. Caution: Digital Output overload As the input signal enters at the unit’s input (A), the unaltered direct signal is fed to the Direct Pre/Post Hush Selector (B).
MIXER PARAMETERS Effects Level (in Hush; Chorus; Delay; Reverb and Hush; Pitch Shift; Delay; Reverb configurations) This controls the level of the entire effect signal. This control should be set relative to the levels of the Left and Right Direct signals. In configurations which do not include a master Effects Level, the single effect level parameter (Chorus Level, Delay Level, etc.) is considered the master Effect Level control.
B. REVERB SECTION Reverb, or reverberation, is the continuance of sound within a given room or enclosed chamber after the source of the sound has stopped producing it. More specifically, it is a multitude of echoes so densely spaced that, to the human ear, seem as a single continuous sound. These echoes gradually decrease in intensity until they are ultimately absorbed by the boundaries and obstacles within the room or enclosure.
Reverb Decay This parameter specifies the length of time that the reverb signal will sound before it has completely faded out (or until its echoes have been ultimately absorbed by the boundaries within the given "room"). The maximum length of this decay will vary dependent upon which reverb type is active. High Freq. Damping High Frequency Damping is used to control the amount of high frequency information in the reverb signal.
C. DELAY SECTION Delay is simply a reproduction of the input signal, originating at a prescribed time (usually expressed in milliseconds, or mS) following the input signal. DELAY TYPES The Intellifex Online HUSH; Delay; Ducker configuration offers 3 delay types: Stereo, Ping-Pong and 2-Tap. The Stereo delay type provides two separate delays. This delay type is used for applications requiring two discrete delay lines with individual regeneration loops.
Pan 1/2 This allows for the panning of each delay to the left or right output, if desired. The Pan parameter is adjustable from 0 to 100—where 0 is full left, 100 is full right and 50 is center. Dly Time 1/2 These parameters determine the amount of time after a signal is input that the delayed signal will begin to reproduce the input signal. Regen 1/2 This parameter is provided for each delay and determines the number of times the delayed signal will repeat itself.
D. DUCKER SECTION The process of ducking enables the user to suppress the level of a given signal or effect dynamically, dependent upon the presence of another signal which is desired to be prominent.
E. PITCH CHANGE SECTION Pitch Change effects involve splitting the input signal into at least two separate signals, then modifying the pitch of one signal and mixing it back together with the unaltered direct signal. The Intellifex Online offers two types of pitch change effects: Chorus and Pitch Shift.
PITCH SHIFT Pitch Shifting is used to change the pitch of the input signal to produce one to four harmony notes based on a single input signal. The Hush; Pitch Shift; Delay configuration offers 4 harmony voices while the Hush; Pitch Shift; Delay; Reverb configuration offers 2. Each harmony voice may be of any fixed interval - from to one octave above the input signal to two octaves below—and is selected in 20 cent increments.
DETERMINING INTERVALS BY CENT VALUES PARAMETER CORRESPONDING VALUE INTERVAL +1200 +1100 +1000 +900 +800 +700 +600 +500 +400 +300 +200 +100 0 -100 -200 -300 -400 -500 -600 -700 -800 -900 -1000 -1100 -1200 -1300 -1400 -1500 -1600 -1700 -1800 -1900 -2000 -2100 -2200 -2300 -2400 One octave Major 7th minor 7th Major 6th minor 6th perfect 5th diminished 5th perfect 4th Major 3rd minor 3rd Major 2nd minor 2nd Unison Major 7th minor 7th Major 6th minor 6th perfect 5th diminished 5th perfect 4th Major 3rd minor 3r
F. HUSH® SECTION HUSH® is Rocktron’s patented single-ended noise reduction system. The HUSH system contained in the Intellifex Online is Hush Systems' first fully digital implementation of HUSH achieved through Digital Signal Processing (DSP), and is modeled after the latest HUSH design. The low level expander of the HUSH system operates like an electronic volume control.
7. Configurations At the root of each preset’s sound is its configuration. A preset's configuration determines both the active effects for a given preset and the order in which those effects are routed in the signal path. The Intellifex Online provides 6 highly flexible configurations capable of producing sounds which previously could only be achieved by using numerous effects devices complexly patched together.
A. HUSH/CHORUS/DELAY/REVERB Configuration This configuration offers HUSH® noise reduction at the input to quiet a noisy input signal (such as from a high-gain guitar preamp) with 4 chorus and delay voices and reverb. Note: 22 When the Delay Time for any voice is set to zero, that voice is taken out of the regeneration loops. This will allow for higher regeneration levels (if needed). It also allows for a more pure sounding decay of the echo when used with other voices set at long delay times.
HUSH/CHORUS/DELAY/REVERB Parameters Function Parameter List Range via FUNCTION SELECT control via PARAMETER SELECTcontol via PARAMETER ADJUST control MIXER EFFECTS LVL L DIR LVL R DIR LVL DIRECT HUSH CHORUS LVL DELAY LVL REVERB LVL REGEN L REGEN R -∞ to +6.0dB -∞ to +6.0dB -∞ to +6.
B . HUSH/REVERB Configuration This configuration combines HUSH® noise reduction with high purity reverb sounds. Eight different reverb types are provided, along with up to 210mS of predelay.
HUSH/REVERB Parameters Function Parameter List Range via FUNCTION SELECT control via PARAMETER SELECT control via PARAMETER ADJUST control MIXER REVERB LVL L DIR LVL R DIR LVL DIRECT HUSH -∞ to +6.0dB -∞ to +6.0dB -∞ to +6.
C. HUSH/DELAY/DUCKER Configuration The Intellifex Online offers three types of delay—2-Tap, Stereo and Ping-Pong. The configurations for each are shown in the following diagrams.
Stereo Delay Ping-Pong Delay 27
HUSH/DELAY/DUCKER Parameters Function Parameter List Range via FUNCTION SELECT control via PARAMETER SELECTcontrol via PARAMETER ADJUST contol MIXER DELAY LVL L DIR LVL R DIR LVL DlRECT HUSH -∞ to +6.0dB -∞ to +6.0dB -∞ to +6.
D. HUSH/8 VOICE CHORUS/DELAY Configuration This configuration provides eight voices which may be chorused and/or delayed up to 418 milliseconds each. Note: When the Delay Time for any voice is set to zero, that voice is taken out of the regeneration loops. This will allow for higher regeneration levels (if needed). It also allows for a more pure sounding decay of the echo when used with other voices set at long delay times.
HUSH/8 VOICE CHORUS/DELAY Parameters Function Parameter List Range via FUNCTION SELECT control via PARAMETER SELECT control via PARAMETER ADJUST contol MIXER CHORUS LVL L DIR LVL R DIRLVL DIRECT HUSH REGEN L REGEN R -∞ to +6.0dB -∞ to +6.0dB -∞ to +6.0dB Pre or Post -∞ to 0.0dB -∞ to 0.
E.
HUSH/PITCH SHIFT/DELAY Parameters Function Parameter List Range via FUNCTION SELECT control via PARAMETER SELECT control via PARAMETER ADJUST control MIXER P SHIFT LVL L DIRLVL R DIR LVL DIRECT HUSH REGEN L REGEN R -∞ to +6.0dB -∞ to +6.0dB -∞ to +6.0dB Pre or Post -∞ to 0.0dB -∞ to 0.0dB HUSH HUSH l/O EXP THRESH REL RATE In or Out -92 to -20dB 25mS to 800mS PITCH 1 FINE 1 LEVEL 1 PAN 1 DELAY1 -2400 to +1200 -20 to +20 -∞ to 0.
F. HUSH/PITCH SHIFT/DELAY/REVERB Configuration This configuration combines HUSH noise reduction with 2 voices of Pitch Shift and Delay along with a third delay. This is followed by a Ducking feature for the delayed signals and Reverb. Note: When the Delay Time for any voice is set to zero, that voice is taken out of the regeneration loops. This will allow for higher regeneration levels (if needed).
HUSH/PITCH SHIFT/DELAY/REVERB Parameters 34 Function Parameter List Range via FUNCTION SELECT control via PARAMETER SELECT control via PARAMETER ADJUST contol MIXER EFFECT LVL L DIR LVL R DIR LVL DIRECT HUSH PSHIFT LVL DELAY LVL REVERB LVL REGEN L REGEN R -∞ to +6.0dB -∞ to +6.0dB -∞ to +6.0dB Pre or Post -∞ to 0.0dB -∞ to 0.0dB -∞ to 0.0dB -∞ to 0.0dB -∞ to 0.
8. Operating the Intellifex A. Recalling a stored Intellifex Online preset 2 Step 1 1 To recall an Intellifex Online preset, first turn the PRESET control to the preset number to be recalled. The display will alternate between the preset number/title selected and: PRESS RECALL FOR Step 2 To recall the selected preset, press the RECALL button and the display will now show only the new preset number and title (or configuration type—depending on the CONFIG L.E.D. status).
B. Changing preset parameters 4 Step 1 3 2 1 The parameter menu for each effect can be called up via the FUNCTION SELECT control. Turn this control to the effect to be modified. ***** REVERB ***** Step 2 Turn the PARAMETER SELECT control to choose which parameter to be altered for that effect. REV DECAY Step 3 Use the PARAMETER ADJUST control to modify the parameter value. The LED above the STORE button will light, indicating that the preset has been altered from its original state.
C. Storing modified parameter values 2 1,3,4 To store altered parameter values, press the STORE button while the effect title or parameter is displayed to start the store procedure.
Step 4 After the altered parameter values have been stored into the selected preset number, the Intellifex Online will display "COPY TITLE TOO?". This will only be displayed when storing into a new preset number, and allows you copy the title from the original preset into the new preset also, if desired. To copy the title from the original preset, press the STORE button a third time and the display will again flash "STORED".
D. Editing a preset title The Title Edit function can be accessed in user presets 1-80 only. The titles of factory presets 81-160 can not be edited. 3 5 2,4 1 To begin the Title Edit function, turn the FUNCTION SELECT control clockwise until the Intellifex Online displays "TITLE EDIT". Step 1 TITLE EDIT Turn the PARAMETER SELECT control clockwise to initiate the Title Edit mode. Turning this control will select the character location to be edited.
E. Selecting a "Power On" preset The Intellifex allows you to select the preset which that be recalled each time the unit is turned on. 2 Step 1 1 3 Turn the PRESET control to the preset number that is to be recalled each time the unit is turned on. 24 PRESET TITLE Step 2 Recall the selected preset by pressing the RECALL button. 24 PRESET TITLE Step 3 Press the STORE button while the preset number/title or configuration is displayed to save the current preset as the "power on" preset.
9. MIDI Operation A. MIDI Controller Assignment Controller mapping allows for specific Intellifex adjustable parameters to be mapped (or assigned) to a MIDI controller number for real-time control (via a pitch wheel, expression pedal, etc.) in live performance situations. Any parameter may be assigned to any controller number, from controller 0 through controller 120, or OFF. In the OFF position, the assigned parameter will not respond to any MIDI control change. Each preset allows for up to 8 controllers.
Step 5 Turning the PARAMETER SELECT control one step clockwise will display the effect parameter that is currently mapped to the NUMB1 control number. PARA1 XXX Turn the PARAMETER ADJUST control to scroll through the available parameters for the current configuration. Step 6 PARA1 Step 7 EFFECTS LVL After selecting the parameter to be assigned to the NUMB1 controller, press the STORE button to save it. "STORED" will flash briefly on the display.
Step 11 Turn the PARAMETER SELECT control for the last parameter - Controller Lower Limit. LLIM C1 Step 12 XXX Use the PARAMETER ADJUST control to select the parameter value which the controller is not to fall below. LLIM C1 Step 13 -10.0 After choosing a lower limit parameter value, press the STORE button to save it. "STORED" will flash briefly on the display. STORED Notes This entire process is repeated 7 times for a total of 8 controllers (NUMB2, NUMB3, etc.).
B. MIDI Program Mapping Program mapping allows for an Intellifex preset number to be mapped (or assigned) to a different MIDI program number. The Intellifex is initially programmed at the factory to access to the lower 128 presets (i.e. program number 1 is mapped to preset 1, 128 to 128, etc.) 3,7 Step 1 4,8 2,5,6 1 To access the Program Mapping function, turn the FUNCTION SELECT control one step past the Controller Assign function.
Step 6 The number on the left of the display is the MIDI program number (or the number sent via a MIDI footswitch, etc.). Use the PARAMETER SELECT control to select the number (1128) to be mapped to a preset. 110 MAP TO XXX MIDI Program Number (1-128) Step 7 The number on the right of the display is the preset number to map to (or the preset number that will be recalled when the MIDI program number on the left is sent).
C. MIDI Channel The MIDI Channel function determines the MIDI channel that the Intellifex Online will receive MIDI commands on. 3 Step 1 4 2 1 Turn the FUNCTION SELECT control to "MIDI Channel". ** MIDI CHANNEL ** Step 2 Turn the PARAMETER SELECT to view the current MIDI Channel. MIDI CHANL Step 3 Use the PARAMETER ADJUST control to select the MIDI channel that the Intellifex Online is to receive MIDI commands on.
D. MIDI Dump/Load Any or all of the Intellifex Online user presets may be dumped to a sequencer or another Intellifex Online via system exclusive messages. The information exchanged when performing a MIDI dump consists of the configuration type, parameter values, title characters and controller assignment/limit information. When dumping a single Intellifex Online preset into another Intellifex Online, the preset being dumped may be loaded into any user preset location on the receiving Intellifex Online.
Step 5 Use the PRESET control on the transmitting Intellifex Online to select the preset you wish to dump. Any of the user presets (1-80) may be dumped. 17 PRESET DUMP Step 6 Use the PRESET control on the receiving Intellifex Online to select the preset location to store the received preset. The preset currently at this location will be overwritten, therefore use caution when selecting the preset location to dump to.
The following information is transmitted when a preset dump is initiated: F0H - Start of Exclusive byte 00H - Manufacturer ID byte 1 00H - Manufacturer ID byte 2 29H - Manufacturer ID byte 3 02H - Product ID byte 28H - Command byte, Preset dump XXH - 200 data bytes, (MSB=0) YYH - Check Sum byte, ("Exclusive or" of data bytes, MSB=0) F7H - End of Exclusive byte Each data byte is a 7-bit value. The first transmitted data byte consists of the lower 7 bits of the first value.
Step 2 Turn the FUNCTION SELECT control on the Intellifex Online to the "MIDI DUMP/ LOAD" function. This function is available at the most clockwise position of the FUNCTION SELECT control in all user presets. MIDI DUMP/LOAD Step 3 Turn the PARAMETER SELECT control to the "DUMP USER DATA" position. DUMP USER DATA Step 4 Start the sequencer recording. RECORD Step 5 Press the STORE button on the Intellifex Online to initiate the user data dump.
Reloading the user memory from a sequencer: Step 1 Connect the MIDI OUT of the sequencer to the MIDI IN on the Intellifex Online with a standard MIDI cable. Step 2 Turn the FUNCTION SELECT control on the Intellifex Online fully clockwise to the "MIDI DUMP/LOAD" position. MIDI DUMP LOAD Step 3 Turn the PARAMETER SELECT control to the "LOAD USER DATA" position. The Intellifex Online is now ready to receive the user data from the sequencer.
The following information is transmitted when a user data dump is initiated: F0H - Start of Exclusive byte 00H - Manufacturer ID byte 1 00H - Manufacturer ID byte 2 29H - Manufacturer ID byte 3 02H - Product ID byte 2AH - Command byte, Start of user dump, 2BH continue user dump.
E. Factory Restore This procedure allows you to restore the Intellifex Online memory to its original condition as it was shipped from Rocktron. ! ! CAUTION ! ! This procedure will permanently erase all user presets (1-80) and replace them with the factory presets found In presets 81-160. If you have stored presets in preset locations 1-80 which you do not want to lose, make a record of all parameter values before performing the Factory Restore procedure.
10. MIDI Implementation Chart Rocktron Intellifex Online DATE: July 30, 1997 MODEL: Intellifex Online MIDI IMPLEMENTATION CHART VERSION: 1.
11. Specifications MEASUREMENT CONDITIONS Maximum Input: +20dBu Input Level Pot minimum Maximum Output: +20dBu Output Level Pot maximum Nominal Input Range: (16dB Headroom) +4dBu to -21dBu Input Level Pot minimum Input Level Pot maximum Input Impedance: 470Kohms Output Impedance: 120 ohms Dynamic Range: 104dB HUSH In, 94dB HUSH Out Peak Signal/A weighted Noise Floor, Direct Level = +6dB, Direct Post HUSH Effects Level= - ∞ THD + N: .