U s e r ’ s M a n u a l
Precautions PRECAUTIONS NOTE: IT IS VERY IMPORTANT THAT YOU READ THIS SECTION TO PROVIDE YEARS OF TROUBLE FREE USE. THIS UNIT REQUIRES CAREFUL HANDLING. All warnings on this equipment and in the operating instructions should be adhered to and all operating instructions should be followed. Do not use this equipment near water. Care should be taken so that objects do not fall and liquids are not spilled into the unit through any openings.
Contents Introduction.......................................................................................................................................1 Top Panel............................................................................................................................................2 Rear Panel..........................................................................................................................................4 Typical Setup........................................
Introduction The Rocktron MIDI Raider is a powerful onstage tool for the serious professional guitarist. A standalone foot controller that can be completely customized for your gear requirements, the MIDI Raider can be set up to your specs in three operating modes: Bank Mode, Song Mode and Remote Mode. * Bank Mode has 120 presets and each instant switch can be set up global or per preset.
Top Panel Primary button functions (2ND L.E.D. off) of the MIDI Raider footswitch 2 1 Bank UP/DOWN These switches allow for the selection of the preset bank (0-12). switches 2 Switches 1-15 These switches are used as preset switches and/or instant access switches, dependent upon the configuration of the MIDI Raider. (see SETUP, Pages 1 and 2) 3 2ND switch This switch activates the secondary button functions.
Secondary button functions (2ND L.E.D. on) of the MIDI Raider footswitch 1 2 3 DEC switch - used to decrement data selection currently shown on the left side of the display. INC switch - used to increment data selection currently shown on the left side of the display. 4 DEC switch - used to decrement data selection currently shown in the center of the display. 5 INC switch - used to increment data selection currently shown in the center of the display.
Rear Panel 4 1 PEDAL 1 jack This ¼” stereo TRS jack allows for the connection of a continuous controller (such as an expression pedal, volume pedal, fader, etc.) to the MIDI Raider. 2 PEDAL 2 jack This ¼” stereo TRS allows for the connection of a second continuous controller to the MIDI Raider. 3 MIDI IN jack This 7-pin DIN connector accepts the MIDI output signal from another MIDI transmitting device which may be used to control the MIDI Raider.
Typical Setup 5
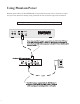
Using Phantom Power Phantom power allows for the MIDI Raider to be powered from your rack (or from an AC outlet near your rack) instead of running a long extension cord out across the stage to the footswitch.
Using Phantom Power Using phantom power with a non-Rocktron MIDI receiving device 7
Editing the MIDI Raider The MIDI Raider can be configured to provide complete control over all of the MIDI receiving devices within a rack. This section discusses each of the following editing programs in detail: SETUP MIDI COPY TITLES SONG/SET CTR STORE CUSTOM SYSX The MIDI Raider MIDI edit cycle on the following page can be used as a quick reference when searching for specific MIDI Raider editing pages.
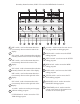
Quick Reference - MIDI Edit Cycle The figure below lists all of the pages for each editing function, as well as the options which are available for each editing page.
SETUP The SETUP program allows the user to configure the general operation of the MIDI Raider footswitch.
Selecting the operating mode Mode Options select BANK, SONG or REMOTE MODE BANK 1 3 2 3 When the desired operating mode has been selected: (a) press the “2ND” button again (turning the “2ND” L.E.D.
SETUP, Page 2 of 10 - Bank Size The second page of the SETUP program allows for the selection of the Bank Size, or the number of presets that the MIDI Raider will bank up or down by when the UP or DOWN switches are pressed. When set to “5”, switches 1-5 become preset switches and the unit will bank up or down by 5 presets at a time. When set to “10”, switches 1-10 become preset switches and the unit will bank up or down by 10 presets at a time.
Selecting the Bank Size Size Options select 1, 5, 10 or 15 BANK BY 10 2 1 2 When the desired bank size has been selected: (a) press the “2ND” button again (turning the “2ND” L.E.D. off) to exit the editing mode; or (b) press the “" button to access additional SETUP editing pages; or (c) press another mode button to edit MIDI Raider features other than SETUP.
SETUP, Page 3 of 10 - Bank Style The third page of the SETUP program, Bank Style, determines how the next preset will be recalled when the MIDI Raider is banked up or down. If the Bank Style parameter is set to “First”, the first preset in the new bank will be recalled when the unit is banked up or down. If set to “Curnt”, the current preset switch from the previous bank will be recalled. When set to “None”, an additional preset switch must be pressed after banking up or down to recall the desired preset.
Selecting the Bank Style Bank Style Options select FIRST, CURNT or NONE bANK style > first 2 1 2 When the desired bank style has been selected: (a) press the “2ND” button again (turning the “2ND” L.E.D. off) to exit the editing mode; or (b) press the “" button to access additional SETUP editing pages; or (c) press another mode button to edit MIDI Raider features other than SETUP.
SETUP, Page 4 of 10 - Instant access switch operating status Note: When scrolling through the switches to program, only those switches which are configured as instant access switches can be accessed. The fourth page of the SETUP program determines whether the controller values sent from the MIDI Raider are global (the same for all presets) or set on a per preset basis.
Selecting the Instant access operating status Switches to Program select PED1-2 SW1-15 Operating Type select GLOBAL or PER PR ped1 global 2 3 2 3 1 When the desired control value status has been selected: (a) press the “2ND” button again (turning the “2ND” L.E.D. off) to exit the editing mode; or (b) press the “" button to access additional SETUP editing pages; or (c) press another mode button to edit MIDI Raider features other than SETUP.
SETUP, Page 5 of 10 - Naming MIDI Channels The fifth page of the SETUP program allows for custom 4 character abbreviations to be shown in place of MIDI channels and instant access switches during editing. Assigning a name to each MIDI channel can make it considerably easier to remember which MIDI devices are assigned to particular MIDI channels. This is also true of instant access switches. To assign a name to a MIDI channel or instant access switch: () With the 2ND L.E.D.
Naming MIDI Channels and Instant Access Switches Channel/Switch to Name select CH1-16 SW1-15 PED1, PED2 Channel Name select A-Z 1-9 ch16 name->i.fex 2 3 4 2 3 4 1 When the desired channels and switches have been named: (a) press the “2ND” button again (turning the “2ND” L.E.D. off) to exit the editing mode; or (b) press the “" button to access additional SETUP editing pages; or (c) press another mode button to edit MIDI Raider features other than SETUP.
SETUP, Page 6 of 10 - Starting Preset Number Some MIDI devices may use “0” as the first preset number of each MIDI channel, while others may use “1”. This page of the SETUP program allows for either “0” or “1” to be selected as the starting preset number for each MIDI channel so that the preset number displayed by the MIDI Raider matches the preset number displayed by the MIDI device. To select the starting preset number: () With the 2ND L.E.D.
Selecting the Starting Preset Number Selected Channel select CH1-16 Starting Preset Number select 0 or 1 ifex pr start > 0 2 3 2 3 1 When the Starting Preset Number has been selected for each channel: (a) press the “2ND” button again (turning the “2ND” L.E.D. off) to exit the editing mode; or (b) press the “" button to access additional SETUP editing pages; or (c) press another mode button to edit MIDI Raider features other than SETUP.
SETUP, Page 7 of 10 - MIDI Filtering The seventh page of the SETUP program, MIDI Filtering, allows for incoming MIDI signals to either be merged with the footswitch’s MIDI information or selectively blocked. Filtering may be done either by message type or by MIDI channel. To change the MIDI filtering status: () With the 2ND L.E.D. still lit, press the "" switch to access the seventh page of the SETUP program.
Selecting MIDI Filtering Options MIDI Thru Status Message select select BLOC or MERG All MIDI Commands or CH1-16 note on > merg 2 3 2 3 1 When the desired MIDI Filtering options have been selected: (a) press the “2ND” button again (turning the “2ND” L.E.D. off) to exit the editing mode; or (b) press the “" button to access additional SETUP editing pages; or (c) press another mode button to edit MIDI Raider features other than SETUP.
SETUP, Page 8 of 10 - Preset Reinitialization The eighth page of the SETUP program, Preset Reinitialization, allows for the restoration of an individual preset to its original factory settings. This procedure will erase any modifications that the user has made to a specific preset and return it to its original condition. ! WARNING! The Preset Reinitialization feature will erase all data for the selected preset and return it to its original condition as shipped from the factory.
Reinitializing a Preset Preset to Reinitialize select PR1-120 reinit pr10 3 2 1 2 When the desired presets have been reinitialized: (a) press the “2ND” button again (turning the “2ND” L.E.D. off) to exit the editing mode; or (b) press the “" button to access additional SETUP editing pages; or (c) press another mode button to edit MIDI Raider features other than SETUP.
SETUP, Page 9 of 10 - Memory Reinitialization (All Presets) ! WARNING! The Memory Reinitialization feature will erase the entire memory of the MIDI Raider and return it to its original condition as shipped from the factory. Once the STORE button is pressed, all erased data will be unrecoverable! The ninth page of the SETUP program, Memory Reinitialization, allows for the restoration of the entire MIDI Raider memory to its original factory settings.
Reinitializing the MIDI Raider Renitialization Code Number select 0-255 (“230” must be selected to activate the reinitialization process) INIT all mem 1 3 2 1 2 When the MIDI Raider has been reinitialized: (a) press the “2ND” button again (turning the “2ND” L.E.D. off) to exit the editing mode; or (b) press the “" button to access additional SETUP editing pages; or (c) press another mode button to edit MIDI Raider features other than SETUP.
SETUP, Page 10 of 10 - Remote Title Number Remote mode notes: When operating the MIDI Raider in remote mode with a Rocktron rack unit, changes made from the rack unit itself will be reflected on the footswitch. For example, if button 6 on the MIDI Raider is configured to control the Delay In/Out parameter on the rack unit, switching out the delay from the rack unit instead of the MIDI Raider will cause the L.E.D. for button 6 on the footswitch to turn off.
Selecting a Remote Title Number Remote Title Number select 0-255 remote title 1 2 1 2 When the Remote Title Number has been selected: (a) press the “2ND” button again (turning the “2ND” L.E.D. off) to exit the editing mode; or (b) press the “" button to access previous SETUP editing pages; or (c) press another mode button to edit MIDI Raider features other than SETUP.
The MIDI program provides access to the MIDI features of the MIDI Raider footswitch.
Assigning Programmable Patch Changes Preset Number select PR1-120 MIDI Channel select CH1-16 (or channel name) pr120 ch1 Program Change select 1-128, OFF (or 0-127, OFF) pc128 1 2 3 4 5 3 4 5 When the desired program changes have been assigned: (a) press the “2ND” button again (turning the “2ND” L.E.D. off) to exit the editing mode; or (b) press the “" button to access additional MIDI editing pages; or (c) press another mode button to edit MIDI Raider features other than MIDI.
MIDI, Page 2 of 7 - Control Number Assignment The second page of the MIDI program, Control Number Assignment, allows for control numbers and MIDI channels to be assigned to instant access switches and pedals. Note: When operating in BANK or SONG mode, the status of each instant access switch is stored in the MIDI Raider. This feature allows for a pedal or instant access switch to control a specific parameter of another MIDI device.
Assigning Control Numbers to Pedals and Instant Access Switches Switch/Pedal Number select SW1-15, P1, P2 (or by name) MIDI Channel select CH1-16 (or by name) SW1 Control Number select 0-120, OFF CH1 CN1 2 2 3 4 2 3 4 3 4 1 When the desired control numbers have been assigned: (a) press the “2ND” button again (turning the “2ND” L.E.D.
MIDI, Page 3 of 7 - Control Value Assignment The third page of the MIDI program, Control Value Assignment, allows for “on” and “off” controller values to be assigned to instant access switches and pedals. Control changes can be sent went an instant access switch is pressed or a controller pedal is moved to aid in selecting a desired control value. Note: When the pedals P1 and P2 are displayed, the Control Value Assignment page sets the maximum and minimum values for the movement of the pedal.
Assigning Control Values to Instant Access Switches Switch/Pedal Number select SW1-15, P1, P2 ON Value select 0-127, OFF OFF Value select 0-127, OFF sw1 on127 of1 2 3 4 2 3 4 1 When the desired control values have been assigned: (a) press the “2ND” button again (turning the “2ND” L.E.D. off) to exit the editing mode; or (b) press the “" button to access additional MIDI editing pages; or (c) press another mode button to edit MIDI Raider features other than MIDI.
MIDI, Page 4 of 7 - Switch Type The fourth page of the MIDI program, Switch Type, determines how each instant access switch will operate. This feature allows for each switch to be assigned as either a Latching, Momentary or Hold switch, and is global for all presets. • A LATCHING switch type sends the “on” control value when the switch is pressed and turns the L.E.D. on. Pressing the switch a second time sends the “off” control value and turns the L.E.D. off.
Selecting Switch Types for Instant Access Switches Switch Number select SW1-15 Switch Type select LATCHING, MOMENTARY or HOLD sw1 latching 2 3 2 3 1 When the desired switch types have been assigned: (a) press the “2ND” button again (turning the “2ND” L.E.D. off) to exit the editing mode; or (b) press the “" button to access additional MIDI editing pages; or (c) press another mode button to edit MIDI Raider features other than MIDI.
MIDI, Page 5 of 7 - Program Change Status The fifth page of the MIDI program, Program Change Status, determines whether or not the MIDI Raider will respond to incoming program changes, as well as whether to map the incoming program changes to a preset. If the MIDI Raider is set to respond to incoming program changes, it will send out information associated with each preset just as if the buttons on the MIDI Raider were pressed.
Selecting Program Change Status Program Change Status select OFF, ON or MAP program chng map 2 1 2 When the desired program change status has been assigned: (a) press the “2ND” button again (turning the “2ND” L.E.D. off) to exit the editing mode; or (b) press the “" button to access additional MIDI editing pages; or (c) press another mode button to edit MIDI Raider features other than MIDI.
MIDI, Page 6 of 7 - Program Mapping This page allows for incoming program changes to be mapped to MIDI Raider presets when the Program Change Status is set to “MAP” (see MIDI, Page5). This feature is only available when operating the MIDI Raider in Bank Mode. To assign the program mapping status: () With the 2ND L.E.D. still lit, press the "" switch to access the next page of the MIDI program, Program Mapping.
Mapping Program Changes to MIDI Raider Presets Program Change to Map from select PC1-128 pc128 Preset Number to Map to select PR1-120, OFF map > pr120 2 3 2 3 1 When the desired program mapping status has been assigned: (a) press the “2ND” button again (turning the “2ND” L.E.D. off) to exit the editing mode; or (b) press the “" button to access additional MIDI editing pages; or (c) press another mode button to edit MIDI Raider features other than MIDI.
MIDI, Page 7 of 7 - MIDI Receive Channel The seventh page of the MIDI program, MIDI Receive Channel, determines the MIDI channel that incoming program changes must be on for the MIDI Raider to respond. (This feature is operable only in Bank Mode - see SETUP, Page 1). To define the MIDI receive channel: () With the 2ND L.E.D. still lit, press the "" switch to access the next page of the MIDI program, MIDI Receive Channel.
Selecting the MIDI Receive Channel MIDI Receive Channel select 1-16, OMNI RECEV CHANL 16 2 1 2 When the desired MIDI receive channel has been assigned: (a) press the “2ND” button again (turning the “2ND” L.E.D. off) to exit the editing mode; or (b) press the “" button to access previous MIDI editing pages; or (c) press another mode button to edit MIDI Raider features other than MIDI.
COPY The COPY program allows for presets, banks, songs and sets to be copied from one location to another. COPY, Page 1 of 4 - Preset Copy The first page of the COPY program, Preset Copy, allows for a single preset to be copied from one preset location to another.
To Copy Presets Preset to be copied select PR1-120 Preset location to copy to select PR1-120 pr120 copy > pr108 1 2 3 4 3 4 5 When the desired presets have been copied: (a) press the “2ND” button again (turning the “2ND” L.E.D. off) to exit the editing mode; or (b) press the “" button to access additional COPY editing pages; or (c) press another mode button to edit MIDI Raider features other than COPY.
COPY, Page 2 of 4 - Bank Copy The second page of the COPY program, Bank Copy, allows for an entire bank of presets to be copied from one bank location to another. Note: If the MIDI Raider is configured to bank by one preset at a time (see SETUP, Page 2), this page is not available. When the MIDI Raider is configured to bank by 5 presets at a time: • • Bank Copy will copy 5 presets Bank 1 = Presets 1-5 Bank 2 = Presets 6-10 Bank 3 = Presets 11-15 ...
To Copy Banks Bank to be copied select BANK 1-50 Bank location to copy to select BANK 1-50 bnk24 copy-> bnk32 4 2 3 2 3 1 When the desired banks have been copied: (a) press the “2ND” button again (turning the “2ND” L.E.D. off) to exit the editing mode; or (b) press the “" button to access additional COPY editing pages; or (c) press another mode button to edit MIDI Raider features other than COPY.
COPY, Page 3 of 4 - Song Copy Tip: If only a few changes need to be made to an existing song to create a new song, copy the existing song and make the changes to the new song. This will be much quicker and easier than creating an entirely new song. The third page of the COPY program, Song Copy, allows for a song to be copied from one song location to another. Song Copy copies the presets and locations associated with the song to be copied. To copy a song to another song location: () With the 2ND L.E.D.
To Copy Songs Song to be copied select SONG 1-150 sg150 Song location to copy to select SONG 1-150 copy- > sg116 4 2 3 2 3 1 When the desired songs have been copied: (a) press the “2ND” button again (turning the “2ND” L.E.D. off) to exit the editing mode; or (b) press the “" button to access additional COPY editing pages; or (c) press another mode button to edit MIDI Raider features other than COPY.
COPY, Page 4 of 4 - Set Copy Tip: If only a few changes need to be made to an existing set to create a new set, copy the existing set and make the changes to the new set . This will be much quicker and easier than creating an entirely new set. The fourth page of the COPY program, Set Copy, allows for an entire set to be copied from one set location to another. Set Copy copies all of the songs and their order of an entire set (50 songs). To copy a set to another set location: () With the 2ND L.E.D.
To Copy Sets Set to be copied select SET1-10 Set location to copy to select SET1-10 set8 copy -> set 10 4 2 3 2 3 1 When the desired sets have been copied: (a) press the “2ND” button again (turning the “2ND” L.E.D. off) to exit the editing mode; or (b) press the “" button to access previous COPY editing pages; or (c) press another mode button to edit MIDI Raider features other than COPY.
TITLES The TITLES program allows for custom titles to be entered for each MIDI Raider preset. Each custom preset title can be up to 13 characters in length. To access TITLES: () To access TITLES, press the "2ND" button to activate the secondary button functions. () Press the "TITLES" button. The L.E.D. above the "TITLES" button will flash and the MIDI Raider will display the only page of the TITLES program.
To Create Preset Titles Preset to name select PR1-120 Flashing Decimal denotes current character to edit 120 Title select A-Z, 0-9 for each character m.idi raider 1 2 3 4 5 3 4 5 When the desired preset titles have been created: (a) press the “2ND” button again (turning the “2ND” L.E.D. off) to exit the editing mode; or (b) press another mode button to edit MIDI Raider features other than TITLES.
SONG/SET SONG/SET allows for presets to be assigned to the preset switches to create a SONG (or a custom bank of presets). Multiple SONGS can then be arranged in a bank order to create a SET. One SET is made up of 50 banks of songs. The SONG/SET program also allows for selection of the current operating set when operating the MIDI Raider in Song mode (see SETUP, Page 1). SONG/SET, Page 1 of 3 - Set Select The first page of the SONG/SET program allows for the selection of the current operating set.
To Select a Set Current Set select SET1-10 set select 1 1 2 3 3 When the desired set has been selected: (a) press the “2ND” button again (turning the “2ND” L.E.D. off) to exit the editing mode; or (b) press the “" button to access additional SONG/SET editing pages; or (c) press another mode button to edit MIDI Raider features other than SONG/ SET.
SONG/SET, Page 2 of 3 - Song Create The second page of the SONG/SET program, Song Create, allows you to create a custom bank of presets by assigning presets to the MIDI Raider preset switches. If the MIDI Raider is configured to bank by 1 preset at a time, only 1 preset per song is available. If the MIDI Raider is configured to bank by 5 presets at a time, 5 presets per song are available. If the MIDI Raider is configured to bank by 10 presets at a time, 10 presets per song are available.
To Create a Song Song select SONG1-150 Preset select PR1-120 Preset Switch select SW1-15 sg150 sw15 pr120 2 3 4 2 3 4 1 When the desired songs have been created: (a) press the “2ND” button again (turning the “2ND” L.E.D. off) to exit the editing mode; or (b) press the “" button to access additional SONG/SET editing pages; or (c) press another mode button to edit MIDI Raider features other than SONG/ SET.
SONG/SET, Page 3 of 3 - Set Create The third page of the SONG/SET program, Set Create, allows songs to be arranged in a bank order to create sets. To create a set: () With the 2ND L.E.D. still lit, press the "" switch to access the next page of the SONG/SET program, Set Create. () Use the "INC" and "DEC" switches directly below the displayed set number to select the desired set. () Use the "INC" and "DEC" switches directly below the displayed bank to select a bank to assign a song to.
To Create a Set Set select SET1-10 Bank select BK1-50 Song select SONG1-150 set10 bk40 sg150 2 3 2 4 1 4 When the desired sets have been created: (a) press the “2ND” button again (turning the “2ND” L.E.D. off) to exit the editing mode; or (b) press the “" button to access previous SONG/SET editing pages; or (c) press another mode button to edit MIDI Raider features other than SONG/ SET.
CTR STORE CTR STORE (or Controller Store) stores the “on” or “off” status of each instant access switch for the preset that is currently recalled. () Set the instant access switches to the desired on/off status for the current preset. Once stored, this status will be recalled each time the preset is recalled and the corresponding MIDI control change for each switch will be sent (if operating in Song or Bank mode).
To Store the Status of the Instant Access Switches 2 3 When the Instant Access switch status has been stored: (a) press the “2ND” button again (turning the “2ND” L.E.D.
CUSTOM CUSTOM allows the user to create a custom MIDI string of any five MIDI commands for each preset. All five commands will be sent whenever the preset is recalled. CUSTOM, Page 1 of 2 - Command Selection The first page of the CUSTOM program, Command Selection, allows for the selection of MIDI commands and the order in which they are to be transmitted once the preset has been recalled. To access CUSTOM: () To access CUSTOM, press the "2ND" button to activate the secondary button functions.
To Select MIDI Commands Preset Number select PR1-120 MIDI Command select ALL COMMANDS Command Number select CMD1-5 PR120 cmd1 noff> 1 3 4 5 3 4 5 2 When the desired MIDI commands have been selected: (a) press the “2ND” button again (turning the “2ND” L.E.D. off) to exit the editing mode; or (b) press the “" button to access additional CUSTOM editing pages; or (c) press another mode button to edit MIDI Raider features other than CUSTOM.
CUSTOM, Page 2 of 2 - Additional Data Some MIDI commands selected in CUSTOM, Page 1 will have a “>” symbol following the command name. This symbol indicates MIDI commands that require additional data which needs to be programmed before the message can be stored in memory. For example, the “Note Off>” command requires information concerning the MIDI Channel, Note Number and Note Velocity, as shown in the example below.
To Provide Additional MIDI Command Data Data 1 this example: MIDI CHANNEL ch16 Data 2 this example: NOTE NUMBER Data 3 this example: NOTE OFF VELOCITY n127 v127 7 8 9 7 8 9 6 When the additional data has been entered: (a) press the “2ND” button again (turning the “2ND” L.E.D. off) to exit the editing mode; or (b) press the “" button to access the previous CUSTOM editing page; or (c) press another mode button to edit MIDI Raider features other than CUSTOM.
SYSX The SYSX program allows the user to perform a bulk dump or bulk load of the entire MIDI Raider programmable memory, as well as create a system exclusive MIDI string up to 30 bytes long for each preset to communicate device and manufacturer specific information. SYSX, Page 1 of 3 - Bulk Dump/Load The first page of the SYSX program, Bulk Dump/Load, allows for the user to perform a Bulk Dump or Load of the MIDI Raider programmable memory.
To Perform a Bulk Dump or Bulk Load Dump/Load Status select DUMP or LOAD Bulk dump 4 1 3 3 2 When the Bulk Dump/Load is completed: (a) press the “2ND” button again (turning the “2ND” L.E.D. off) to exit the editing mode; or (b) press the “" button to access additional SYSX editing pages; or (c) press another mode button to edit MIDI Raider features other than SYSX.
SYSX, Page 2 of 3 - MIDI Sysx On/Off status The second page of the SYSX program, MIDI Sysx On/Off Status, allows for a system exclusive MIDI string assigned to a preset to be designated as “on” or “off” when recalling the preset. Designating a system exclusive message as “off” does not erase the message, it is merely disabled when the preset is recalled. ON - message is sent when preset is recalled. OFF - message is not sent when preset is recalled. () With the 2ND L.E.D.
Designating the MIDI String On/Off Status Preset select PR1-120 pr120 On/Off Status select ON or OFF sysx off 2 3 2 3 1 When the on/off status has been designated for all desired presets: (a) press the “2ND” button again (turning the “2ND” L.E.D. off) to exit the editing mode; or (b) press the “" button to access additional SYSX editing pages; or (c) press another mode button to edit MIDI Raider features other than SYSX.
SYSX, Page 3 of 3 - Byte Value Assignment The third page of the SYSX program allows for the assignment of byte values for each byte of the system exclusive message. () With the 2ND L.E.D. still lit, press the "" button to access the third page of the SYSX program. (If the MIDI Raider is not already in the SYSX editing mode, press "2ND", then "SYSX", followed by "" two times.
Assigning Byte Values Byte Number select BYTE1-30 sysx Value select 0-127, EOX byte 1 > 0 5 6 5 6 4 When the system exclusive byte values have been assigned for all desired presets: (a) press the “2ND” button again (turning the “2ND” L.E.D. off) to exit the editing mode; or (b) press the “" button to access previous SYSX editing pages; or (c) press another mode button to edit MIDI Raider features other than SYSX.
Expression Pedal Cords 72
MIDI Implementation Model: MIDI Raider Date: December 2, 1994 Version: 1.
Technical Data INPUTS/OUTPUTS Locking 7 pin MIDI In, with Phantom Power, (Aux. Remote) Locking 7 pin MIDI Out, with Phantom Power, (Remote) 2 - ¼” Pedal Inputs 1 - 2.5mm DC Pin, Power jack POWER REQUIREMENTS 9VAC 1100MA or Greater DROP OUT VOLTAGE WIDTH LENGTH HEIGHT WEIGHT 74 90VAC (powering one footswitch) 10.2” (260mm) 15.6” (397mm) 3.5” (89mm) 8.5lbs (3.
75
76
Rocktron -A Division of GHS Corporation 2813 Wilber Avenue Battle Creek MI 49037 USA Rocktron Phone: 1-(269)-968-3351 Email: info@rocktron.com Check us out on the web at: www.rocktron.com 2011-R4 Rev.