Reaction Compressor Instruction Manual May be covered by one or more of the following: U.S. Patents #4538297, 4647876, 4696044, 4745309, 4881047, 4893099, 5124657, 5263091, 5268527, 5319713, 5333201, 5402498 and 5493617. Other patents pending. Foreign patents pending.
Compliance Your Reaction Compressor™ pedal has been tested and complies with the following Standards and Directives as set forth by the European Union: Council Directive(s): Compatibility 89/336/EEC Standard(s): EN55013, EN50082-1 Electromagnetic This means that this product has been designed to meet stringent guidelines on how much RF energy it can emit, and that it should be immune from other sources of interference when properly used.
Precautions Refer all service to qualified service personnel. Servicing is required when the apparatus has been damaged in any way, such as power supply or plug is damaged, liquid has been spilled or objects have fallen into the apparatus or if the apparatus has been exposed to rain or moisture, does not operate normally or has been dropped. DO NOT ATTEMPT TO SERVICE THIS EQUIPMENT. QUALIFIED PERSONNEL SHOULD SERVICE THIS EQUIPMENT ONLY.
Introduction Compressors are one of the best tools in a guitar player’s tool box, and the Reaction Compressor fulfills all the requirements for outstanding compression. Professional players use a compressor like a secret weapon to get accomplish many things, including adding more sustain to any guitar without adding distortion, defining every note in a chord while letting it ring out, creating in your face solos, and much more.
Introduction use the LEVEL control to fine tune your output level. That’s it! Sound check is done. Use the Reaction Compressor as a master SOLO switch to not only define what you play but also to raise the volume! The soundman can worry about something else…you have performance control!. Typically you want to set the output level after compression has been applied so that it is the same as the pedal in True Bypass – this is called “unity gain” (the same level from pedal on to pedal off).
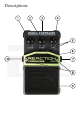
Descriptions
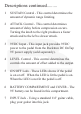
Descriptions continued......... 1 SUSTAIN Control - This control determines the amount of dynamic range limiting. 2 ATTACK Control - This control determines amount of delay before compression occurs. Turning the knob to the right produces a faster attack and to the left a slower attack. 3 9VDC Input - This input jack provides 9VDC power to the pedal from the Rocktron DC OnTap 9V power supply (sold seperately).
Descriptions continued......... 8 THUMB SCREWS for Battery Compartment. Unscrew these thumb screws to access the battery compartment. 9 FOOTSWITCH - Use this switch to turn on or off the pedal. The On/Off Led will show you if the pedal is on or off. 10 OUTPUT Jack - Using a standard 1/4” guitar cable you can plug in another pedal from this jack or plug directly into your amplifier.
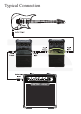
Typical Connection
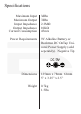
Specifications Maximum Input Maximum Output Imput Impedance Output Impedance Current Consumption Power Requirements Dimensions Weight 3dBu 7dBu 2.2MΩ 10KΩ 45mA 9V Alkaline Battery or Rocktron DC OnTap Univeral Power Supply (sold seperately). Negative Tip 125mm x 78mm 61mm 5” x 3.25” x 2.5” 0.7kg 1.
How to change the battery: To change the battery, remove the thumb screws on the top of the pedal and remove the battery compartment cover. Remove the old battery and replace it with a new 9V Alkaline battery. Replace battery in the same area as the old battery was located. Place the battery compartment cover on the pedal and re-insert the thumb screws. Save yourself tons of money in batteries by using the Rocktron DC OnTap Universal Power Supply to power this pedal (sold seperately).
Rocktron - A Division of GHS Corporation 2813 Wilber Ave Battle Creek MI 49037 USA www.rocktron.com info@rocktron.com tel: 1-269-968-3351 rev. 7-27-09 2009.