
Owner's Manual


Red +
Black -
+
__
2.
+
__
2.
Red +
Black -
8 Ohm -8 Ohm +
8 Ohm Wiring
Heat Shrink Cap
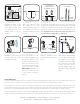
6. Fine-Tune Aiming
Angle the speakers in your
desired position with the allen
wrench.
5. Bury Speakers
Place your speakers in each
hole, and begin lling back up.
Be sure the speaker is deep
enough in the ground that the
wire(s) can be buried at least
2” below the nal landscaping
grade. Pack down the dirt.
IMPORTANT: Remember to
NOT cover the port with dirt
so your speaker can function
properly.
Tilting Panning
Rockustics
®
by MSE Audio
®
| 13717 W 108th St | Lenexa, KS 66215
913-663-5600 or 855-663-5600 | www.rockustics.com
Limited Warranty:
Rockustics warrants its loudspeakers to be free from defects in material and workmanship for a period of ten (10) years for speaker product and three (3)
years for the electronic components to the original purchaser. Purchase must be made from an authorized Rockustics dealer.
This warranty does not cover service or parts to repair damage caused by misuse, abuse, damage while in transit, alterations, unauthorized repairs, failure
to follow instructions, re, ood, or any other cause beyond the reasonable control of Rockustics. Defects in speaker cabinets or grilles must be brought to
the attention of your dealer immediately after purchase. This warranty will be void if the products’ serial number has been altered or removed.
Should your Rockustics product require service, please call the MSE Audio customer service department for a return authorization. All merchandise returned
to Rockustics without prior authorization will be refused. For your return authorization number, please call 913.663.5600 or email sales@mseaudio.com
4. Test
Fully wire the rest of your system
and test to make sure sound is
coming from each unit.
Alternate Step: 70V Wiring
When wiring for 70V applications
leave the Green and Red wires
tied together. Leave the Black
and White wires tied together.
Then nd Yellow (+) and Blue
(-) wires and connect them to
your 70V amplier output. This
transformer setting is tapped at
64W.
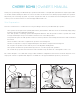
~12”
~16”
2. Digging
Dig a hole sufcient to bury
the speaker(s) to the correct
depth (noted above) and to also
accommodate 2-3” of gravel or
crushed rock under the speaker
housing.
HOUSE
PATIO
AMP
1. Layout Design
Determine the layout of your
system. Place each speaker
in the general location it will
be installed. Also place your
amplier where it will be
installed.
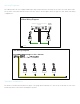
3. 8 Ohm Wiring
Locate the green and white wires. Disconnect the red wire from
the green wire and the black wire from the white wire. Connect the
positive (+) lead from the amp to the green wire on the CB5, then
connect the negative (-) lead from the amp to the white wire on the
CB5. You will NOT use the red, black, yellow, or blue wires in an
8 ohm installation. Simply tape or cap them off.
Green White
Yellow (+)
Blue (-)
8 Ohm Wiring
Soldered leads with
pre-installed wire nuts
8 Ohm Wiring
Green
8 Ohm +
White
8 Ohm -