
User Manual Manual


Rockwell Automation Publication 1734-UM014B-EN-P - June 2013 21
Configure the Adapter for Your EtherNet/IP Network Chapter 3
Set the
Network Address
The adapters ship DHCP-enabled and with the switches set to 999. To change
the network address, do the following.
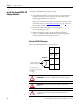
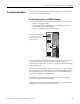
Set the Network Address for POINT I/O Adapter
• Use the thumbwheel switches located on the adapter. Press either the + or -
buttons to change the number.
• Use a Dynamic Host Configuration Protocol (DHCP) server, such as
Rockwell Automation BootP/DHCP.
• Retrieve the IP address from non-volatile memory.
The adapter reads the thumbwheel switches first to determine if the switches are
set to a valid number. You set the node address by using the 3-position
thumbwheel switch. Press the + or - buttons to change the number. Valid settings
range from 001…254.
When you use the thumbwheel to assign an address and set it to 001, the adapter
gateway address is set to 0.0.0.0. and the subnet mask is 255.255.255.0 . When
you use the thumbwheel to assign an address and set it between 002...254, the
adapter gateway address is set to 192.168.1.1.
The adapter does not have a host name assigned, or use any Domain Name
System when using the thumbwheel settings.
If DHCP is not enabled, the adapter uses the IP address, along with other TCP
configurable parameters, stored in non-volatile memory.
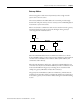
44848
Network address thumbwheel
Press either the + or - buttons
to change the number and
assign the IP address.
02
0
1734-AENTR
Module
Status
Network
Activity
Network
Status
Point Bus
Status
System
Power
Field
Power
POINT I O
Link 1
Activity/
Status
Link 2
Activity/
Status
IP ADDRESS