
Installation and Upgrade Guide


Publication 1757-IN510A-EN-P - October 2003
5-22 ProcessLogix Client Installation and Upgrade Procedures
• Network API for Windows
• ODBC Client
• Standard Displays
• System Shapes
• OPC Server Connect
4. Click Ne x t .
5. Click Ne x t to accept the default directory for the Client
Software.
6. If the Directory Already Exists window opens, click Yes to
continue. Otherwise, continue with the next step.
7. If the Specify Microsoft Excel Directory window opens, click
Ne x t . Otherwise, skip to step
9.
8. To disable the Microsoft Excel Data Exchange write option, click
No in response to the question:
Do you want Microsoft Excel Data Exchange to be allowed to
write to a ProcessLogix Server database?
9. Click Ne x t to accept ProcessLogix Client Software as the default
Program Folder for the Client software.
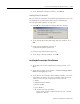
10. Review the software installation details summarized in the
Confirmation window.
• If you need to make changes, click Back to access any
previous entries.
• If the details are okay, click Ne x t to begin the Client
Software setup. This may take 10 to 15 minutes to complete.
IMPORTANT
In Step 5 below, you MUST NOT change the
directory names from their defaults. If you do change
directory names, the ProcessLogix system may not
operate properly.
ATTENTION
!
Rockwell Automation recommends answering No to
the question:
Do you want Microsoft Excel Data Exchange to be
allowed to write to a ProcessLogix Server database?
Answering Yes enables the write option and it is
possible for anyone with access to the machine to
write to the Server database.