
Installation and Upgrade Guide


Publication 1757-IN510A-EN-P - October 2003
Additional Redundant Server Procedures 6-17
12. Click Cancel at the Unable to connect prompt, if applicable.
13. Click Station ⇒ Con n ect to call up the Station Connect dialog
box.
14. Select Default and click Edit Connection.
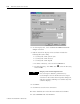
15. On the Connection tab, make these entries to have the Station
point to SERVERA (PLX1 A):
a. In the Server field, enter or Br o w se to the Primary Server
name, SERVERA.
b. Select the Station type as Static Station.
c. Enter >2< as the Static Station Number and click Advanced.
d. Check the Aux iliary setup file checkbox.
e. Click Br o w se and navigate to:
C:\Honeywell\Client\Station\defaultb.stn and click Op en .
16. Click Save.
17. Click Yes to save changes.
18. Select Default and click Connect.
19. Click Cancel at the Unable to connect prompt, if applicable.
20. If you have redundant LANs, you must repeat Step 1 through
Step 19 to set up files for the second LAN using the name or IP
address of SERVERA and SERVERB specified in the Hosts file
for the second LAN
.
Navigate in Knowledge Builder to Server and Client
Configuration Guide
⇒
Configuring and Monitoring a
Redundant Server System
⇒
Configuring Stations for Server
Redundancy
⇒
Dual Network Configuration for more
information.
21. Click Station ⇒ Ex i t .
22. Click Yes to exit Station.
IMPORTANT You must indicate the full path to the .stn file.