
User Manual Owner manual


2
Chapter
21
Installing the KF3
To install the KF3, follow these steps:
1. Define your network needs.
2. Construct the necessary cables.
3. Ground and terminate your network correctly.
4. Determine the correct voltage for your application and set the KF3’s
voltage selector. Change power cord if necessary.
5. Check the KF3’s default configuration parameters and change those
which are not suitable for your application.
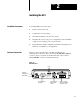
Figure 2.1 shows the back panel of the KF3, including its two
communication connectors. The connector labelled RS-232 Computer
connects to the host computer via an RS-232C cable. The connector
labelled DH-485 connects to the DH-485 network.
Figure 2.1
KF3
Back Panel
CAUTION: FOR CONTINUED
PROTECTION AGAINST RISK
OF FIRE REPLACE ONLY
WITH THE SAME TYPE
AND RA
TING OF FUSE.
CAUTION:
DOUBLEFOLD NEUTRAL
FUSES
FUSES: 0.1A 250V
TYPE 5mm X 20MM
115V/230V
Voltage
Selector
Power Switch
Fuses
AC power connector
(115V/230V)
DH485 connector
links to DH485
network
RS232C connector
links to host computer
via RS232C cable
Installation
Procedures
Interface Connections