User Manual Stratix 5900 Services Router User Manual Catalog Number 1783-SR
Important User Information Read this document and the documents listed in the additional resources section about installation, configuration, and operation of this equipment before you install, configure, operate, or maintain this product. Users are required to familiarize themselves with installation and wiring instructions in addition to requirements of all applicable codes, laws, and standards.
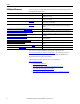
Table of Contents Important User Information . . . . . . . . . . . . . . . . . . . . . . . . . . . . . . . . . . . . . . . . 2 Table of Contents Preface Audience . . . . . . . . . . . . . . . . . . . . . . . . . . . . . . . . . . . . . . . . . . . . . . . . . . . . . . . . . . 5 Services Router Configuration . . . . . . . . . . . . . . . . . . . . . . . . . . . . . . . . . . . . . . 5 Additional Resources . . . . . . . . . . . . . . . . . . . . . . . . . . . . . . . . . . . . . . . . . . . . . . .
Table of Contents Install Stratix Configurator Software . . . . . . . . . . . . . . . . . . . . . . . . . . . Discover the Router. . . . . . . . . . . . . . . . . . . . . . . . . . . . . . . . . . . . . . . . . . . Creating a Community and Adding Devices . . . . . . . . . . . . . . . . . . . . . . . . Create a Community . . . . . . . . . . . . . . . . . . . . . . . . . . . . . . . . . . . . . . . . . Creating an Initial Configuration of a Feature . . . . . . . . . . . . . . . . . . . . . .
Preface This publication describes the installation and configuration of the Stratix 5900™ services router. This services router is the Rockwell Automation version of the Cisco 819 (ISR819H) Secure Hardened Router with Serial connection. Audience This guide is for the person configuring and monitoring Stratix 5900 services router.
Preface These documents contain additional information concerning related products from Rockwell Automation. Additional Resources Resource Description Stratix 5900 Device Manager Online Help Provides context-sensitive information on configuring and using the router, including system messages. Stratix Configurator Online Help Provides context-sensitive information on configuring and using the router, including system messages.
Chapter 1 Getting Started This chapter provides an overview of the features available for the Stratix 5900 services router. Stratix 5900 Services Router Topic Page Stratix 5900 Services Router 7 Items Shipped with the Stratix 5900 Services Router 9 Power Supply 10 Status Indicators 11 Serial Port 11 Configuration Software 12 The Stratix 5900 services router is a hardened network device with available wall, floor, and DIN rail mount features that supports Ethernet communication.
Chapter 1 Getting Started The Stratix 5900 services router provides the following these features.
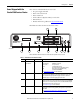
Getting Started Chapter 1 These items are included with the services router. • AC power supply with cable • Power cord retention lock • Power switch lock • Serial to Ethernet (RJ-45-to-DB-9) console cable • Din Rail mount • Product information, publication 1783-PC004A-EN-P Items Shipped with the Stratix 5900 Services Router This illustration shows the front of the services router.
Chapter 1 Getting Started Table 2 - Stratix 5900 Services Router Features (continued) No. Item Labeled Description 6 Console /AUX port CON/AUX An RJ45 console port provides console access if a Console cable is attached. If a modem or other serial device (DCE) is attached, and the proper license enabled, it can also function as a AUX port. The pinout is identical to the AUX port on ISR/G2 platforms, and includes CTS/RTS, and DSR/DTR.
Getting Started Chapter 1 Status Indicators This table describes the status indicators for the Stratix 5900 services router. Table 3 - Stratix 5900 Services Router Status Indicators Status Indicator Color Description SYS Yellow FPGA download is complete. Green (blinking) ROMMON is operational. Green (solid) IOS is operational. Green (four blinks during bootup) Reset has been pushed during the bootup. Off After applying power, when FPGA is being downloaded (in ROMMON).
Chapter 1 Getting Started Configuration Software Stratix 5900 Configurator software and Stratix 5900 Device Manager are GUIbased device-management tools for the Stratix 5900 services router. Stratix 5900 Configurator software is a PC-based application that simplifies router, firewall, intrusion prevention system (IPS), VPN, unified communications, WAN, LAN, and basic wireless configuration through easy-touse wizards.
Getting Started Chapter 1 Stratix 5900 Device Manager Software Interface Window Rockwell Automation Publication 1783-UM005A-EN-P - September 2013 13
Chapter 1 Getting Started Stratix 5900 Device Manager Software Interface and Connections Window Stratix Configurator Software Page 14 Rockwell Automation Publication 1783-UM005A-EN-P - September 2013
Chapter 2 Install Stratix 5900 Services Router This chapter explains how to install and connect the Stratix 5900 services router. This router supports Ethernet communication from component to component. It has a chassis for use in industrial automation and harsh environments.
Chapter 2 Install Stratix 5900 Services Router ATTENTION: Read the DIN-rail mounting instructions carefully before beginning installation. Failure to use the correct hardware or to follow the correct procedures could result in a hazardous situation to people and damage to the system. • The covers are an integral part of the safety design of the product. Do not operate the unit without the covers installed. • No user-serviceable parts inside. Do not open. • Hot surface.
Install Stratix 5900 Services Router Install the Unit Chapter 2 The following items are needed to install the unit. • ESD-preventive cord and wrist strap • DIN-rail bracket • Ethernet cables for connecting to the Fast Ethernet (FE) WAN and LAN ports The Stratix 5900 services router can be installed on a flat surface or mounted DIN rail. Install the Router on a DIN Rail 1. Remove the two screws on the back of the unit. 32378-M 2. Line the bracket holes up and attach the bracket. 3.
Chapter 2 Install Stratix 5900 Services Router Installation Clearance The recommended clearance when horizontally mounted is 1.5 inches on both sides for floor-mount bracket clearance and 2 inches on top. IMPORTANT Top clearance is not required but stacking heat dissipating objects on top of the services router is not allowed. I/O side clearance is needed as it is required to access the cable connections.
Install Stratix 5900 Services Router Connect a Personal Computer, Server, or Workstation Chapter 2 To connect a computer (or other Ethernet devices) to an Ethernet switch port, follow these steps. 1. Connect one end of the Ethernet cable to an Ethernet switch port on the router. 1 Ethernet cable 2 Ethernet port on the router 3 RJ45 Port on the computer S FE 3 L S FE 2 L S GE WAN 0 L S FE 1 L S LAN FE 0 L CON / AUX RESET SYS SERIAL ACT 2 1 3 32445-M 2.
Chapter 2 Install Stratix 5900 Services Router Connect an External Ethernet Switch If more than four computers are required to be connected to each other, you can add Ethernet connections to the router by connecting an external Ethernet switch to the Ethernet switch on the router. To connect an external Ethernet switch to an Ethernet switch port on the router, complete these steps. 1. Connect one end of the Ethernet cable to an Ethernet switch port on the router. 1 Ethernet port on the router.
Install Stratix 5900 Services Router Chapter 2 Connect a Terminal or Computer to the Console Port Connect a terminal or computer to the Console port either to configure the software by using the configuration software or to troubleshoot problems with the router. To connect a terminal or computer to the console port on the router, follow these steps: 1. Connect the RJ-45 end of a DB-9-to-RJ-45 serial cable to the RJ-45 Console port on the router.
Chapter 2 Install Stratix 5900 Services Router Terminal Emulator Application Settings Use these settings for the terminal emulator connection. • 9600 baud • 8 data bits, no parity • 1 stop bit • No flow control When the terminal emulator establishes communication, the router prompt is displayed. For more information on terminal emulation settings, see Applying Correct Terminal Emulator Settings for Console Connections on the Cisco website.
Install Stratix 5900 Services Router Chapter 2 Apply Power IMPORTANT This product relies on the building’s installation for short-circuit (overcurrent) protection. Be sure that the protective device is rated not greater than: 120 V AC, 20 A U.S (240 V AC, 16…20 A international). This product requires short-circuit (overcurrent) protection, to be provided as part of the building installation. Install only in accordance with national and local wiring regulations.
Chapter 2 Install Stratix 5900 Services Router 4. Push the adapter in to connect the lock clips. 32384-M 32385-M Power is connected to the services router.
Install Stratix 5900 Services Router Assemble the On/Off Power Lock Chapter 2 Follow this illustration to assemble the power lock.
Chapter 2 Install Stratix 5900 Services Router Verify Connections Follow these instructions to verify that all devices are properly connected to the router. 1. Turn on all the connected devices. 2. Check the status indicators. 3. Use this table to verify the router operation. For complete status indicator descriptions, see Status Indicators on page 11. Power and Link Status Indicator Normal Patterns SYS Yellow FPGA download is complete. Green (blinking) ROMMON is operational.
Install Stratix 5900 Services Router Replacement Accessory Parts Chapter 2 Replacement accessory parts are available through your local Cisco distributor. • Power Supply: PWR2-20W AC power supply • Mounting: ACS-810-DM – Din Rail Mounting Kit • Console and Smart Serial Cabling See the Cisco 819 Integrated Services Routes Software Configuration Guide, http://www.cisco.com/en/US/docs/routers/access/800/819/software/ configuration/Guide/819_SCG.html for detailed information.
Chapter 2 Install Stratix 5900 Services Router Notes: 28 Rockwell Automation Publication 1783-UM005A-EN-P - September 2013
Chapter 3 Configure the Stratix 5900 Services Router This chapter provides instructions for initial configuration of the Stratix 5900 services router.
Chapter 3 Configure the Stratix 5900 Services Router Basic Configuration A basic configuration gives the router a name, creates a user account with a password, and creates the enable secret password. The Basic Configuration window is where you name the router that you are configuring, enter the domain name for your organization, and control access. The windows appear when you first configure the router.
Configure the Stratix 5900 Services Router Configure the IP Address on the Computer Chapter 3 You must configure an IP address on the computer so that you can configure the router. The default configuration file assigns an IP address to a LAN interface on the router, and you must configure the computer to be on the same subnet as the router LAN interface.
Chapter 3 Configure the Stratix 5900 Services Router Obtain an IP Address in Microsoft Windows 7 If you are running Windows 7 software version, follow these steps to open the Internet Protocol TCP/IP Properties dialog box and obtain an IP address automatically. a. Choose click Start > Control Panel > Network and Sharing Center. b. Click Change Adapter Settings. c. Right-click Local Area Connection. d. Click Properties. e. On the Networking tab, select Internet Protocol Version 4 (TCP/ IPv4). f.
Configure the Stratix 5900 Services Router Chapter 3 Assign a Specific IP Address Follow these steps to assign a specific IP address to the computer. For example, a static IP address of 10.10.10.3 and a subnet mask of 255.255.255.248. 1. On the General Tab, click Use the following IP address. 2. In the IP address field, enter the IP address. For example: 10.10.10.3 3. In the Subnet mask field, enter the subnet mask. For example: 255.255.255.
Chapter 3 Configure the Stratix 5900 Services Router Getting Started with Stratix 5900 Device Manager Software Stratix Device Manager software lets you quickly configure router connections. The software is a lite version of Stratix Configurator software program. The factory installs the software into the router’s nonvolatile memory. You access the software on the router by using a browser window and an IP address.
Configure the Stratix 5900 Services Router Chapter 3 Stratix 5900 Device Manager Main Window Rockwell Automation Publication 1783-UM005A-EN-P - September 2013 35
Chapter 3 Configure the Stratix 5900 Services Router Stratix 5900 Device Manager Software Wizard The configuration wizard appears the first time you turn on your services router and communicate with it by using an IP address. The wizard guides you through the essential parts of the router configuration so that the router can start functioning on the network.
Configure the Stratix 5900 Services Router Chapter 3 For security reasons, the username cisco and password cisco expires the first time they are used. If you reset the router to the factory defaults, the username cisco and password cisco reactivate. 3. Replace username and password with the username and password that you want to use. This command creates a new user with privilege level 15 and a password for that user. If you do not do this, you cannot log into the router after you end the session.
Chapter 3 Configure the Stratix 5900 Services Router Getting Started with Stratix Configurator Software Stratix Configurator software is a GUI-based device-management tool for the services router. The software lets you perform advanced configurations on the router.
Configure the Stratix 5900 Services Router Chapter 3 After you have used Stratix 5900 Device Manager software or CLI commands to give your router a basic configuration, you can use Stratix Configurator software to do the following: • Add more connections. • Fine-tune configurations you completed by using Stratix 5900 Device Manager software. • Configure advanced features such as Virtual Private Networks (VPN) and Digital Certificates.
Chapter 3 Configure the Stratix 5900 Services Router 9. Download the Adobe Flash Player for Internet Explorer, and then start Stratix Configurator software. 10. Read the section Creating a Community and Adding Devices on page 44 to create a community of devices and how to use Stratix Configurator software to configure them.
Configure the Stratix 5900 Services Router Chapter 3 Discover the Router You can verify your connection by starting Stratix Configurator software and discovering your devices. Follow these steps to verify your connection by discovering your router. 1. Open Stratix Configurator software. The Select / Manage Community dialog box appears. 2. Enter the device information and click OK. Stratix Configurator software Community View window appears and states that the device is not discovered. 3.
Chapter 3 Configure the Stratix 5900 Services Router The software schedules and starts discovering the device. Once the device is discovered, it states Discovered. If the device is not discovered, Discovery Failed appears.
Configure the Stratix 5900 Services Router Chapter 3 4. Click Details to research the error.
Chapter 3 Configure the Stratix 5900 Services Router Creating a Community and Adding Devices Stratix Configurator software works with device communities. A community consists of one or more devices that you specify by providing their IP addresses and login credentials. After you create the community, you can begin working with the devices in it. You can create and manage communities from the Manage Community dialog box. The Manage Community dialog box appears when you start Stratix Configurator software.
Configure the Stratix 5900 Services Router Chapter 3 Create a Community Follow these steps to create a community, add devices to it, and discover all the devices in a community. 1. From the menu bar, choose Application > Manage Community. 2. Click Create a new community. TIP You can rename a community by clicking on the name and typing a new name. You can right-click the community icon and add a new community or delete a community. 3. Enter the IP address or hostname. 4.
Chapter 3 Configure the Stratix 5900 Services Router When you check the Connect Securely check box, HTTPS port 443 and SSH port 22 information is automatically added for the device. To view the port information, click the down-arrow next to the Connect Securely check box. If you did not check the Connect Securely check box, the HTTP port 80 and Telnetport 23 information is automatically added for the device. To view the port information, click the down-arrow next to the Connect Securely check box. 6.
Configure the Stratix 5900 Services Router Creating an Initial Configuration of a Feature Chapter 3 When you create an initial configuration of a feature, you are configuring a router interface. Follow these steps to create an initial configuration of a feature. 1. Choose the community that the device belongs to, and click OK. 2. In the Community View page, choose the device that you want to work with, and click Discover.
Chapter 3 Configure the Stratix 5900 Services Router 5. Choose the configuration task that you want to perform in the Configure tree. For example, choose Interface Management > Interfaces and Connections. Interfaces and Connections The Interfaces and Connections Window has a Create Connection Tab and an Edit Connection/Interface tab.
Configure the Stratix 5900 Services Router Editing a Configuration Chapter 3 Once you have created a configuration by using a wizard, you can edit that configuration without returning to the wizard again. Editing the configuration gives you access to additional configuration values that are not available in the wizards. The following example procedure describes editing a Fast Ethernet connection. Follow these instructions to edit a configuration. 1. To access the edit screens, click the Edit tab. 2.
Chapter 3 Configure the Stratix 5900 Services Router Summary Window The Summary dialog box shows you the changes you have made to the router configuration and the associated CLI commands that are sent to the router. You can do these tasks on the Summary dialog box. • Click cancel to go back and make changes. • Click Deliver the settings to the router. • Click Save to file to save the configuration file.
Configure the Stratix 5900 Services Router Chapter 3 Table 5 - WAN Interface Parameter Descriptions Item Description Add Connection Add Connection is enabled if no WAN connection is configured yet. The Edit and Delete buttons are enabled if at least one WAN connection has been configured. To configure an interface, select the interface and click Add Connection.
Chapter 3 Configure the Stratix 5900 Services Router Table 6 - Internet (WAN): Ethernet Interface Parameter Description (continued) Item Description IP Unnumbered Option Share an IP address that has already been assigned to another interface. Then, choose the interface whose IP address you want the interface that you are configuring to use. If you did not choose Enable PPPoE, this option is not available. Easy IP (IP Negotiated) The router obtains an IP address by PPP/IPCP address negotiation.
Configure the Stratix 5900 Services Router Chapter 3 Internet (WAN): User Specified Encapsulation The User Specified Encapsulation window lets you configure a WAN interface when you are specifying the encapsulation. Table 7 - WAN Interface Parameter Descriptions Item Description Status Icon and Enable or Disable Button The Status and Enable or Disable icons are available to edit an initial configuration. The Up arrow icon indicates the interface is up.
Chapter 3 Configure the Stratix 5900 Services Router Table 7 - WAN Interface Parameter Descriptions (continued) 54 Item Description Authentication Type Check Box Check the box for the type of authentication used by your service provider. If you do not know the type of service your provider uses, you can check both boxes. The router attempts both types of authentication, and then one attempt succeeds. CHAP authentication is more secure than PAP authentication.
Configure the Stratix 5900 Services Router Serial Connections Chapter 3 You can use the wizard to create a serial connection.
Chapter 3 Configure the Stratix 5900 Services Router This table describes the Serial Connection parameters. Table 8 - Serial Connection Parameter Descriptions 56 Parameter Description Encapsulation List Choose the encapsulation for this connection. If you are editing a connection, you cannot change the encapsulation type in this window. You must delete the connection, and then create a new connection with the encapsulation type you need.
Configure the Stratix 5900 Services Router Configuring a Firewall Chapter 3 Stratix Configurator software lets you configure a firewall that uses default settings if you have configured a WAN interface on the router. For detailed information see the Cisco Configuration Professional User Guide. TIP The Cisco IOS image on the router must support the Firewall feature set in order for you to be able to configure a firewall with Stratix Configurator software.
Chapter 3 Configure the Stratix 5900 Services Router Configuring Security Settings Some configuration settings that compromise router and network security are enabled by default because they offer useful services. For example Cisco Discovery Protocol (CDP) enables an administrator to view information about neighboring routers on the network. However, CDP can be a security risk if the information that it provides gets into the wrong hands.
Chapter 4 Configure the Stratix 5900 Services Router by Using CISCO IOS Command-line Interface (CLI) The Cisco IOS command-line interface (CLI) is a user interface that is used for configuring, monitoring, and maintaining devices. This interface is a terminal emulator program, such as Putty. Use the emulator to execute Cisco IOS commands, by using a router console or terminal, or remote access methods.
Chapter 4 Configure the Stratix 5900 Services Router by Using CISCO IOS Command-line Interface (CLI) How to Use CLI for the First Time The following section introduces you to the Cisco Internetworking Operating System (IOS) user to the IOS command line interface (CLI). This information explains ho to use the IOS CLI to configure and manage an IOS router. This table defines important terms and acronyms that are used throughout this section.
Configure the Stratix 5900 Services Router by Using CISCO IOS Command-line Interface (CLI) Chapter 4 2. Type disable at the Router# prompt to switch back to user EXEC level. Typing a question mark (?) at the privileged EXEC level reveals many more command options than those available at the user EXEC level. Router> enable Password: [enable password] Router# disable Router> TIP For security reasons, the router does not echo the password that is entered.
Chapter 4 Configure the Stratix 5900 Services Router by Using CISCO IOS Command-line Interface (CLI) Once in the configuration branch, you can enter system level configuration commands that apply to the entire router at the global configuration level. Interface specific configuration commands are available once you have switched to the particular interface configuration level. For more detailed information and examples on how to navigate through the IOS CLI hierarchy see Router Management on page 72.
Configure the Stratix 5900 Services Router by Using CISCO IOS Command-line Interface (CLI) Chapter 4 This is a an example of word help. Router# co? configure connect copy Command Syntax You can use command syntax help to obtain a list of command, keyword, or argument options that are available based on the syntax that you already entered. To use command syntax help, enter a question mark (?) in the place of a keyword or argument. Include a space before the question mark.
Chapter 4 Configure the Stratix 5900 Services Router by Using CISCO IOS Command-line Interface (CLI) Hot Keys For many editing functions, the IOS CLI editor provides hot keys. The following table lists some of the shortcuts that are available.
Configure the Stratix 5900 Services Router by Using CISCO IOS Command-line Interface (CLI) Chapter 4 User Access Verification Username: 3. Enter the username username1 and press Return or Enter. Password: 4. Enter the password password1 and press Return or Enter. Router# A message appears that is similar to the first warning message. The message directs you to change the username and password. You are now in privileged EXEC mode.
Chapter 4 Configure the Stratix 5900 Services Router by Using CISCO IOS Command-line Interface (CLI) Enter the Configuration Commands Manually You can use the Cisco IOS CLI to enter the necessary configuration commands. To enter the Cisco IOS commands manually, complete these steps. 1. Log on to the switch through the Console port or through an Ethernet port. See Connect a Terminal or Computer to the Console Port on page 21 for more information. 2.
Configure the Stratix 5900 Services Router by Using CISCO IOS Command-line Interface (CLI) Chapter 4 Switch(config-if)# ip address 10.10.10.1 255.255.255.248 Switch(config-if)# no shutdown Switch(config-if)# exit If you are going to connect the computer directly to the switch, the computer must be on the same subnet as this interface. 7. Configure the switch as an http server for nonsecure communication, or as an https server for secure communication.
Chapter 4 Configure the Stratix 5900 Services Router by Using CISCO IOS Command-line Interface (CLI) Switch(config-line)# transport output telnet ssh Switch(config-line)# exit Switch(config)# line vty 5 15 Switch(config-line)# privilege level 15 Switch(config-line)# login local Switch(config-line)# transport input telnet Switch(config-line)# transport output telnet Switch(config-line)# transport input telnet ssh Switch(config-line)# transport output telnet ssh Switch(config-line)# end Pay particular atten
Configure the Stratix 5900 Services Router by Using CISCO IOS Command-line Interface (CLI) Chapter 4 Router(config-if)# ip address 20.2.2.2 255.0.0.0 configures an IP address on serial0 (interface) Router(config-if)# no shutdown - activates serial0 (interface) Router(config-if)# exit configuration level - exits back to global Router(config)# router rip - switches to configure RIP routing engine Router(config-router)# network 10.0.0.0 - adds network 10.0.0.
Chapter 4 Configure the Stratix 5900 Services Router by Using CISCO IOS Command-line Interface (CLI) Remove Commands / Resetting Default Values The IOS software provides an easy way to remove commands from a configuration. To remove a command from the configuration, simply navigate to the proper location and type ‘no’ followed by the command to be removed. The following example shows how to remove an IP address from the ethernet0 interface.
Configure the Stratix 5900 Services Router by Using CISCO IOS Command-line Interface (CLI) Chapter 4 Save Configurations The services router stores configurations in two locations - RAM and NVRAM. The running configuration is stored in RAM and is used by the router during operation. Any configuration changes to the router are made to the runningconfiguration and take effect immediately after the command is entered.
Chapter 4 Configure the Stratix 5900 Services Router by Using CISCO IOS Command-line Interface (CLI) Router Management IOS supports many different types of show commands. This section covers a few of the common show commands used to both manage and troubleshoot a router. The scope of this document is not to instruct how to use these commands to troubleshoot a router, but to make you aware that these management options exist.
Configure the Stratix 5900 Services Router by Using CISCO IOS Command-line Interface (CLI) Chapter 4 When displaying a configuration, the exclamation marks (!) function as line separators to make reading easier. Referring to the above example, notice how commands entered at the interface configuration level appear indented underneath the respective interface, for example, interface Ethernet0.
Chapter 4 Configure the Stratix 5900 Services Router by Using CISCO IOS Command-line Interface (CLI) Router uptime is 1 week, 1 day, 38 minutes System restarted by power-on System image file is “flash:c3640-j-mz_1126_P.bin”, booted via flash Host configuration file is “3600_4-confg”, booted via tftp from 171.69.83.194 cisco 3640 (R4700) processor (revision 0x00) with 107520K/23552K bytes of memory. Processor board ID 03084730 R4700 processor, Implementation 33, Revision 1.0 Bridging software.
Configure the Stratix 5900 Services Router by Using CISCO IOS Command-line Interface (CLI) Chapter 4 Display Interface States To view information about a particular interface, use the show interface command.
Chapter 4 Configure the Stratix 5900 Services Router by Using CISCO IOS Command-line Interface (CLI) 5 minute output rate 0 bits/sec, 0 packets/sec 1012272 packets input, 91255488 bytes, 0 no buffer Received 916 broadcasts, 0 runts, 0 giants 18519 input errors, 0 CRC, 17796 frame, 0 overrun, 0 ignored, 723 abort 283132 packets output, 13712011 bytes, 0 underruns 0 output errors, 0 collisions, 31317 interface resets 0 output buffer failures, 0 output buffers swapped out 3 carrier transitions DCD=up DSR=up
Configure the Stratix 5900 Services Router by Using CISCO IOS Command-line Interface (CLI) Chapter 4 The prompts in the setup command facility vary, depending on your router model, on the installed interface modules, and on the software image. The following steps and the user entries (in bold) are shown only as examples. TIP If you make a mistake while using the setup command facility, you can exit and run the setup command facility again.
Chapter 4 Configure the Stratix 5900 Services Router by Using CISCO IOS Command-line Interface (CLI) 7. Enter an enable password that is different from the enable secret password. This password is not encrypted (less secure) and can be seen when viewing the configuration. The enable password is used when you do not specify an enable secret password, with some older software versions, and some boot images. Enter enable password: xxxxxx 8.
Configure the Stratix 5900 Services Router by Using CISCO IOS Command-line Interface (CLI) Chapter 4 ! no ip routing ! interface FastEthernet0 no shutdown speed 100 duplex auto ip address 172.16.2.3 255.255.0.0 ! 12. Respond to the following prompts. Enter 2 to save the initial configuration. [0] Go to the IOS command prompt without saving this config. [1] Return back to the setup without saving this config. [2] Save this configuration to nvram and exit.
Chapter 4 Configure the Stratix 5900 Services Router by Using CISCO IOS Command-line Interface (CLI) Copy the Default Configuration File to NVRAM If you want to start with a factory default configuration that is designed to support Stratix Configurator software, you can use this procedure. The factory default configuration includes all the commands necessary to support Stratix Configurator software and configures an Ethernet interface with the IP address 10.10.10.1.
Configure the Stratix 5900 Services Router by Using CISCO IOS Command-line Interface (CLI) Chapter 4 3 2279424 Apr 15 2008 20:34:54 +00:00 cpexpress.tar Router# 4. Enter the copy flash: nvram: command, as shown in this example. Router# copy flash:cpconfig-8xx.cfg nvram: This copies the default configuration file to router NVRAM, When the default configuration file is in NVRAM, it becomes the router startup configuration. 5. Enter the copy startup-config running-config command, as shown in this example.
Chapter 4 Configure the Stratix 5900 Services Router by Using CISCO IOS Command-line Interface (CLI) Notes: 82 Rockwell Automation Publication 1783-UM005A-EN-P - September 2013
Index A AAL5 MUX 53 AAL5 SNAP 53 adapter 15 address type list 53 Adobe Flash Player 39 authentication 54 serial connection 56 C cable 15, 17, 19 crossover 36 not connected 43 CDP 58 CHAP 52, 54 Cisco documentation 6 software 34 Cisco Discovery Protocol 58 Cisco Internetworking Operating System 60 Cisco IOS image 57 clearance installation 18 CLI 12, 34 command line 12, 59 command syntax 63 configurations save 71 configure using 59, 64 default values reset 70 detailed information 59 device manager 34 display
Index H hierarchy CLI 68 hostname 30 http 30 https 30 power 100…240 V AC 10 supply 10 troubleshoot 36 PPPoA 53 PPPoE 53 privilege level 30 privileged EXEC mode 37 I install 15, 17 Internet Explorer 36, 39 intrusion prevention system 38 IOS 60 IP address 30, 43 communicate with 36 configure 31 dynamic 53, 56 negotiated 53 specific 33 static 53 unnumbered 53 IP Unicast 57 IPS 38 IPv4 34 L LAN 37 bridging and routing 7 connect 17 interface 31, 51 interfaces 34 ports 9, 16 subnet 31 lock-down 38 M memory n
Index status indicators 11 ACT check 11 blinking 11 fast blinking 11 slow blinking 11 SYS 11 Stratix 5900 Device Manager software 34 interface 13 Stratix Configurator software 38 subnet mask 33 summary window 37, 50 T temperature 16 template 8 terminal emulator 21 timeout policy 30 transmitting 11 U UL 15 USB to serial 21 user access verification 65 V virtual circuit identifier 53 virtual path identifier 53 voice features 8 VPN 38, 39 features 8 Vty line 30 W WAN 34 autodetect encapsulation 52 configur
Index Notes: 86 Rockwell Automation Publication 1783-UM005A-EN-P - September 2013
Rockwell Automation Support Rockwell Automation provides technical information on the Web to assist you in using its products. At http://www.rockwellautomation.com/support you can find technical and application notes, sample code, and links to software service packs. You can also visit our Support Center at https://rockwellautomation.custhelp.com/ for software updates, support chats and forums, technical information, FAQs, and to sign up for product notification updates.