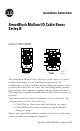
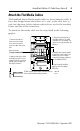
Installation Instructions ArmorBlock MaXum I/O Cable Bases Series B (Series 1792D-CBXXX) CB12 CBFM 41528 41529 The ArmorBlock MaXum™ Ι/Ο Cable Bases mate with 4 or 8 point modules depending on your installation requirements. No modification is required. Modules are interchangeable whether flat or round media cable bases are used. This interchangeability provides plug and play block upgrade capability and easy field replacement. The completely assembled ArmorBlock module and base requires no enclosure.
ArmorBlock MaXum I/O Cable Bases Series B European Union Directive Compliance If this product has the CE mark it is approved for installation within the European Union and EEA regions. It has been designed and tested to meet the following directives.
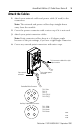
ArmorBlock MaXum I/O Cable Bases Series B 3 Install Your ArmorBlock 1792D-CB12 To install the cable base: • Mount the cable base • Attach the module to the base • Attach the cables These steps are described in more detail in the following sections. Mount the Cable Base The cable base can be mounted either vertically or horizontally, using 3 screws. Cable bases accommodate 4 or 8 point ArmorBlock MaXum modules. You must allow additional space for installation of 8 point ArmorBlock MaXum modules.
ArmorBlock MaXum I/O Cable Bases Series B Attach the Module to the Base IMPORTANT Make sure you properly align the screws to complete the connections between the module contacts and the cable contacts. 1. Position the module over the mounted cable base. Align the three captive screws in the module with the accepting receptacles in the base. 2. Tighten the screws with a torque of 8 inch-pounds to secure the module to the base. Screws must be aligned properly to complete contact connections.
ArmorBlock MaXum I/O Cable Bases Series B 5 Attach the Cables 1. Attach your network cable and power cable (if used) to the connectors. Note: The network and power cables drop straight down away from the module. 2. Cover the power connector with a micro cap if it is not used. 3. Attach your point connector cables. Note: Point connector cables drop at a 45 degree angle because of the pin settings, if you use a right angle connector. 4. Cover any unused point connectors with micro caps.
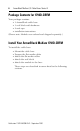
ArmorBlock MaXum I/O Cable Bases Series B Package Contents for 1792D-CBFM Your package contains: • • • • 1 ArmorBlock cable base 1 seal block with hardware 2 end caps installation instructions (Please note: Modules are ordered and shipped separately.
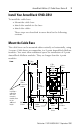
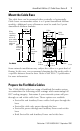
ArmorBlock MaXum I/O Cable Bases Series B 7 Mount the Cable Base The cable base can be mounted either vertically or horizontally. Cable bases accommodate either 4 or 8 point ArmorBlock MaXum modules. Additional space allowances must be made for 8 point ArmorBlock MaXum modules. When installing a cable base with an 8 point module, allow for the additional 6.85in. length. 174mm 8 connector module Flat Media 4.72in. 120mm 2.70in. 68.5mm 1.42in. 36mm 0.64in. 16.25mm 4.72in. 120mm 4.72in.
ArmorBlock MaXum I/O Cable Bases Series B IMPORTANT You must apply end caps to cables that end at the base prior to installation. The caps seal the cables. The cable, with the end cap applied, must end between the two lines on the cable base as shown below. When Auxiliary Power is not used, seal both openings to the power slot. See specific instructions on page 10. The cable, with the end cap applied, must end between the two lines on the cable base, as shown below.
ArmorBlock MaXum I/O Cable Bases Series B 9 Attach the Flat Media Cables The KwikLink DeviceNet flat media cable is a four-conductor cable. It has a key design feature that allows it to “seat” in the cable base in only one direction. Labels indicate which slot to use for the Auxiliary Power and DeviceNet connection. To attach the flat media cable use the steps listed in the following graphic. 1. Remove the end cap covers from the storage area. These are used to cover the cables when they end. 3.
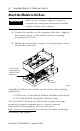
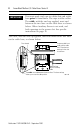
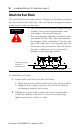
ArmorBlock MaXum I/O Cable Bases Series B Attach the Seal Block The seal block has piercing contacts. Contact occurs when you attach the seal block to the cable base. The seal block is designed to attach to the base in only one direction. ATTENTION ! • The seal block has extremely sharp piercing contacts. Do not press against them with your fingers. You may be injured. • You must properly align the seal block when you attach it to the base. This will maintain the integrity of the sealed base.
ArmorBlock MaXum I/O Cable Bases Series B IMPORTANT 11 There are 3 seating lines on the sides of the seal block, under the captive screws. As the screws are tightened these lines meet the cable base. At this point the seal block is fully seated. Seal Block Match arrows so the seal block is in the correct position over the cable base. When the lines of the seal block meet the base it is fully seated.
ArmorBlock MaXum I/O Cable Bases Series B 2. Tighten the screws with a torque of 8 inch-pounds to secure the module to the base. 30704-M ArmorBlock MaXum I/O modules are described in the following publications: • 1792D series of ArmorBlock MaXum Installation Instructions • 1792-TD001B-EN-P - ArmorBlock Technical Data Specifications I/O Cable Bases - Cat. No.
ArmorBlock MaXum I/O Cable Bases Series B 13 Hazardous Location Approval The following information applies only to products marked with Hazardous Location Approval, when operating in hazardous locations: Products marked “CL I, DIV 2, GP A, B, C, D” are suitable for use in Class I Division 2 Groups A, B, C, D, Hazardous Locations and nonhazardous locations only. Each product is supplied with markings on the rating nameplate indicating the hazardous location temperature code.
ArmorBlock MaXum I/O Cable Bases Series B WARNING ! When used in a Class I, Division 2, hazardous location, this equipment must be mounted in a suitable enclosure with proper wiring method that complies with the governing electrical codes.
ArmorBlock MaXum I/O Cable Bases Series B 15 AVERTISSEMENT ! AVERTISSEMENT ! Utiliser des fils d’alimentation qui conviennent à une température de 30°C au-dessus de la température ambiante. Pour une utilisation en environnement de classe i, division 2 dangereux, cet equipement doit etre monte dans un boitier avec un cablage approprie conforme aux normes electriques en vigueur. This product has been tested at an Open DeviceNet Vendor Association, Inc.
ArmorBlock, ArmorBlock MaXum and KwikLink are trademarks of Rockwell Automation. DeviceNet is a trademark of Open DeviceNet Vendor Association (ODVA). Publication 1792D-IN009B-EN-P - September 2000 Supersedes Publication 1792D-5.9 - November 1998 PN 957395-71 © 2000 Rockwell International Corporation.