
Owner manual


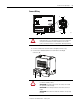

Table Of Contents
- 1794-UM066A-EN-P FLEX I/O Dual Port EtherNet/IP Adapter Modules User Manual
- Important User Information
- Preface
- Table of Contents
- 1 - Overview of FLEX I/O and Your Redundant EtherNet/IP Adapter Module
- Overview
- The FLEX I/O System
- Adapter Features
- Types of Adapters
- Hardware and Software Compatibility
- What the Adapter Does
- Use of the Control and Information Protocol (CIP)
- Understanding the Producer/Consumer Model
- Specifying the Requested Packet Interval (RPI)
- Support of Rack Optimized and Direct Connections
- Chapter Summary
- 2 - Install Your FLEX I/O Adapter
- 3 - Configure the Adapter for Your EtherNet/IP Network
- 4 - Rack Optimized Discrete I/O
- 5 - Analog I/O with Direct Connection
- A - Interpret Status Indicators
- B - Specifications
- C - Configure the RSLinx Ethernet Communication Driver
- D - Adapter Web Dialogs
- Index
- Back Cover

Publication 1794-UM066A-EN-P - February 2012
12 Install Your FLEX I/O Adapter
3. Connect 24V DC common to the left side of the upper connector,
terminal F.
4. Connect +24V DC input power to the left side of the lower
connector, terminal C.
5. Use connections D and E to pass +24V DC common (E) and
24V DC power (D) to the next module in the series (if required).
Set the Network Address
The adapter ships with the thumbwheel switches set to 999 and DHCP enabled.
You can set the network Internet Protocol (IP) address in these ways:
• Use the thumbwheel switches on the module.
• Use a Dynamic Host Configuration Protocol (DHCP) server, such as
Rockwell Automation DHCP.
• Retrieve the IP address (if previously set) from nonvolatile memory.
The adapter reads the thumbwheel switches first to determine if the switches are
set to a valid number. You set the node address by using the three-position
thumbwheel switch. Press the + or - buttons to change the number. Valid settings
are 001…254.
When the switches are set to a valid number, the adapter IP address is
192.168.1.xxx (where xxx represents the number set on the switches). The
adapter subnet mask is 255.255.255.0 and the gateway address is set to 0.0.0.0.
The adapter does not have a host name assigned, or use any Domain Name
System when using the thumbwheel settings.
If you set the switches to an invalid number (such as 000, or a value greater than
254), the adapter checks to see if you enabled DHCP.
45824
Press the + or - buttons to
change the numbers