
Switch User Manual
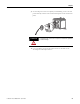
Table Of Contents
- 1783-UM002C-EN-E, Stratix 8000 Ethernet Managed Switches Hardware User Manual
- Preface
- Table of Contents
- 1 - Start
- 2 - Install the Switch
- Installation Guidelines
- Before You Begin
- Verify Package Contents
- Add Modules to the Switch
- Install the Switch
- Install or Remove the CompactFlash Card
- Set Up the Switch Initially with Express Setup
- Configure and Manage the Switch
- Reset the Switch to Factory Defaults
- Connect to the Switch Ports
- Verify Port Connectivity
- Verify Switch Operation
- Connect a Computer or a Terminal to the Console Port
- Run a Power-on Self-test (POST)
- Verify POST Results
- Disconnect Power
- Install and Remove SFP Modules
- Connect to SFP Modules
- 3 - Troubleshoot the Switch
- 4 - Cable and Connectors
- Index
- Back Cover

48 Publication 1783-UM002C-EN-P - April 2009
Chapter 2
Set Up the Switch Initially
with Express Setup
When you first set up the switch, use Express Setup to enter the initial IP
address. Doing this enables the switch to be used as a managed switch. You
can then access the switch through the IP address for additional configuration.
You need this equipment to set up the switch:
• A personal computer with Windows 2000, Windows Vista, Windows
2003, or XP operating system installed.
• A web browser (Internet Explorer 6.0, Internet Explorer 7.0, or Firefox
2.0) with JavaScript enabled.
• A straight-through or crossover Category 5 Ethernet cable to connect
your personal computer to the switch.
Do the following to configure your computer:
• Disable any wireless interface running on your personal computer.
• Disable other networks in your system.
• Set up the DHCP protocol for Auto IP, not static.
• Disable the static DNS server.
• Disable browser proxy settings.
Typically, browser settings are located in Tools>Internet
Options>Connections>LAN Settings.
Follow these steps to run Express Setup.
1. Make sure that at least one switch Ethernet port is available for Express
Setup.
During Express Setup, the switch acts as a DHCP server. If your
personal computer has a static IP address, change your personal
computer settings before you begin to temporarily use DHCP.
2. Apply power to the switch.
When the switch powers on, it begins the power-on self-test (POST).
During POST, the status indicators flash while a series of tests verify
that the switch functions properly. Wait for the switch to complete
POST, which takes approximately 3 minutes.
3. Make sure that POST has completed by verifying that the EIP Mod and
Setup status indicators are flashing green.
IMPORTANT
Do not use the console port for Express Setup.