
Use and Care Manual

Pluck the back straight edge on the coasting side
opposite the blade guides while turning the tension
knob. Sound should be a musical note. Sound becomes
higher pitched as tension increases.
Never increase blade tension so tight as to completely
compress the spring. When completely compressed,
the spring can no longer act as a shock absorber.
Too much tension may cause the blade to break.
Too little tension may cause the blade to slip on the
wheels.
Adjust blade tension properly before making
tracking adjustments. Check that the blade guides are
not interfering with the blade.
Open the front cover by releasing the upper and lower
housing lock. Watch the blade’s position on the upper
tire through the tracking view window as, by hand, you
slowly turn the upper wheel clockwise. If the blade
moves away from the center of the tire, the tracking
must be adjusted.
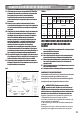
It may be necessary to loosen the hex nut (c) for
a larger range of adjustments. Be sure to retighten after
adjusting.
Turn the adjustment knob (d) (clockwise if blade has
moved left and counterclockwise if blade has moved
right) while turning the wheel by hand until the blade
moves back and rides in the center of the tire.
Check the position of the blade on the lower tire. The
blade should be completely on the tire. If not, adjust the
tracking until the blade is on both tires.
Rotate the upper wheel by hand in a clockwise direction
for a few more turns. Make sure the blade stays in the
same location on the tires. Readjust, if necessary, until
blade is tracking properly.
Close front cover and relatch.
The 1/8 in. blade may not track properly in the
center of the wheel. It may be better to track this blade
on the back half of the upper wheel.
The saw blade guide provides exact and accurate cuts.
Operate the saw with the housing doors closed.
The blade guides have been preset
at the factory. These settings are functional for
some applications. We recommend that you check and
adjust blade guide settings before rst use of your saw.
Turn the lock knob (12) counterclockwise to unlock the
blade guide assembly.
As a guide, use a scrap piece of the same wood you
are about to cut to set the height of the blade guide
assembly. Adjust the blade guide assembly by turning
the adjustment knob (11).
Lock blade guide assembly in place by turning the lock
knob clockwise.
Always lock the blade guide assembly in place before
turning on the band saw.
This band saw comes equipped with a work light that
lights the work area for safer, more accurate cuts.
• Make sure the machine stands securely.
• All covers and safety devices have to be properly tted
before the machine is switched on.
• Always disconnect from power supply when servicing
this machine.
• Do not use bent or cracked band saw blades.
• When working with wood that has been processed
before, watch out for foreign bodies such as nails or
screws etc.
• Replace the table insert if the slot has enlarged.
• Before you actuate the On/Off switch, make sure that
the saw blade is correctly tted and that the machine’s
moving parts run smoothly.
• When cutting round stock, use a suitable jig or xture
to keep the work from turning.
• When cutting boards in an upright position, use a
suitable push block to prevent kickback.
To turn the machine on, move the switch to the “ON”
position. To turn it off, move the switch to the “OFF”
position.
When the machine is not in use and to prevent
unauthorized use, the switch should be locked in the
“OFF” position. To do this, pull the locking key out of
the ON/OFF switch and store the key in a secure place.
With the key removed, the switch will not operate.