NT6 Instruction Manual www.rodemic.
Introduction We at RØDE would like to thank you and congratulate you on investing in the RØDE NT6 Compact Condenser Microphone with Detachable Capsule. The RØDE NT6 is specifically designed for difficult mounting applications. Although clearly relevant to instrument miking, the NT6 is extremely well suited to any situation where a small and unobtrusive, yet powerful microphone system is required.
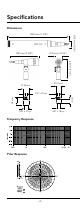
Specifications Acoustic Principle: Pressure gradient Directional Pattern: Cardioid (see graph) Frequency Range: 40Hz-20kHz, selectable HPF @ 80Hz/12dB/octave (see graph) Output Impedence: 200 Sensitivity: -37 dB re 1 Volt/Pascal (16 mV @ 94 dB SPL) +/- 2 dB @ 1kHz Equivalent Noise: 19 dB SPL (A - weighted per IEC651) Maximum Output: +6dBu (@ 1kHz, 1% THD into 1K load) Dynamic Range: 119 dB (per IEC651, IEC268-15) Maximum SPL: 135dB SPL (@ 1kHz, 1% THD into 1K load) (145dB with maximum PA
Specifications Dimensions 88.5 mm (2 4/8”) Ø 20 mm (13/16”) 188.
Features • Externally biased condenser • Gold sputtered 1/2” capsule • Two position PAD - 0dB and -10dB • Two position High-Pass Filter - flat and 80Hz • Convenient two-axis swivel mount and 3m Kevlar ® fibre reinforced cable included • Heavy-duty satin-nickel plated body • Surface mount circuitry • Low noise and full frequency response • Made in Australia • 10 year warranty* Accessories RM5 stand mount WS5 windshield Swivel mount ZP1 zip pouch *Online product registration required.
Mounting the NT6 • The NT6 is supplied with a selection of fittings and adaptors designed to ease positioning and mounting. The NT6 head attaches to a 2-axis swivel-mount that allows it to independently move and lock in position. • To further increase the versatility of the NT6, it comes supplied with 2 threaded adaptors, a 1/4” to 5/8” and a 1/4” to 3/8” that enable the capsule assembly to be securely attached to a wide variety of mic stands, tripods and boompoles.
Mounting the NT6 • With the capsule securely in position, you are ready to connect and position the pre-amplifier (body) as required. Like the head, the pre-amplifier is designed to be positioned and/or mounted in several ways. • The NT6 comes complete with an RM5 Stand Mount. When connected to a mic stand the RM5 securely holds the pre-amplifier in position. This allows the head assembly to be directly suspended from or positioned independently to that of the pre-amplifier.
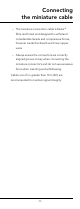
Connecting the miniature cable • With the head and pre-amplifier in position and the XLR cable connected to the back of the pre-amplifier, it is time to connect the mini-XLR connectors. • With the pre-amplifier assembly in one hand and the mini-XLR in the other, align the key on the connector to the groove on the back of the preamplifier. Gently insert the connector ensuring you align the two elements correctly, without applying excessive force during insertion.
Connecting the miniature cable – The miniature connection cable is Kevlar ® fibre reinforced and designed to withstand considerable tensile and compressive forces, however inside this sheath are three copper wires. – Always ensure the connectors are correctly aligned groove-to-key when connecting the miniature connector’s and do not use excessive force when inserting and withdrawing. Cable runs of no greater than 10 m (30’) are recommended to maintain signal integrity.
Using the NT6 • The NT6 is a phantom powered microphone. To operate correctly it requires a 24V or 48V phantom supply from the mixing console or other source. • It is recommended that you use a high-quality microphone lead from the preamp body to the recording device or mixing console, and keep it as short as practical for your application. This will ensure the highest quality sound reproduction.
Using the NT6 • The PAD settings provide a 10 dB reduction in sensitivity or commonly referred to as attenuation, and a two-position variable High-Pass Filter that enables you to step from a flat response to 80 Hz high pass filter; both conveniently located away from the head, providing additional control without the need to move the head once in position. • Use the High-Pass Filter when you wish to remove low frequency noise that is not part of your intended sound source.
Warranty All RØDE microphones are warranted for one year from date of purchase. You can extend that to a full ten years if you register online at www.rodemic.com. The warranty covers parts and labour that may be required to repair the microphone during the warranty period. The warranty excludes defects caused by normal wear and tear, modification, shipping damage, or failure to use the microphone as per the instruction guide.