Kandy DVD MKIII Dual Laser DVD Player U S E R ROKSAN M A N U A L AUDIO LIMITED 6 N ORTHFIELD INDU STR IAL ESTATE B E RESF OR D A VENU E A L PER TON M ID D L E SEX H A0 1 N W ENG L A N D TEL. +44 (0)208 900 6801 +44 (0)208 900 6802 FAX. +44 (0)208 900 0734 www. Roksan.co.
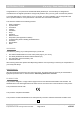
SAFETY CERTIFICATION K a n d y Dual Laser DVD Player LASER SAFETY CAUTION This unit employs a laser. Due to possible eye injury, only qualified service personnel should remove the cover or attempt to service this equipment. Use of controls or adjustments or performance of procedures other than those specified herein may result in hazardous radiation exposure.
INTRODUCTION K a n d y Dual Laser DVD Player Congratulations on your purchase of the ROKSAN Kandy DVD Player. This DVD Player is designed and manufactured to the highest specification and rigorously tested to offer you many years of trouble-free pleasure. Your Kandy DVD Player is at the heart of you’re A/V system. Its correct installation, set-up and operation will have a profound influence on the performance of the entire A/V home theatre installation.
CAUTIONS K a n d y Dual Laser DVD Player AC MAINS SUPPLY Your Kandy DVD Player is set to operate from a fixed supply voltage which is marked on a label next to the mains input plug. Before connecting the mains lead please check that your mains supply corresponds to this label as below: ALL Products ………………………………….Voltage Range: 90V – 240V The mains lead supplied with this product has C7 type (figure 8) mains socket which plugs into the C7 type connector on the unit’s rear panel.
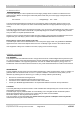
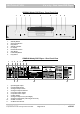
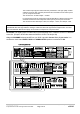
INSTALLATION K a n d y Dual Laser DVD Player ROKSAN Kandy DVD Player- Front Panel View 1 2 3 5 4 6 7 8 9 ROKSAN Dual Laser DVD Player KD-I MkIII 1. 2. 3. 4. 5. 6. 7. 8. 9. Standby Button Open/Close Button Play Button Standby Indicator FL Display Drawer Mechanism Stop Button Pause/Step Button Play Button ROKSAN Kandy DVD Player - Rear Panel View 1 1. 2. 3. 4. 5. 6. 7. 8. 9. 10. 11.
SETUP K a n d y Dual Laser DVD Player CONNECTING MAINS POWER Please refer to the rear panel view on page 5.The moulded connector of the supplied mains lead should be plugged into the socket (11, observe polarity) on the rear of the unit first and then plugged into the mains supply. If the unit is likely to be unattended for a long period, unplug the mains lead from the wall.
The S-Video Output (7) is a better Video link (remember to use high quality S-Video cable and no longer than 5 metres) and should be connected to the S-Video Input of your TV, Projector or Monitor. The connection is: S-Video Output – S-Video. For best quality picture the Component Video Output (5) are 3 RCA connectors and should be connected to the Component Video Input of your Projector or Monitor. The connections are: B/U Output – Blue; G/Y Output – Green ; R/V Output – Red.
CONNECT TO VIDEO INPUT (SCART, COMPOSITE, S-VIDEO, COMPONENT) OF TV, MONITOR, PROJECTOR OR PLASMA TV CONNECT TO DIGITAL INPUT (OPTICAL, COAXIAL) OF SURROUND SOUND PROCESSOR/AMPLIFIER OPERATION K a n d y Dual Laser DVD Player Please refer to the front and rear panel views on page 5. SWITCHING ON The Mains Inlet Socket (11) is located on the rear panel of the DVD Player. This should be connected to the mains for normal operation. If unattended for a long period, disconnect the Mains lead from the supply.
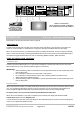
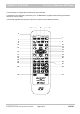
REMOTE CONTROL K a n d y Dual Laser DVD Player Your DVD Player is supplied with a Full Remote Control Handset. The Remote Control Handset is powered by two 1.5V AA batteries (supplied). When inserting the batteries observe the correct polarity. The handset duplicates all front panel controls and contains all other additional features. 5 3 4 6 DISC PBC BRIEF ON/OFF 7 8 9 10 SLOW TITLE POWER 1 MENU ZOOM EJECT 2 0, 2, 4 SCAN SCAN SKIP SKIP 12 16 17 21 22 23 24 25 SEL.
1 2 3 4 5 6 7 8 9 Power Button Eject Button Setup Button Title/Menu Button Brief Button PBC Button Zoom Button Slow Button Goto Button 10 11 12 13 14 15 16 17 18 19 20 Scan Button Scan Button Skip Button Up Button Skip Button Move Right Button Move Left Button Pause/Step Button Stop Button Move Down Button Display Button Toggles the DVD into and out of Standby Standby Indicator will glow Green and Red Opens and Closes the disc loading tray Display will indicate OPEN/CLOSE OSD displays the Setup Menu See
SETUP MENU K a n d y Dual Laser DVD Player To configure the DVD Player to suite your specific requirements follow the instructions below: Using the Setup Button (3) and Move Up, Down, Left or Right Buttons (13, 19, 16 & 15) on your remote handset, you can cruise around the setup menu and select the desired outputs or modes. NOTE: These buttons move the selection cursor to left or right columns of the dropdown menus and navigate up or down the menu. SEL. This button selects the desired mode or setting.
TROUBLESHOOTING K a n d y Dual Laser DVD Player If you suspect that your ROKSAN Kandy DVD Player is not operating properly, you should check all the connections carefully. Pay particular attention to input and output connections. Phono plugs should be fully inserted- a frequent cause of problems is that Phono plug surrounds do not make proper contact. Check the DVD Setup Menu and ensure the correct outputs are selected. Below are some commonly encountered problems with suggestions for possible cure.
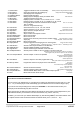
SYMPTOM (DVD) REMEDY Play does not commence even when title is selected. Check “PARENTAL” setup. Audio soundtrack and/or subtitle language is not the one selected at the initial settings. If the audio soundtrack and/or subtitle language does not exist on the disc, the language selected at the initial settings will not be seen/heard. No subtitles. Subtitles appear only with discs, which contain them. Subtitles are cleared from the TV monitor. Press SUBTITLE to display the subtitles.
Disc Handling and Maintenance (A) Handling Precautions Hold the disc by the edges so the surface will not be soiled with fingerprints. (A) Fingerprints, dirt and scratches can cause skipping and distortion. Do not write on the label side with a ballpoint pen or other writing utensils. Do not use record cleaning sprays, benzene, thinner, static electricity prevention liquids or any other solvent. Be careful not to drop or bend the disc. Do not install more than 1 disc on the disc tray.
GUARANTEE K a n d y Dual Laser DVD Player There are no user-serviceable parts inside your Kandy DVD Player. If a fault should develop, refer any servicing to your appointed ROKSAN dealer, distributor or ROKSAN approved service agent. Your ROKSAN Kandy DVD Player is guaranteed against any defect in materials and workmanship for a period of two years from the date of purchase.
S/N Ratio >105dB THD <0.003% Wow & Flutter Below Measurable Limits Power Source 100V – 240V 50Hz / 60Hz Power Consumption < 35 W Dimension 432 x 350 x 90 (W x D x H) mm 432 x 330 x 100 (including feet) Weight NOTES 10Kg K a n d y Dual Laser DVD Player Kandy DVD Player Serial Number: ………………………… Purchase Date Year .……… Month …….. Day ……..